Enable Shibboleth SSO to Oracle EBS via Datawiza
Overview
This tutorial shows how to enable Shibboleth SSO for an Oracle E-Business Suite (EBS) application via Datawiza. Learn more about enabling SSO and MFA for Oracle E-Business Suite (EBS) with Datawiza.
The benefits of integrating applications with Shibboleth via Datawiza includes:
- Improved Zero Trust security through Shibboleth SSO.
- No-Code easy integration between Shibboleth and EBS.
- A single control plane, Datawiza Cloud Manage Console, to manage access to EBS in public clouds and on-premise.
Background
This document focuses on solving the problem when modern identity providers integrate with the legacy Oracle EBS application. We accomplish the integration based on the fact that Oracle EBS requires a set of EBS service account credentials and an EBS DBC file.
In many cases, legacy applications have great difficulty integrating modern SSO, mainly due to the absence of modern protocol support.
The Datawiza no-code Solution effectively reduces the cost of integration, overcomes the gap, and significantly improves application security.
Architecture
The solution contains the following components:
- Shibboleth Identity Provider: A simple Single Sign-On solution for any organisation with complex identity management requirements. With excellent scaling capabilities and customisable user-related data, the Identity Provider equips workforces with a personalised user experience.
- Oracle EBS Application: the legacy application to be protected by Shibboleth.
- Datawiza Access Proxy (DAP): A super lightweight container-based reverse-proxy implements OIDC/OAuth or SAML for user sign-on flow and transparently passes identity to applications through HTTP headers.
- Datawiza Cloud Management Console (DCMC): A centralized management console that manages DAP. DCMC provides UI and RESTful APIs for administrators to manage the configurations of DAP and its granular access control policies.
Both SP initiated flow and IdP initiated flow are supported by the architecture discussed here. Below we will use SP initiated flow for demonstration purposes.
Steps Description
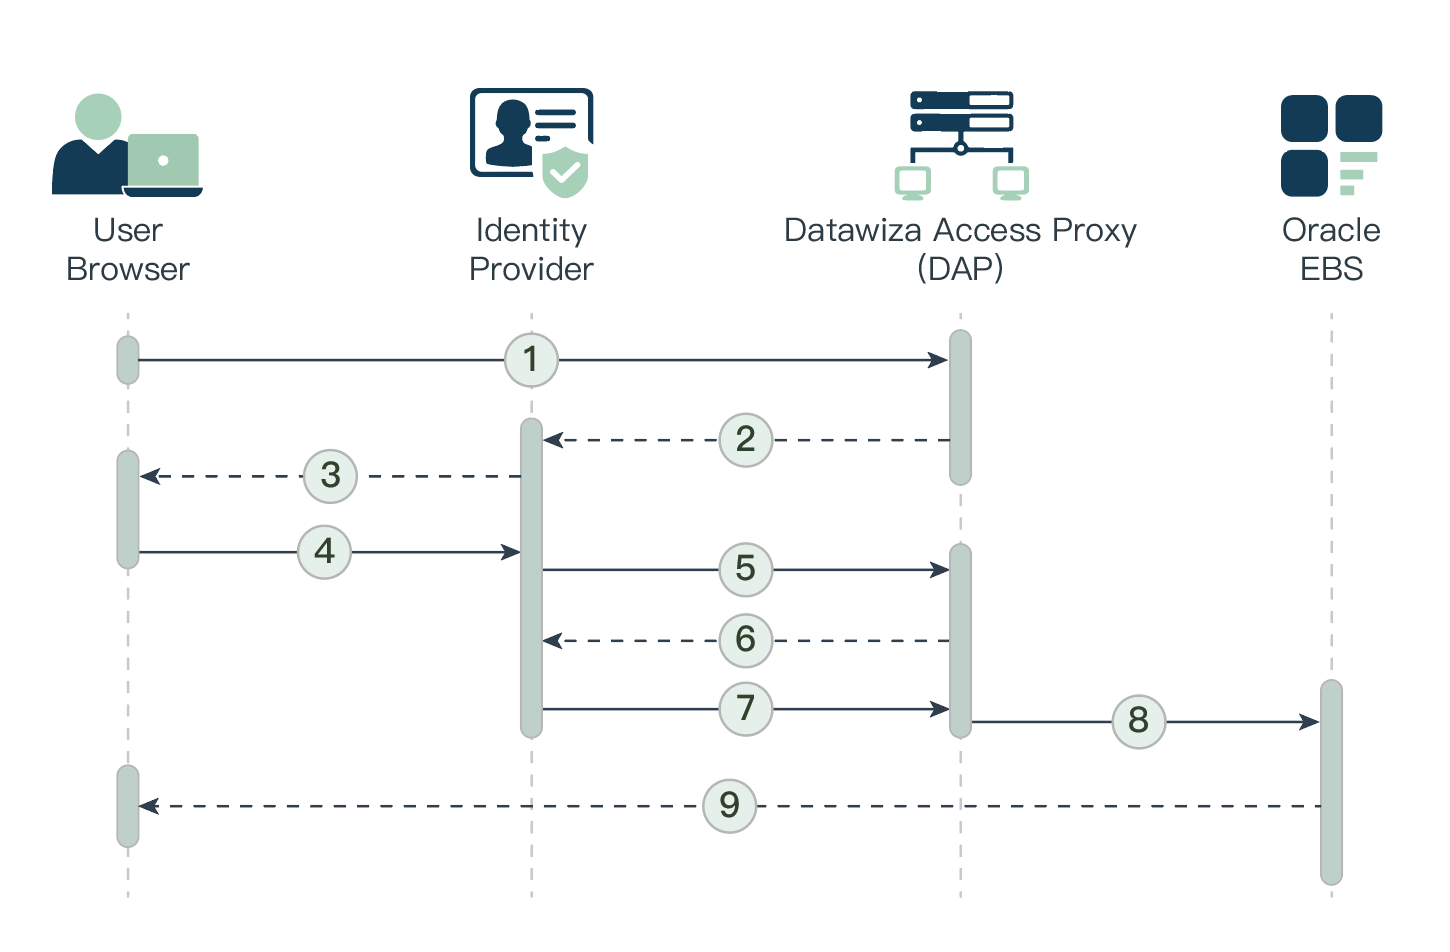
- The user requests access to a DAP-protected EBS resource.
- DAP redirects the user's browser to the identity provider (e.g., Shibboleth or Microsoft Entra ID).
- Identity Provider presents its login page to the user.
- The user submits their credentials to the identity provider.
- Upon successful authentication, the identity provider redirects the user's browser to DAP.
- DAP communicates with the identity provider to exchange tokens.
- Identity Provider issues the user's EBS username and relative information to DAP.
- DAP creates an Oracle E-Business Suite cookie using the EBS username from the identity provider and redirects the user's browser to Oracle E-Business Suite.
- Oracle E-Business Suite presents the requested protected resource to the user.
Prerequisites
Prior Datawiza Access Proxy experience isn't necessary, but you need:
- Shibboleth Identity Provider
- Docker and docker-compose are required to run DAP.
- User identities from an on-premises active directory.
- (Optional) An SSL Web certificate for publishing services over HTTPS, or use default Datawiza self-signed certs while testing.
- An existing Oracle EBS environment. Supported versions include: v12.0 or later.
Configure the EBS environment for SSO and create DBC file
To enable single sign-on in the Oracle E-Business Suite environment:
Sign in to the EBS Management console as an administrator.
Scroll down the Navigator panel and expand User Management.
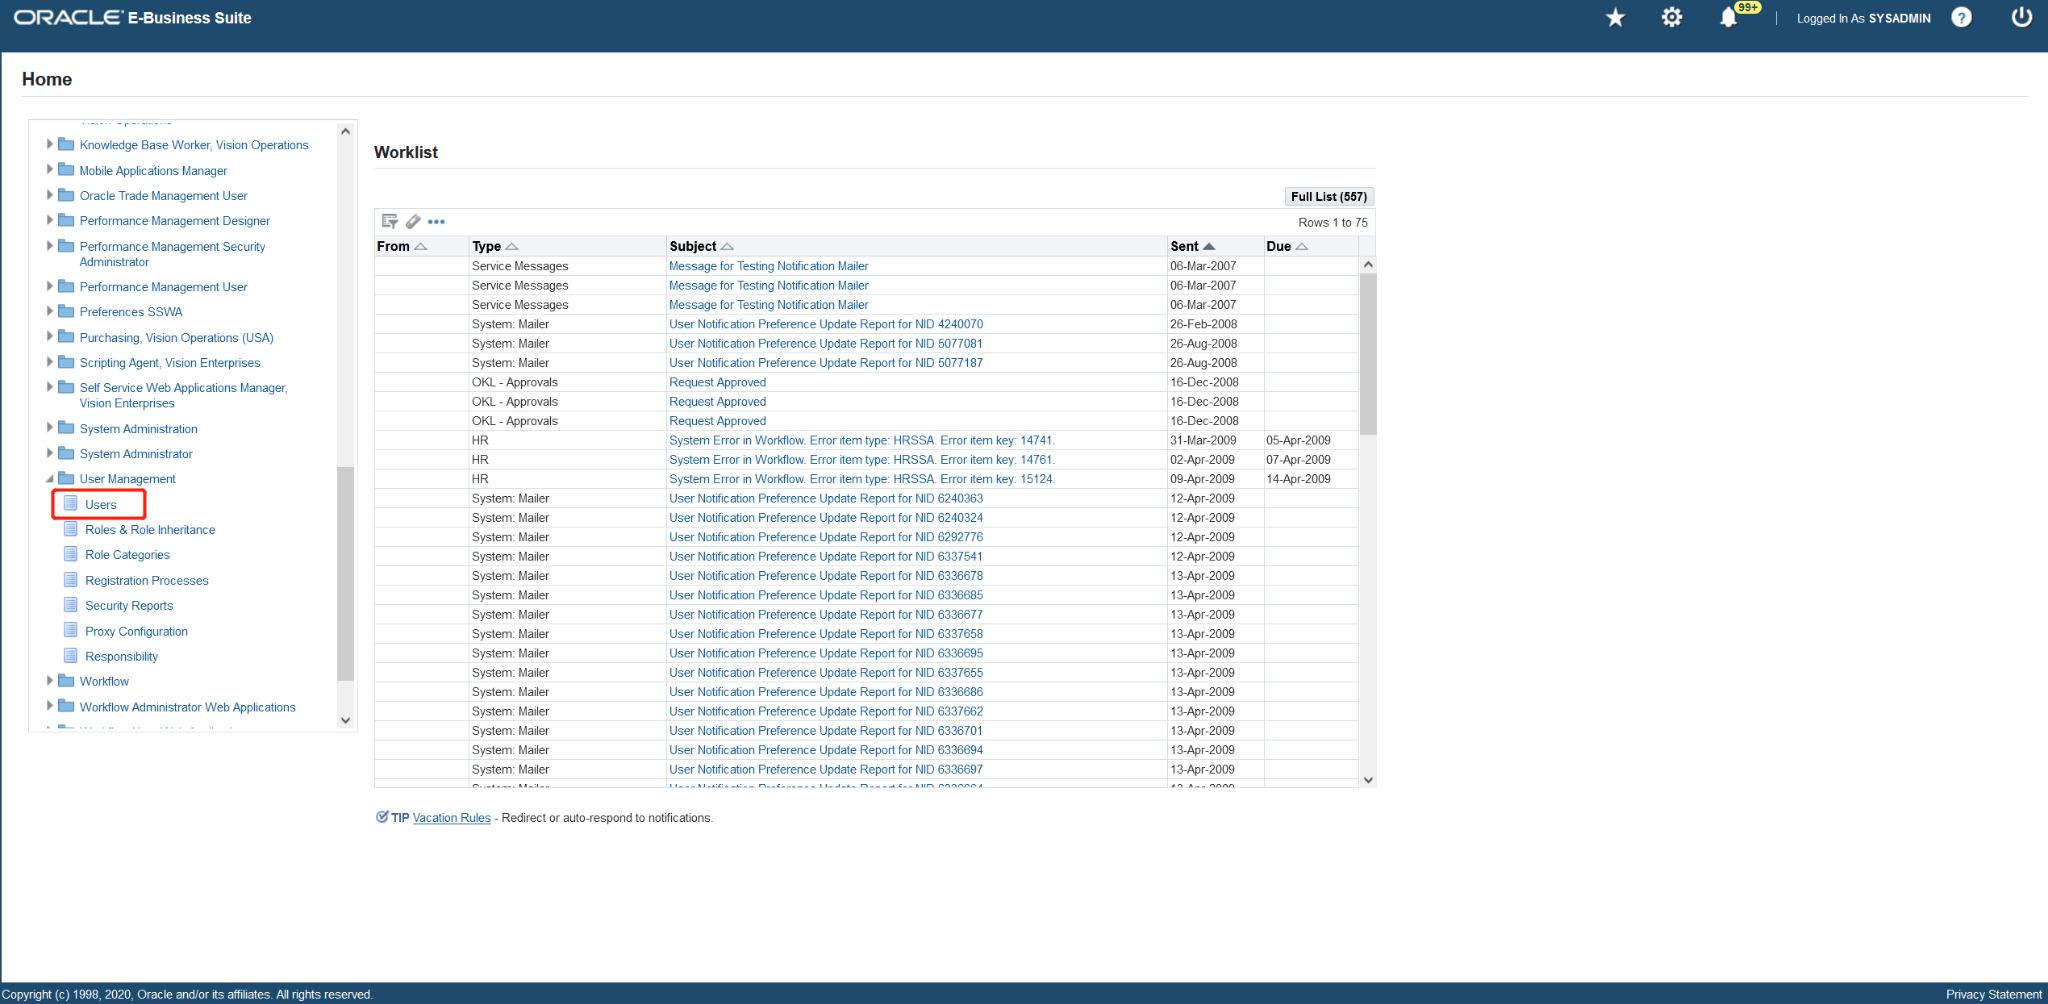
Add a User Account
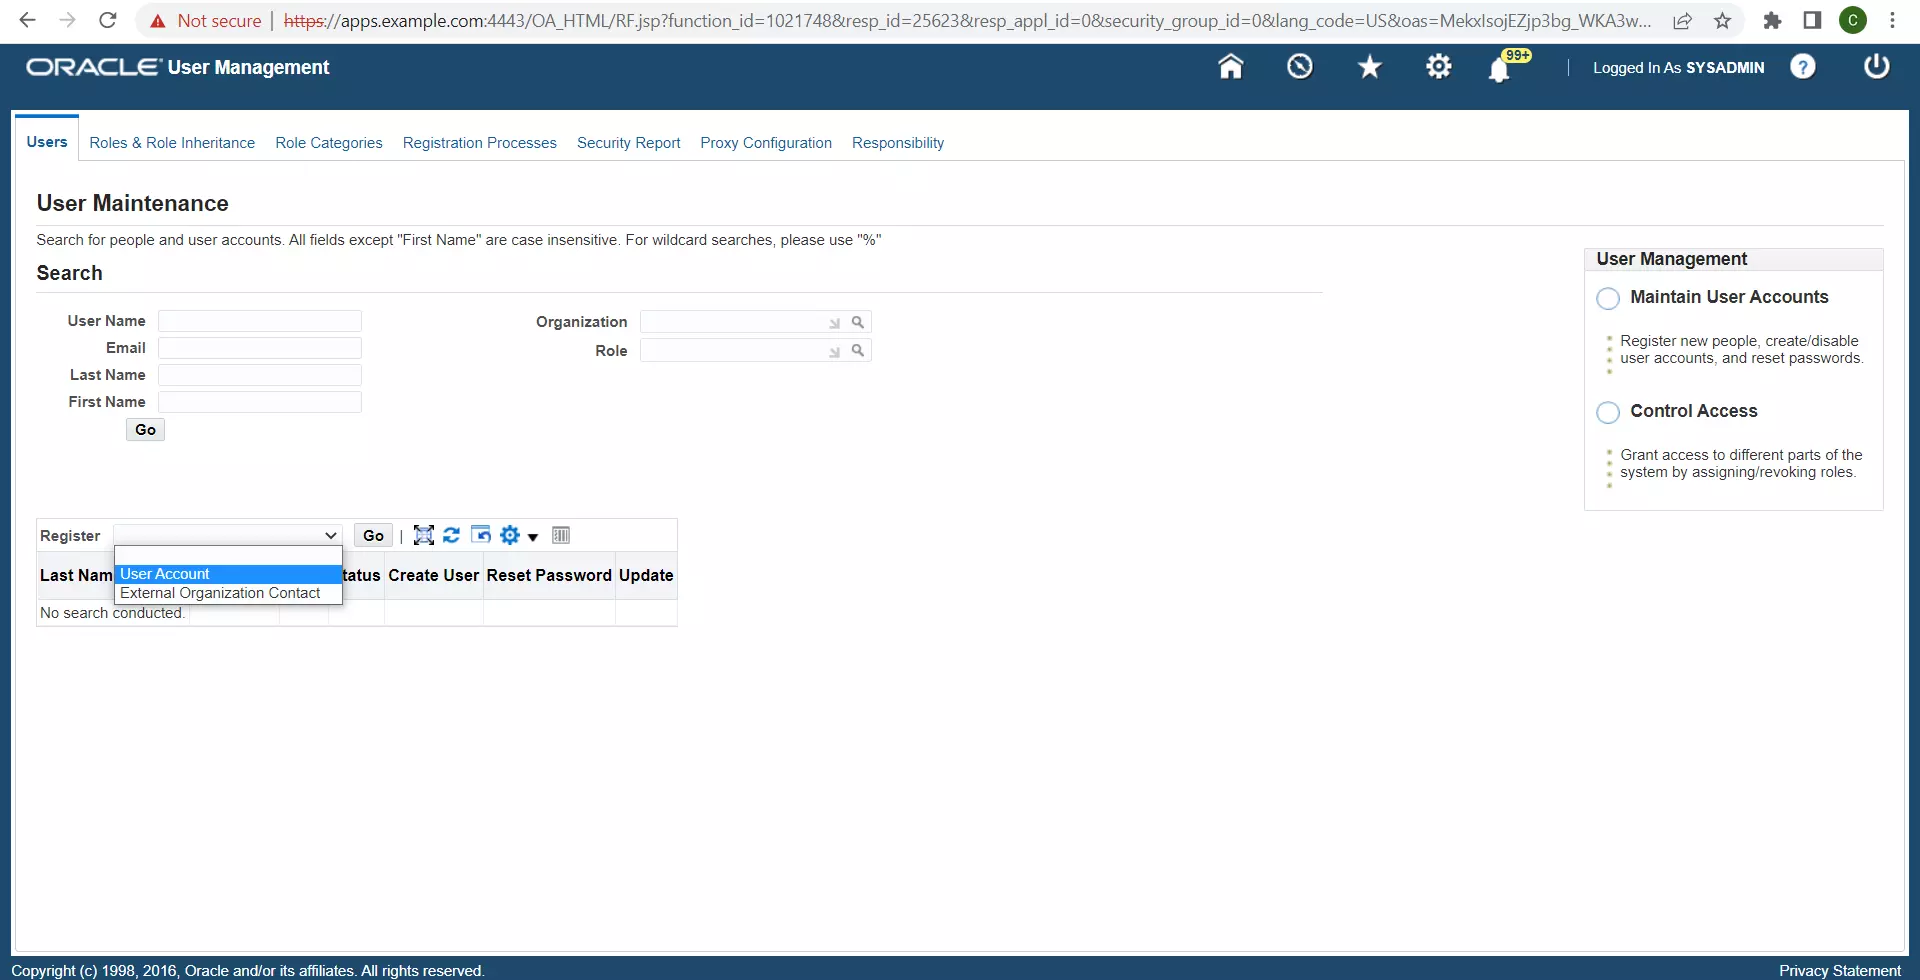
Enter the following details to create the DWSSOUSER user, and then click Submit:
- User Name : DWSSOUSER
- Password : An appropriate password
- Description : DW User account for SSO
- Password Expiration : None
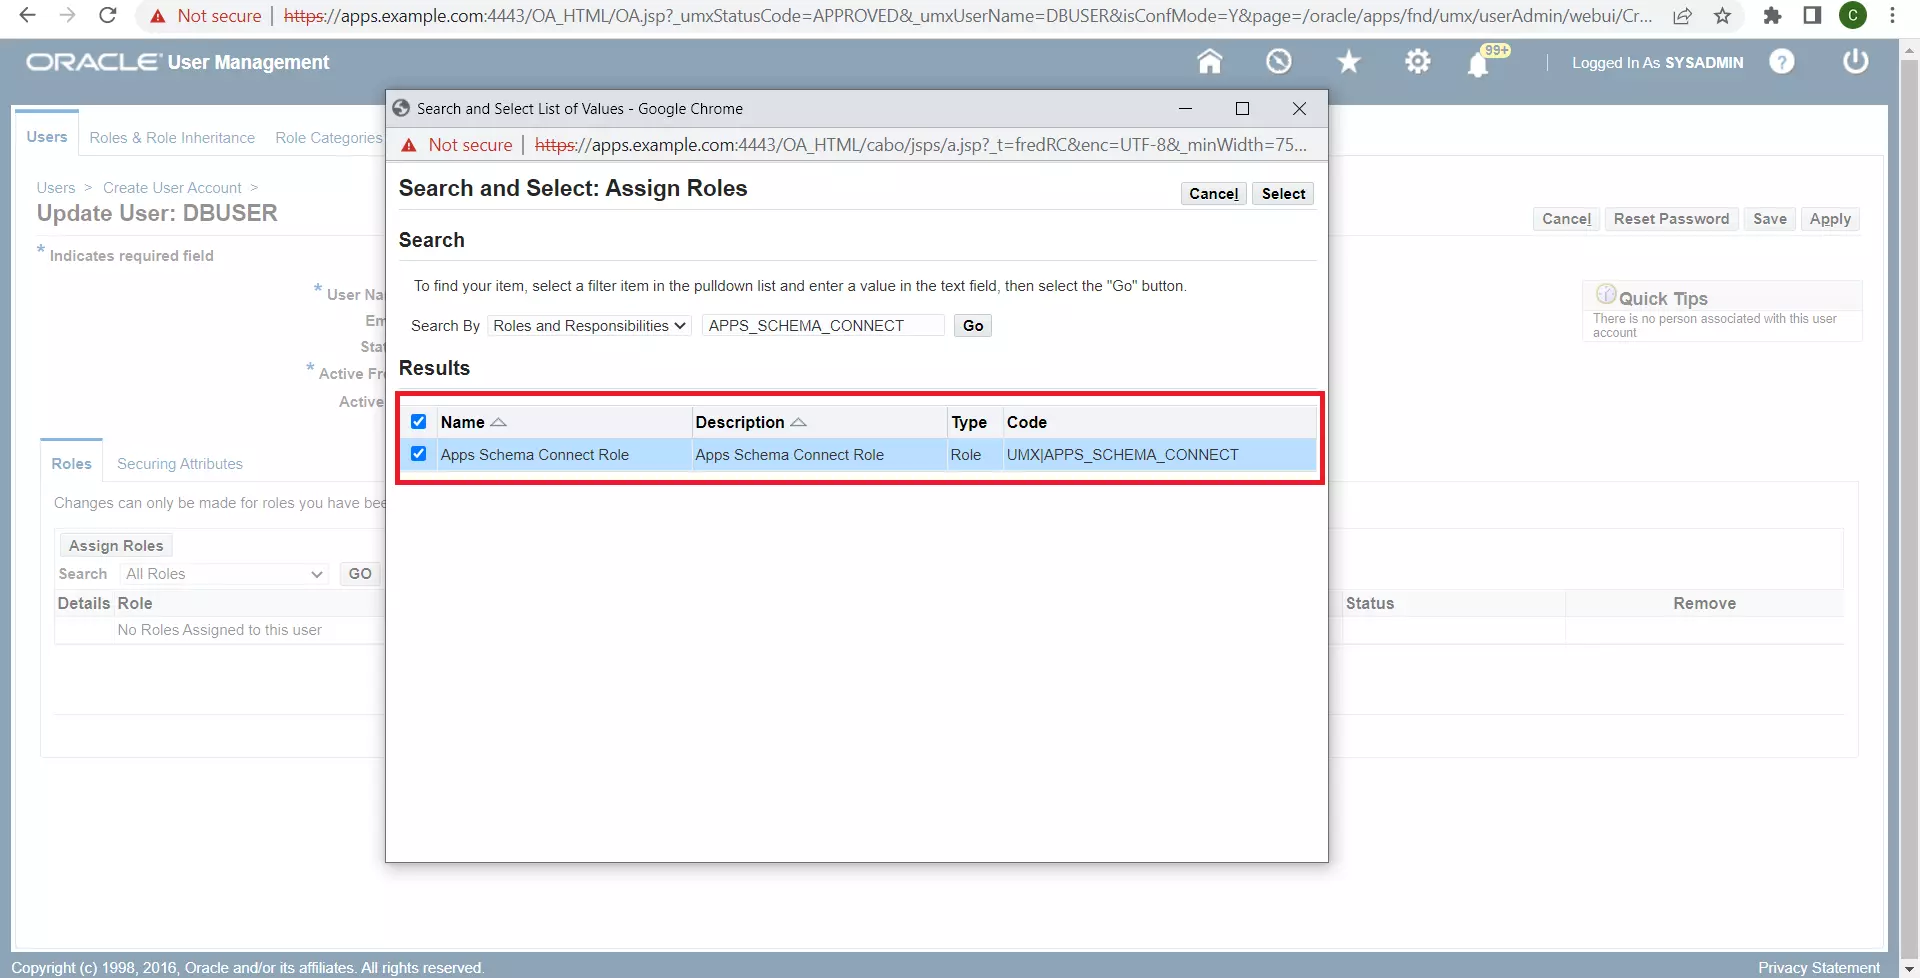
Assign the role Apps Schema Connect to this user. Enter an appropriate Justification (for example, Required for DW SSO) and click Apply.
Use the drawer icon (E-Business Suite version 12.2.8) or navigator icon (E-Business Suite version 12.1/12.2), click Functional Administrator.
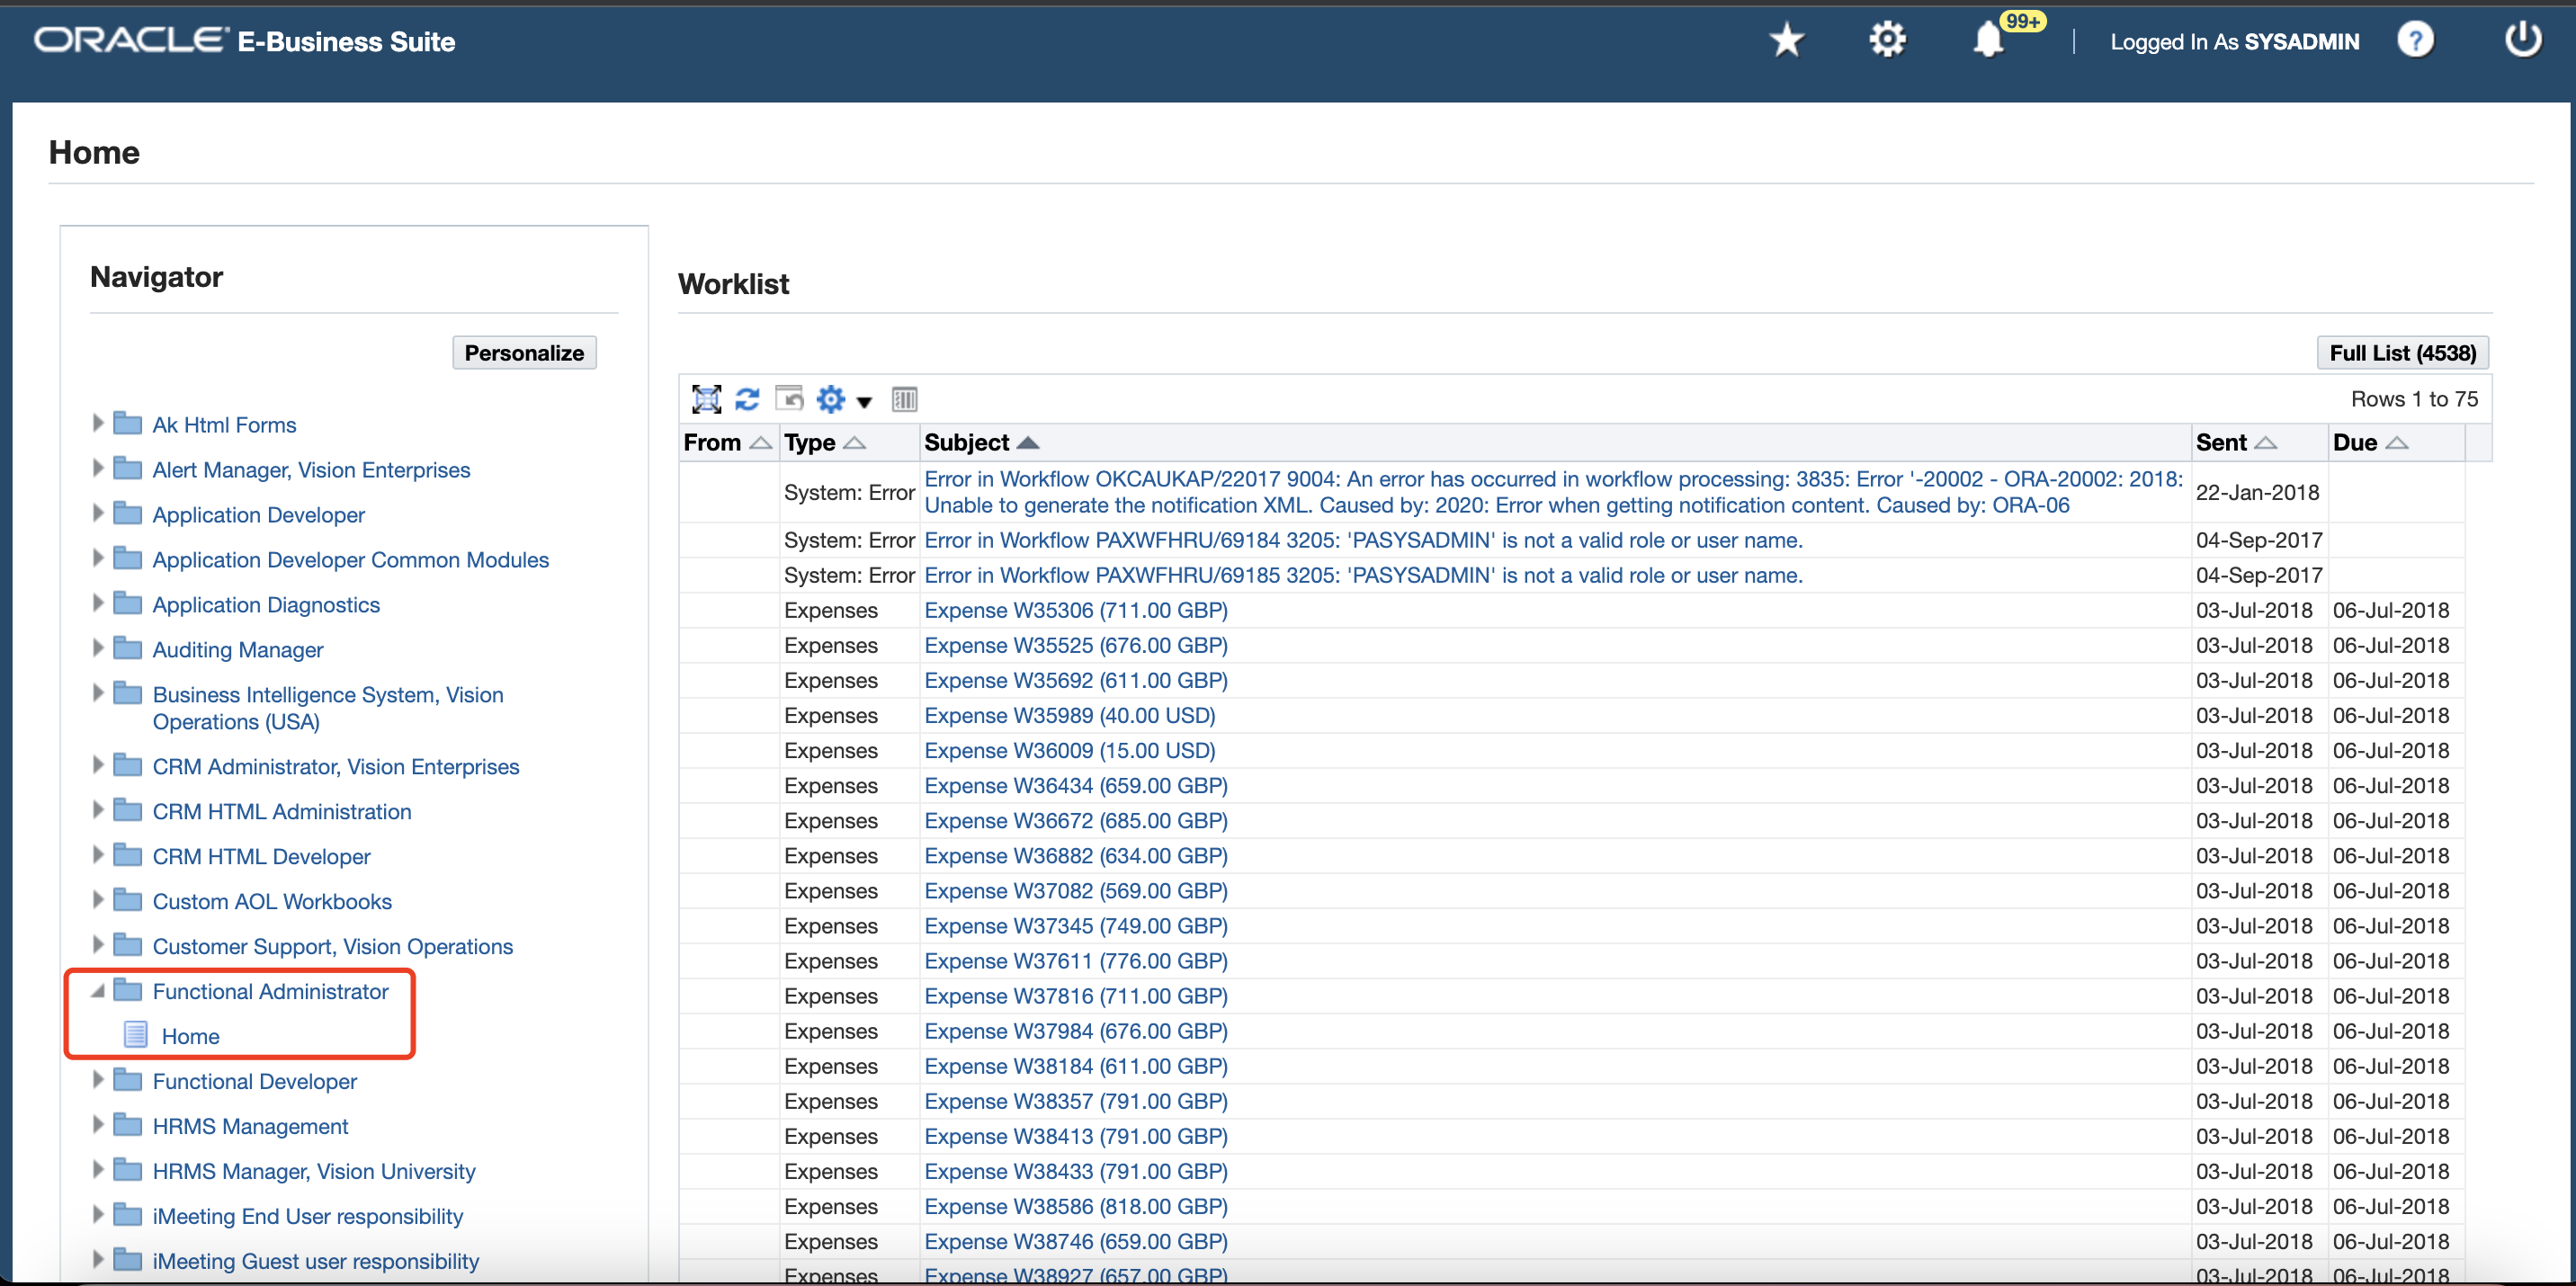
In the Oracle Applications Administration page, click the Core Services tab, and then click Profiles.
Enter
Application Authenticate Agentin the Name field and then click Go. On the list of profiles, select Application Authenticate Agent, and then click Define Profile Values.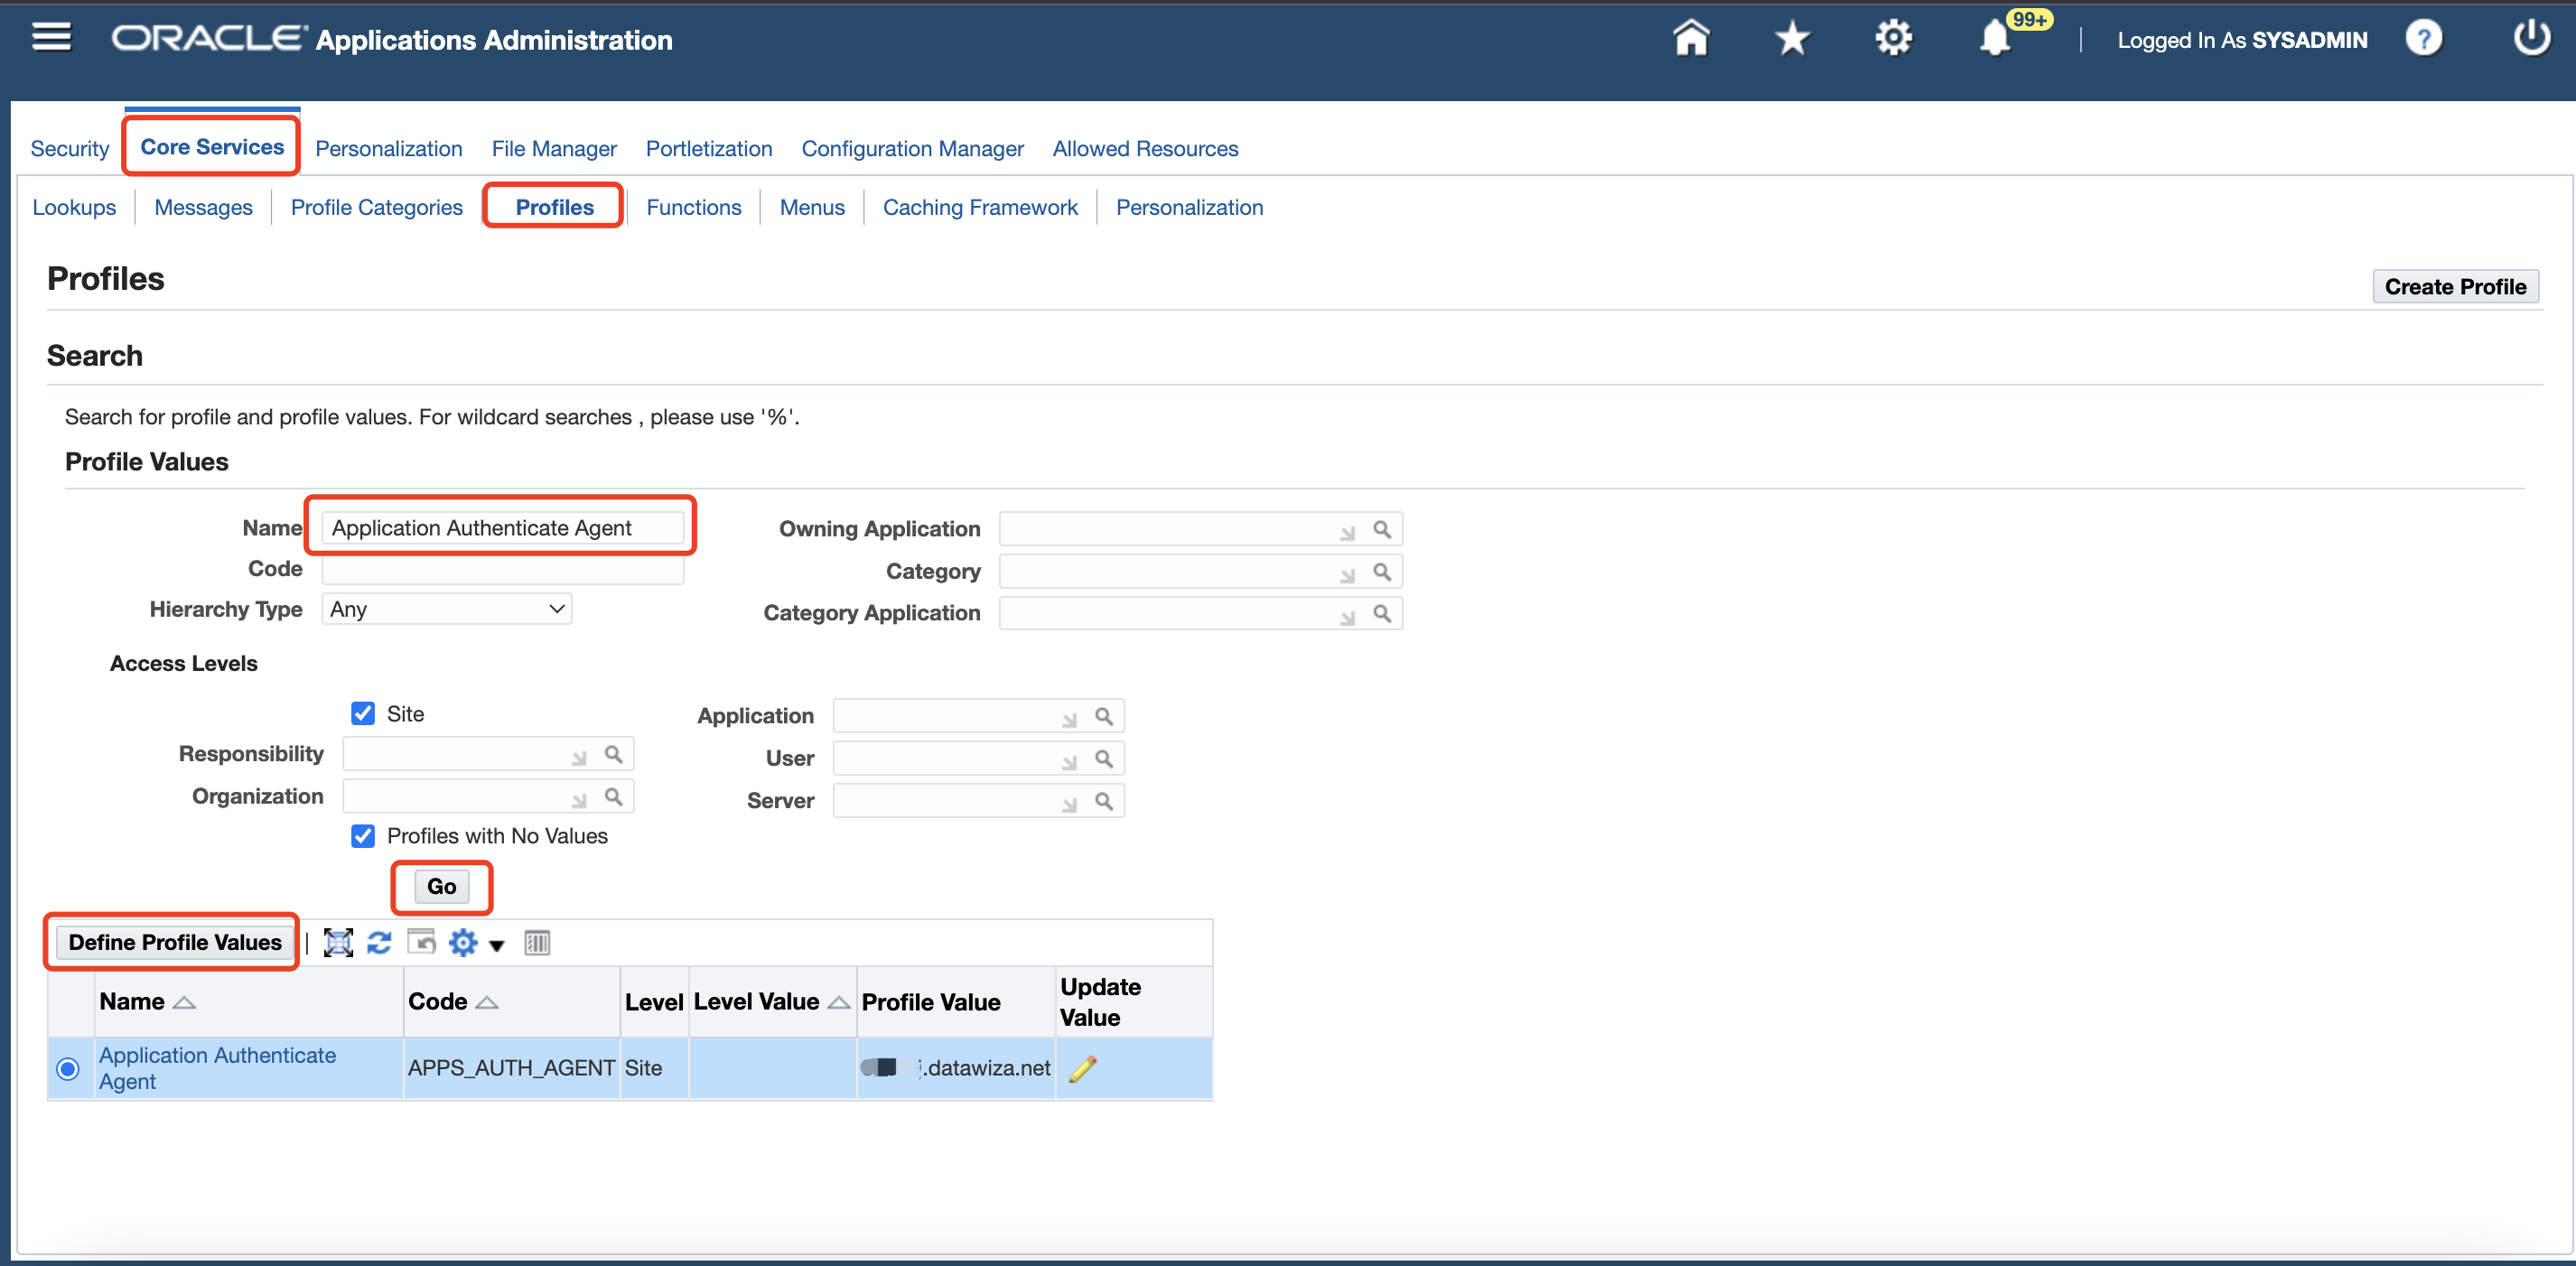
Info
If you cannot find this profile value, you can use form to define this profile value instead.
On the Define Profile Values: Application Authenticate Agent page, update the Site Value to the EBS route that DAP uses to authenticate the user, such as
https://ebssso.example.com. This field must contain the fully qualified domain name of the application protected by DAP.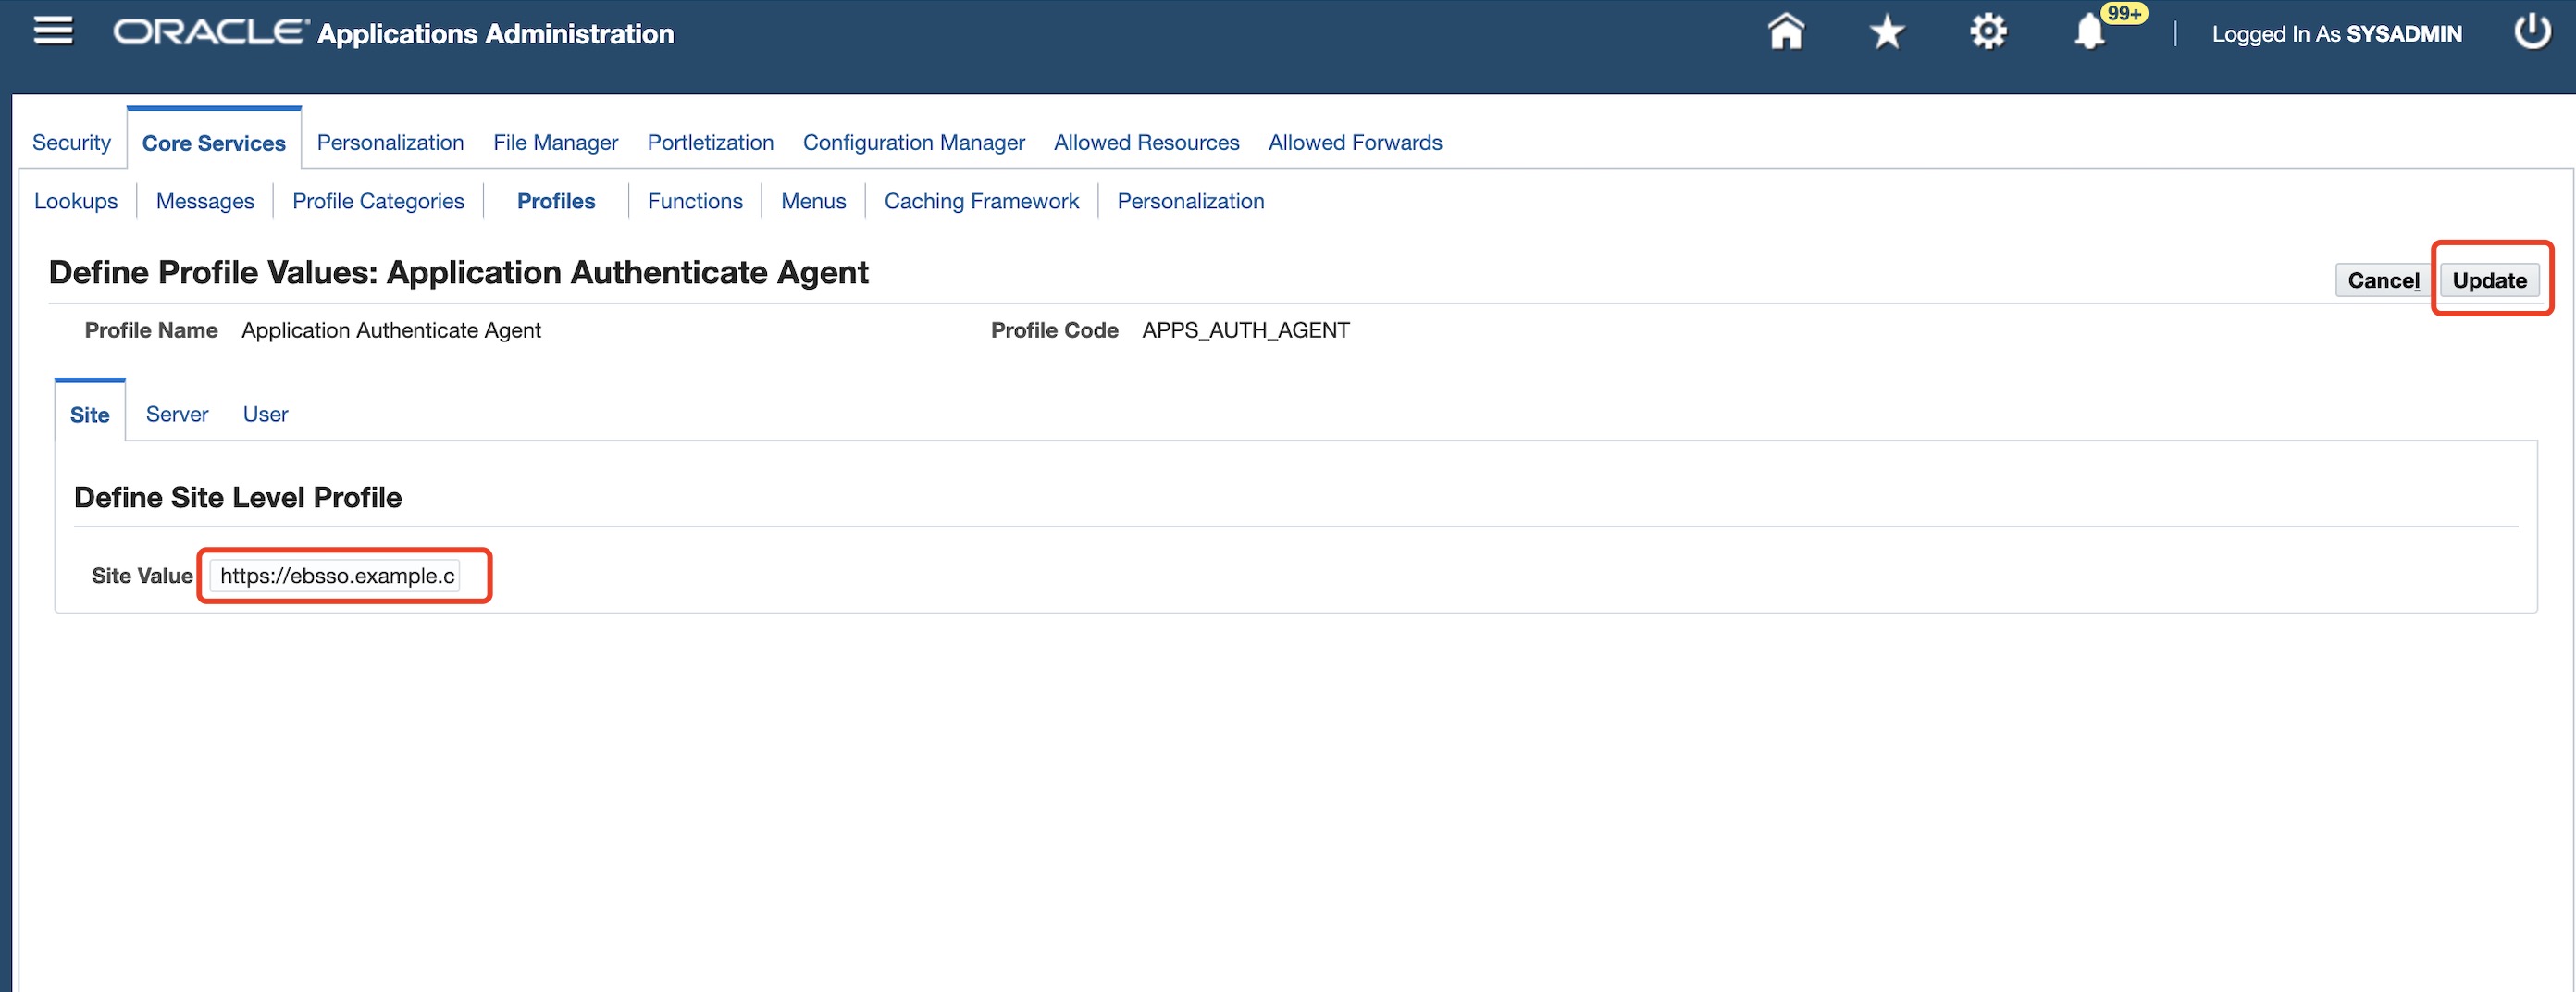
Click Profiles under the Core Services tab, enter
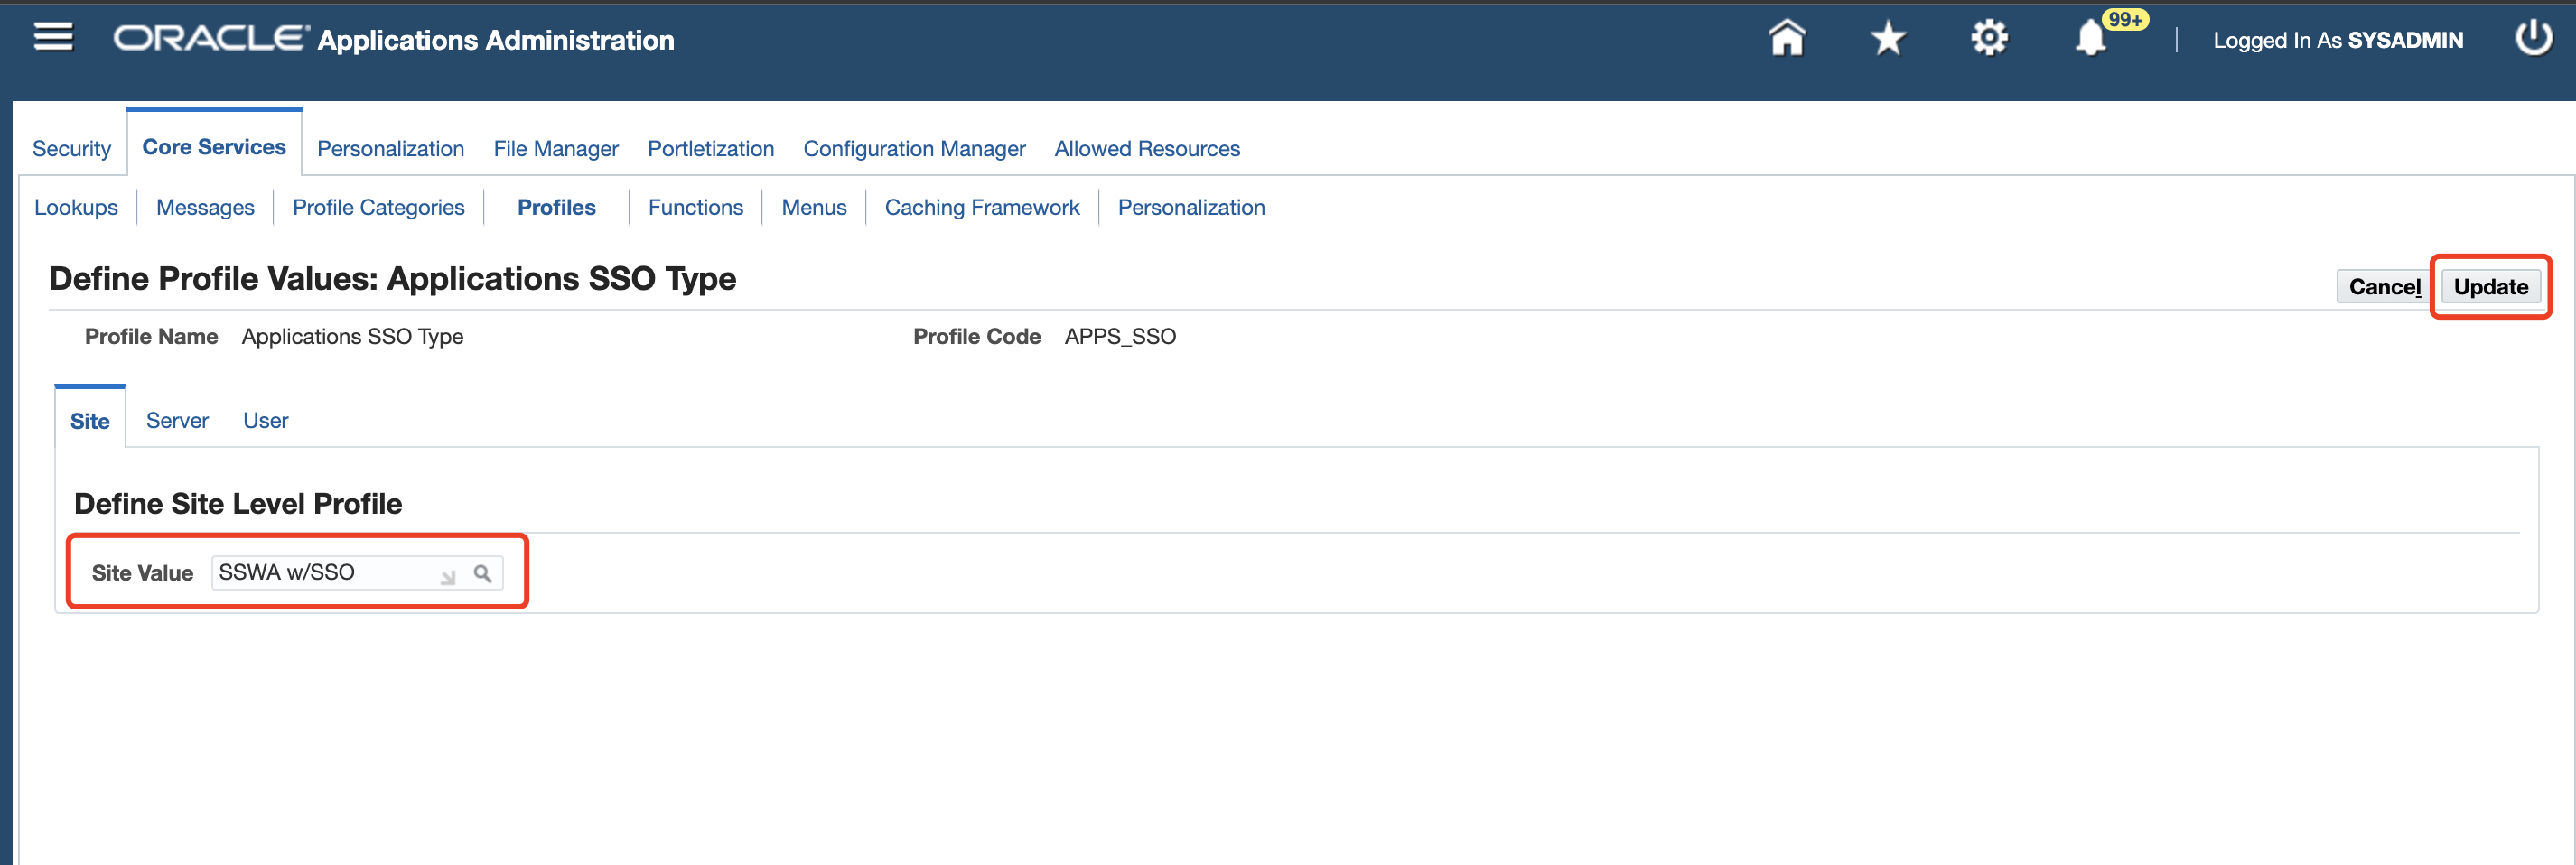
Applications SSO Typein the Name field, and then click Go. On the list of profiles, select Applications SSO Type, click Define Profile Values, change the Site Value field fromSSWAtoSSWA w/SSO, and then click Update.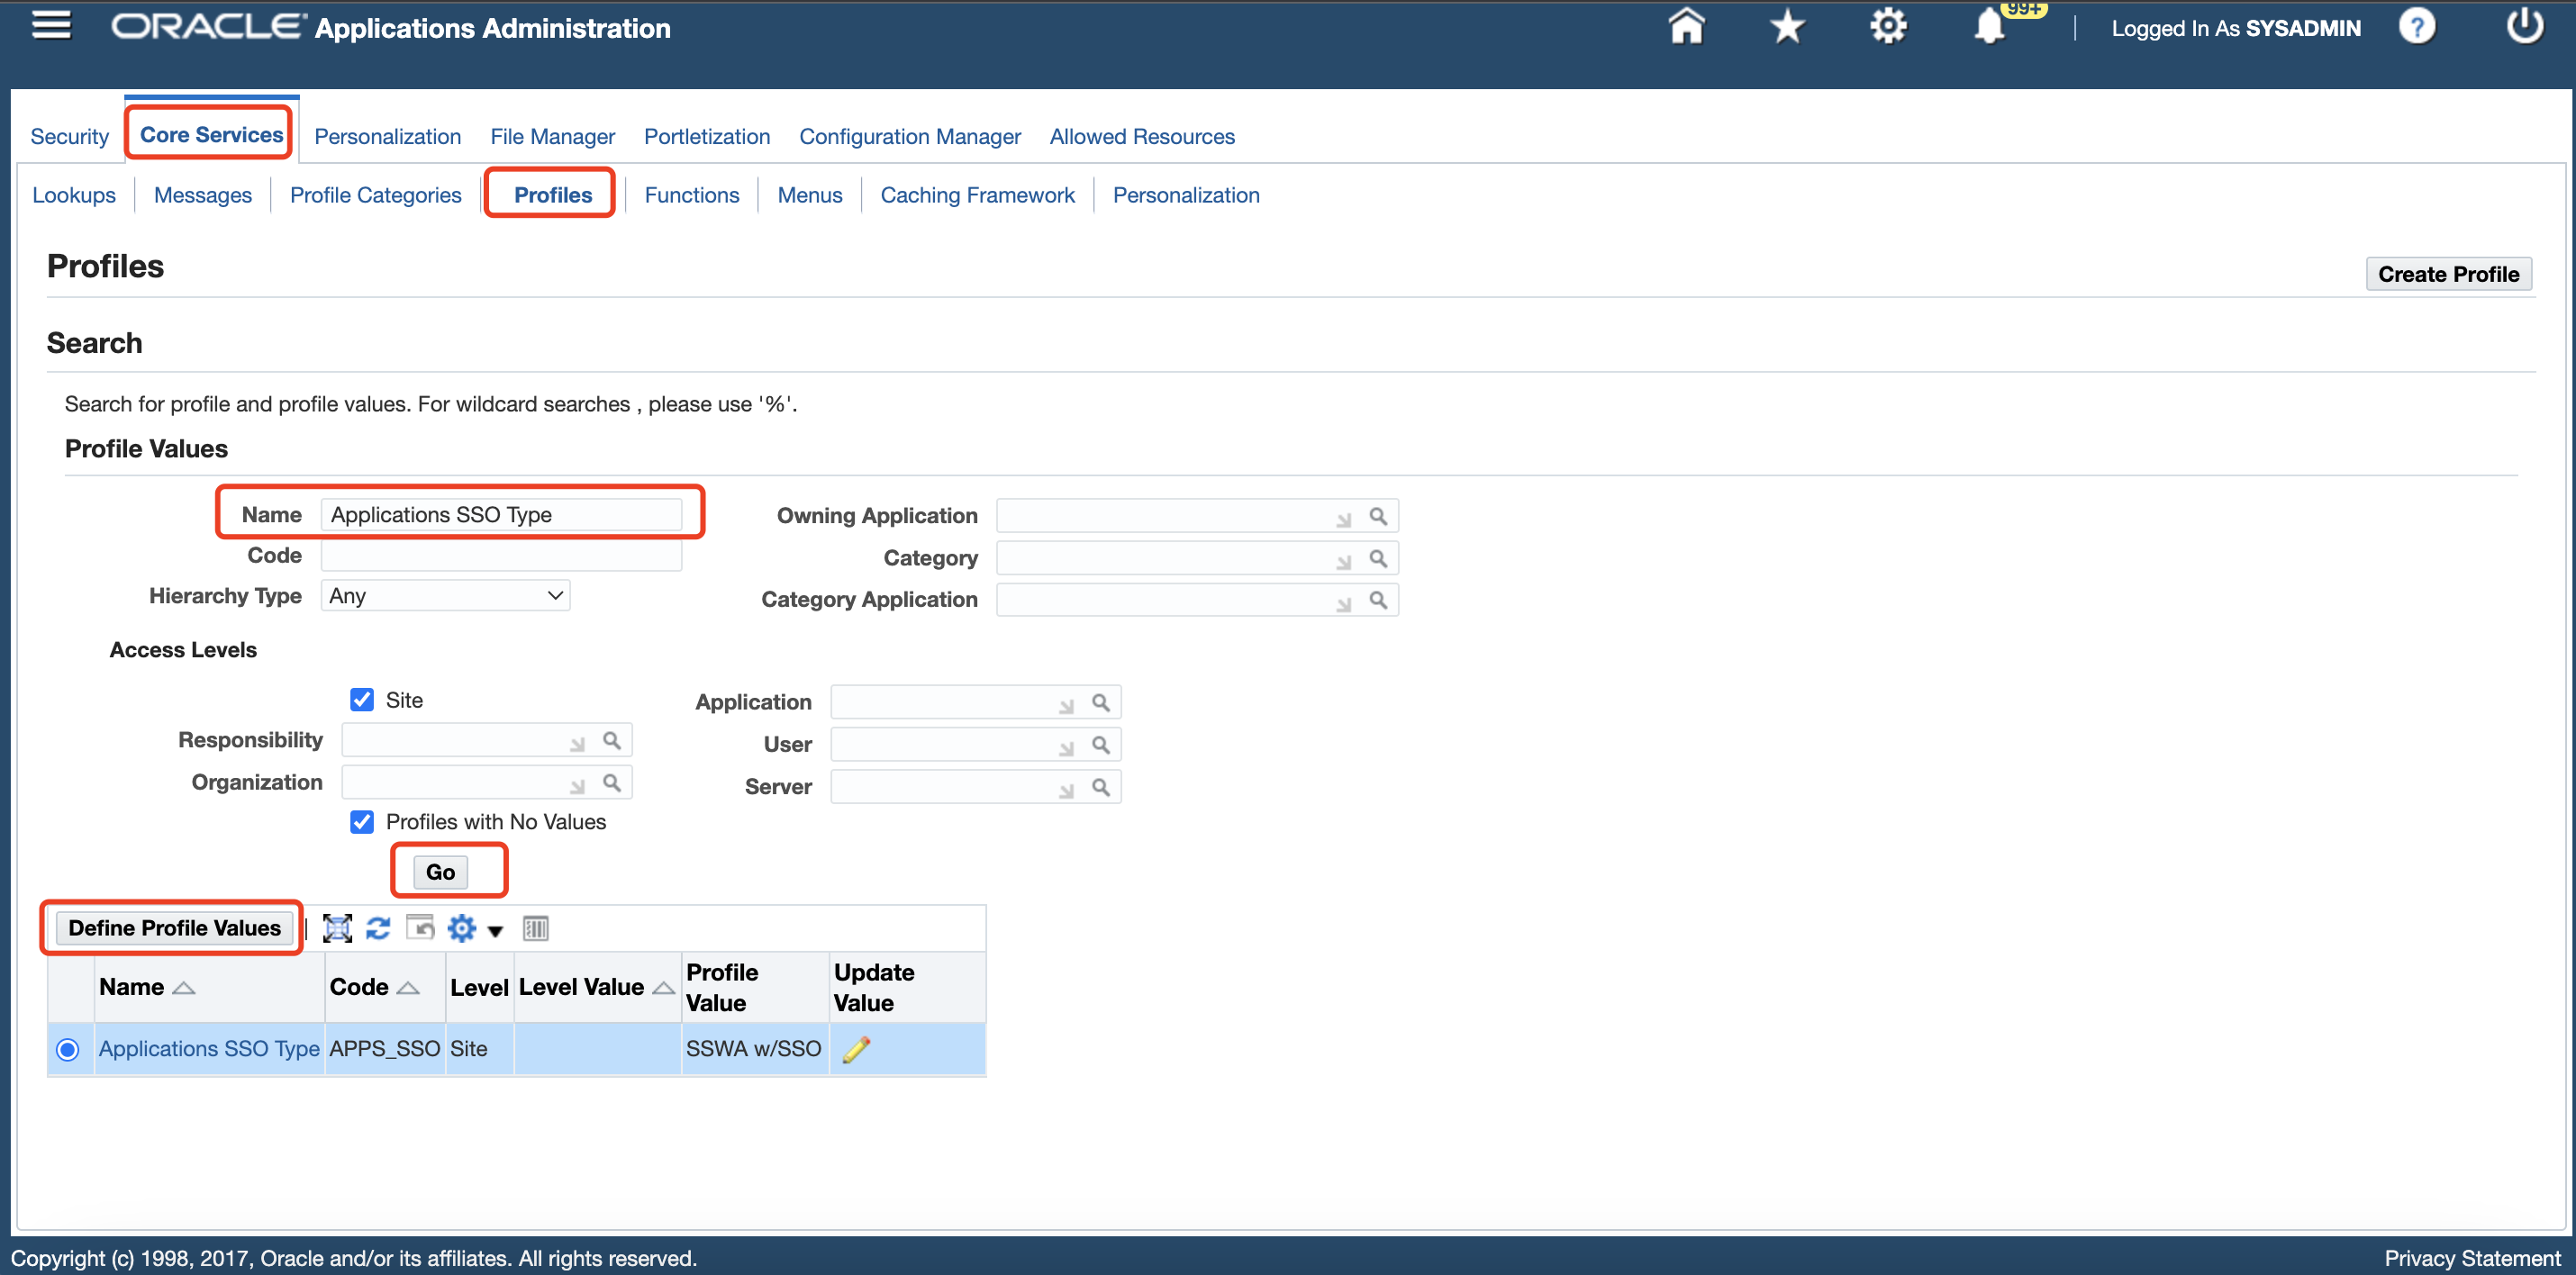
Click Profiles under the Core Services tab, enter
Applications SSO Login Typesin the Name field, and then click Go. Verify that Applications SSO Login Types is set toBOTH.
SSH to your EBS host, execute the command:
sh /u01/install/scripts/configwebentry.shUpdate the basic config for your EBS domain exposed to public through DAP.
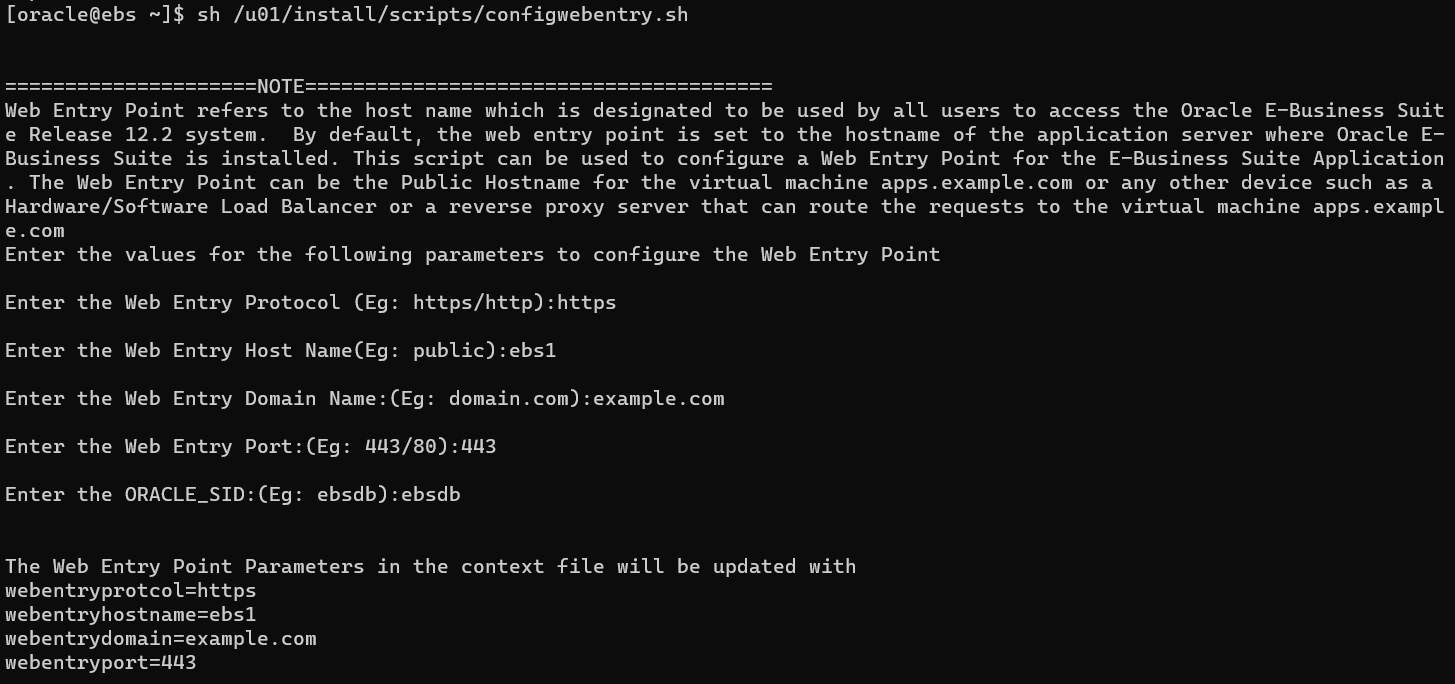 You will find the following variables in the CONTEXT file has been updated or if you don't want to use script, you can also manually update these values by yourself:
Variable Name Description Value s_webentryurlprotocol Set the web entry application tier context variable to the web entry protocol https s_webentryhost Set the web entry application tier context variable to the web entry host name ebs s_webentrydomain Set the web entry application tier context variable to the web entry domain name example.com s_active_webport Set the web entry application tier context variable to the web entry port number 443 s_login_page Set the login page context variable to <webentry protocol>://<webentry host>.<webentry domain>:<active web port>/OA_HTML/AppsLoginhttps://ebs.example.com:443/OA_HTML/AppsLogins_external_url Set the external URL context variable to <webentry protocol>://<webentry host>.<webentry domain>:<active web port>https://ebs.example.com:443Then restart the Oracle E-Business Suite servers.
Note
Before restarting EBS, please be sure to execute the autoconfig script.
Register Datawiza Access Proxy With Oracle E-Business Suite
On the Oracle EBS Linux Environment, generate a new DBC file for use by the Datawiza Access Proxy. You will need the apps user credentials, and the default DBC file (under $FND_SECURE) used by the Apps Tier.
Configure the environment for E-Business Suite using a command similar to:
./u01/install/APPS/EBSapps.env run.The AdminDesktop utility can be used to generate the new DBC file. You'll have to specify the name of a new Desktop Node for this DBC file:
java oracle.apps.fnd.security.AdminDesktop apps/apps CREATE NODE_NAME=<your ebs domain name> DBC=/u01/install/APPS/fs1/inst/apps/EBSDB_apps/appl/fnd/12.0.0/secure/EBSDB.dbcThis will generate a file called
ebsdb_<your ebs domain name>.dbcin the same location as where you ran the previous command.Copy over this DBC file content to a notebook, and we will need to use it later.
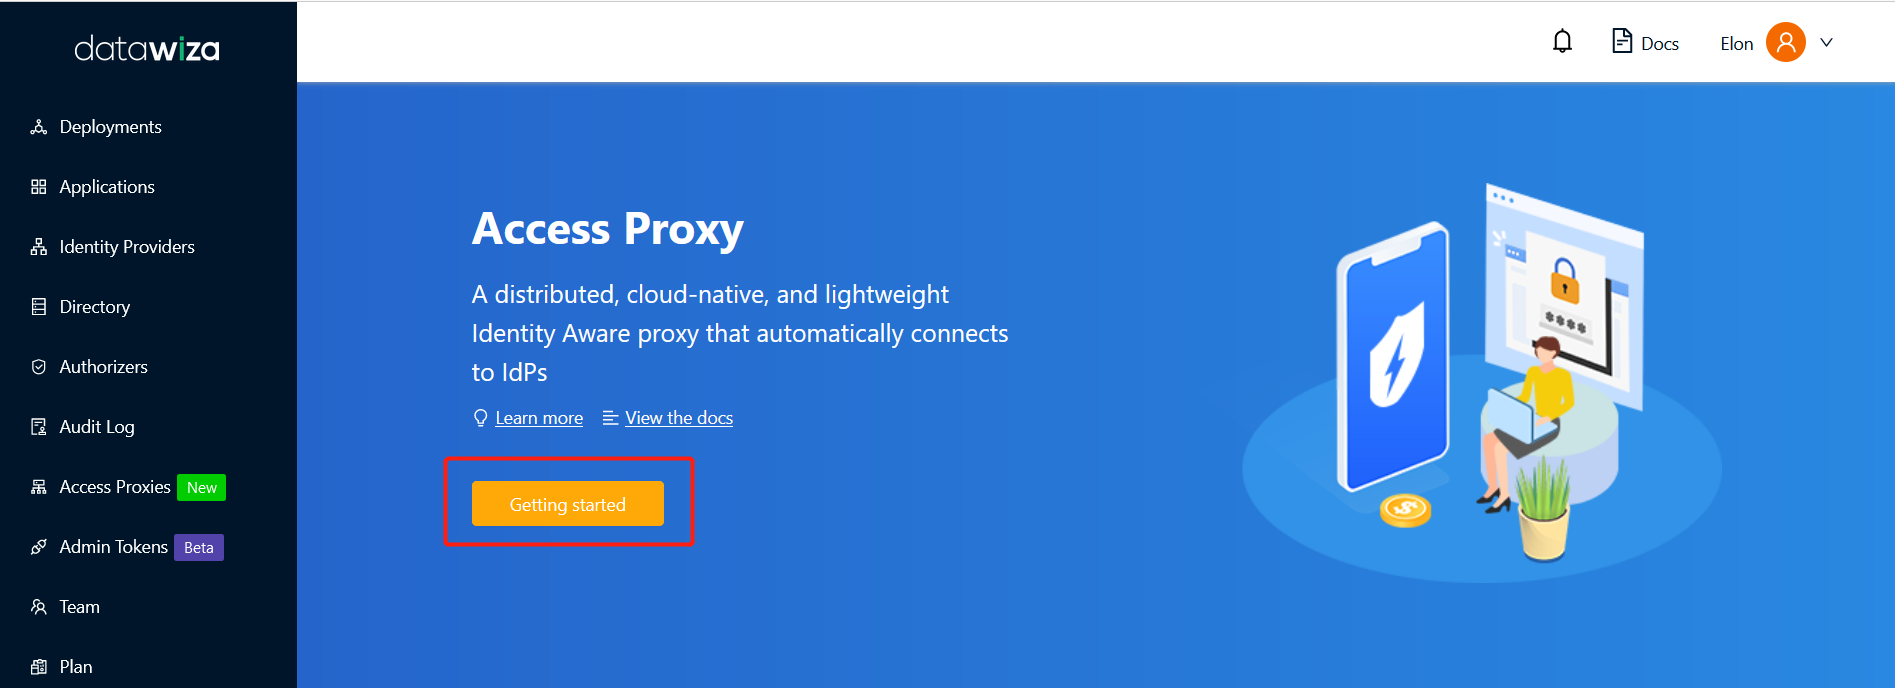
Getting started with Datawiza
To integrate EBS with Shibboleth, login to Datawiza Cloud Management Console (DCMC).
The Welcome page appears.
Click the orange Getting started button, which will guide you through the configuration steps.
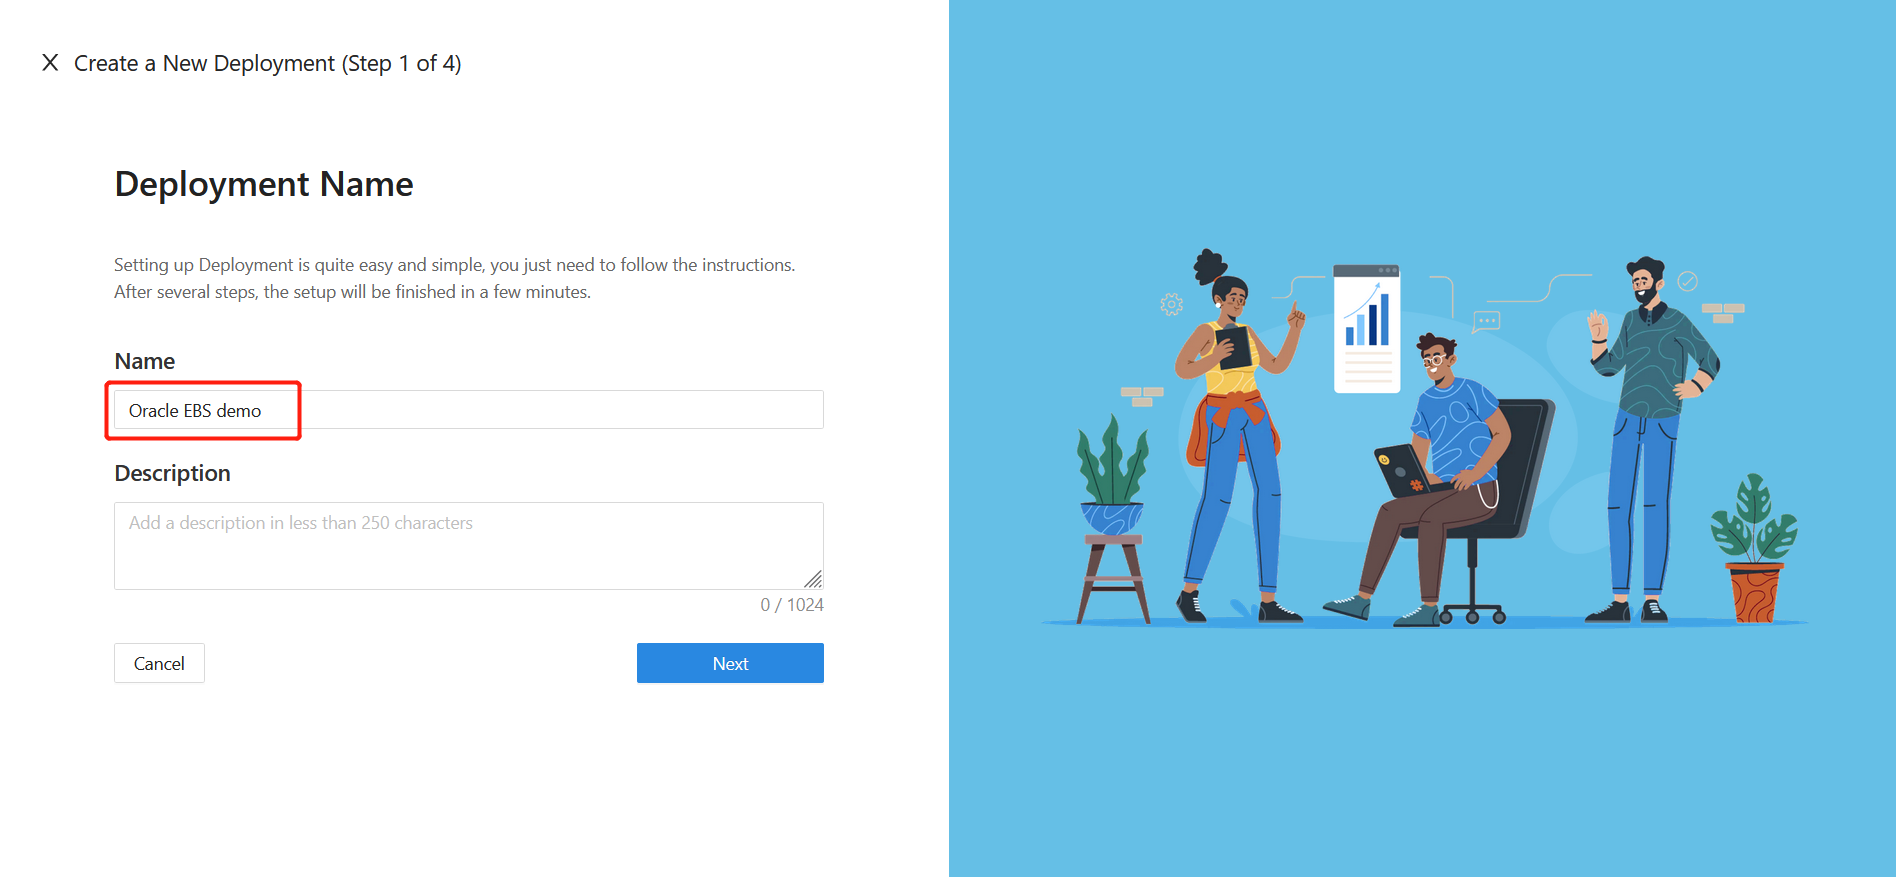
Specify Name and Description, and click Next.
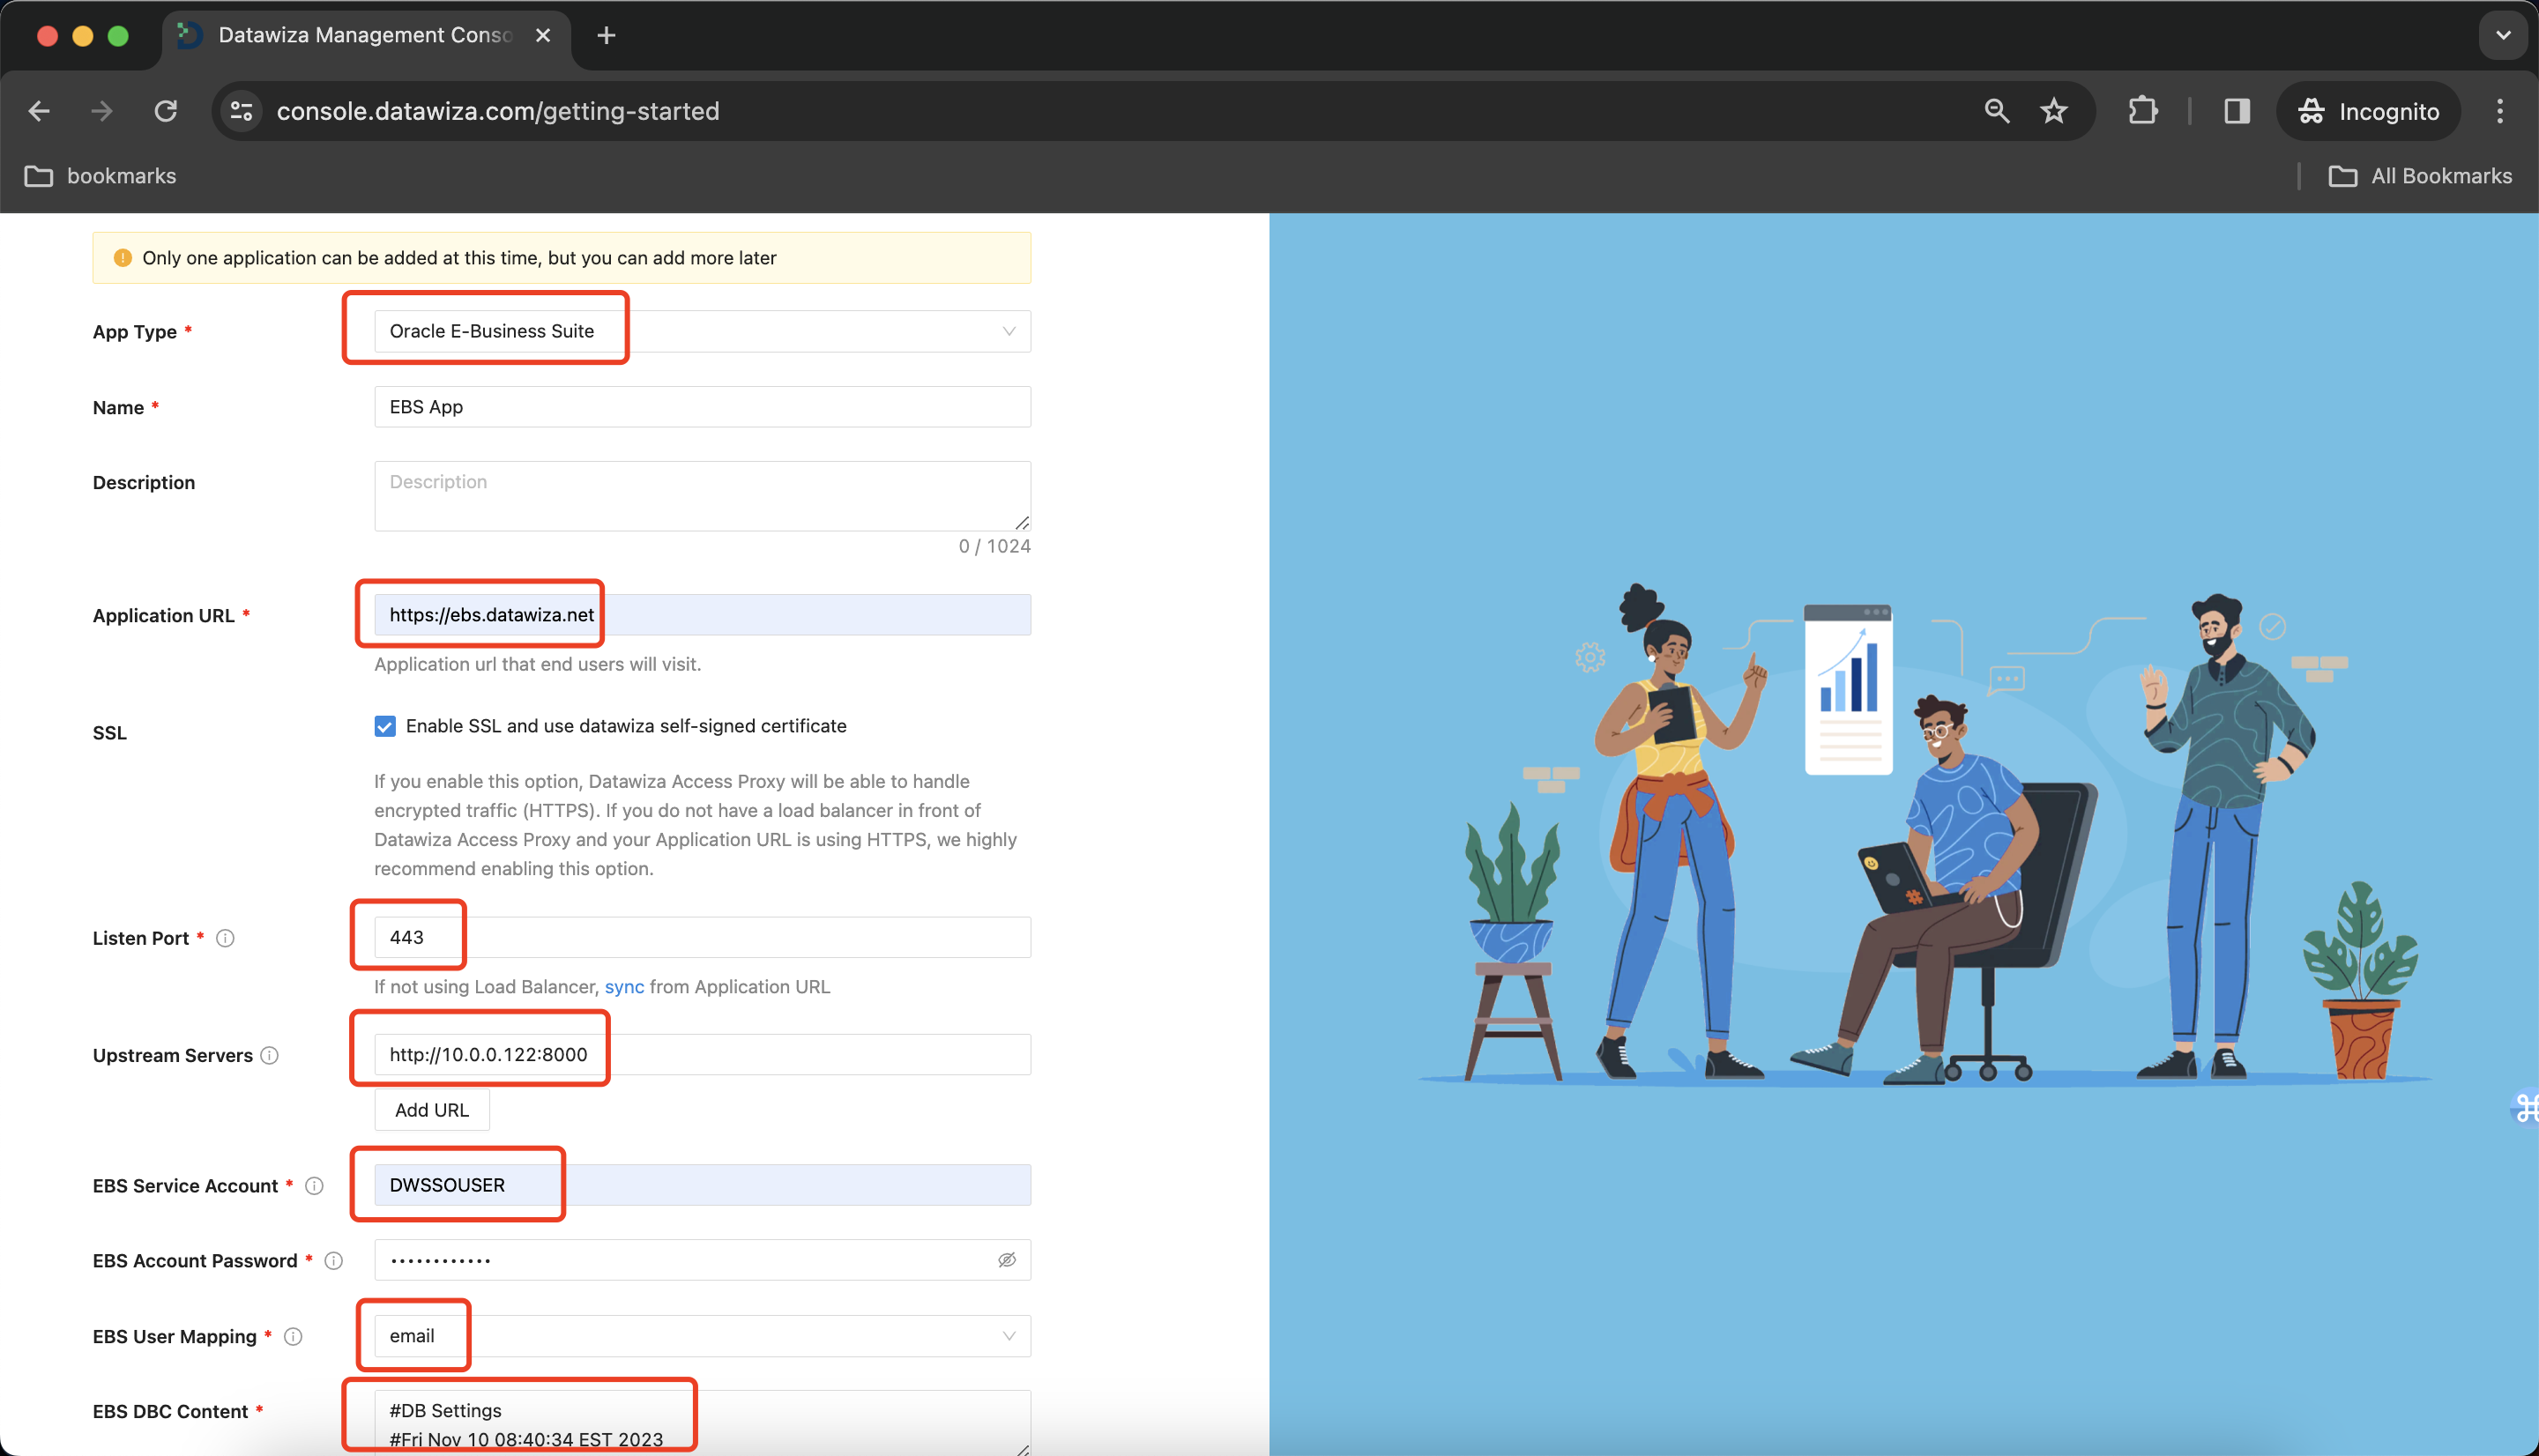
Add Application
Configure your application with the following values:
- App Type : Select Oracle E-Business Suite here.
- Name : The name of your application. Put a meaningful name here. I use the Oracle EBS App.
- Application URL : The external facing URL of the application. For example
https://ebs-external.example.com. You can use localhost DNS for testing purposes. I usehttps://ebs.datawiza.net. - Listen Port : This is the port that the Datawiza Access Proxy listens on. For simplicity, you can use the same port as the one in Public Domain above if you are not deploying the Datawiza Access Proxy behind a Load Balancer.
- Upstream Servers : The URL and port combination of the Oracle EBS Implementation is being protected. Mine is
http://10.0.0.122:8000. - EBS Service Account : The username of the user created as the Service Account. If you followed the instructions, it should be DWSSOUSER.
- EBS Account Password : The password you created for the Service Account.
- EBS User Mapping: It decides which attribute will be mapped to EBS username for authentication, usually this value is coming from the Identity Provider. I use email.
- EBS DBC Content: The content you generated at the previous step.
Select Next.
IdP Configuration
- On the Configure IdP dialog, enter the relevant information.
- Input the IdP name. Select
SAMLasProtocolandGenericasIdentity Provider. Populate the fields of the form with the keys/values obtained from IdP Configuration Guide: Shibboleth SAML.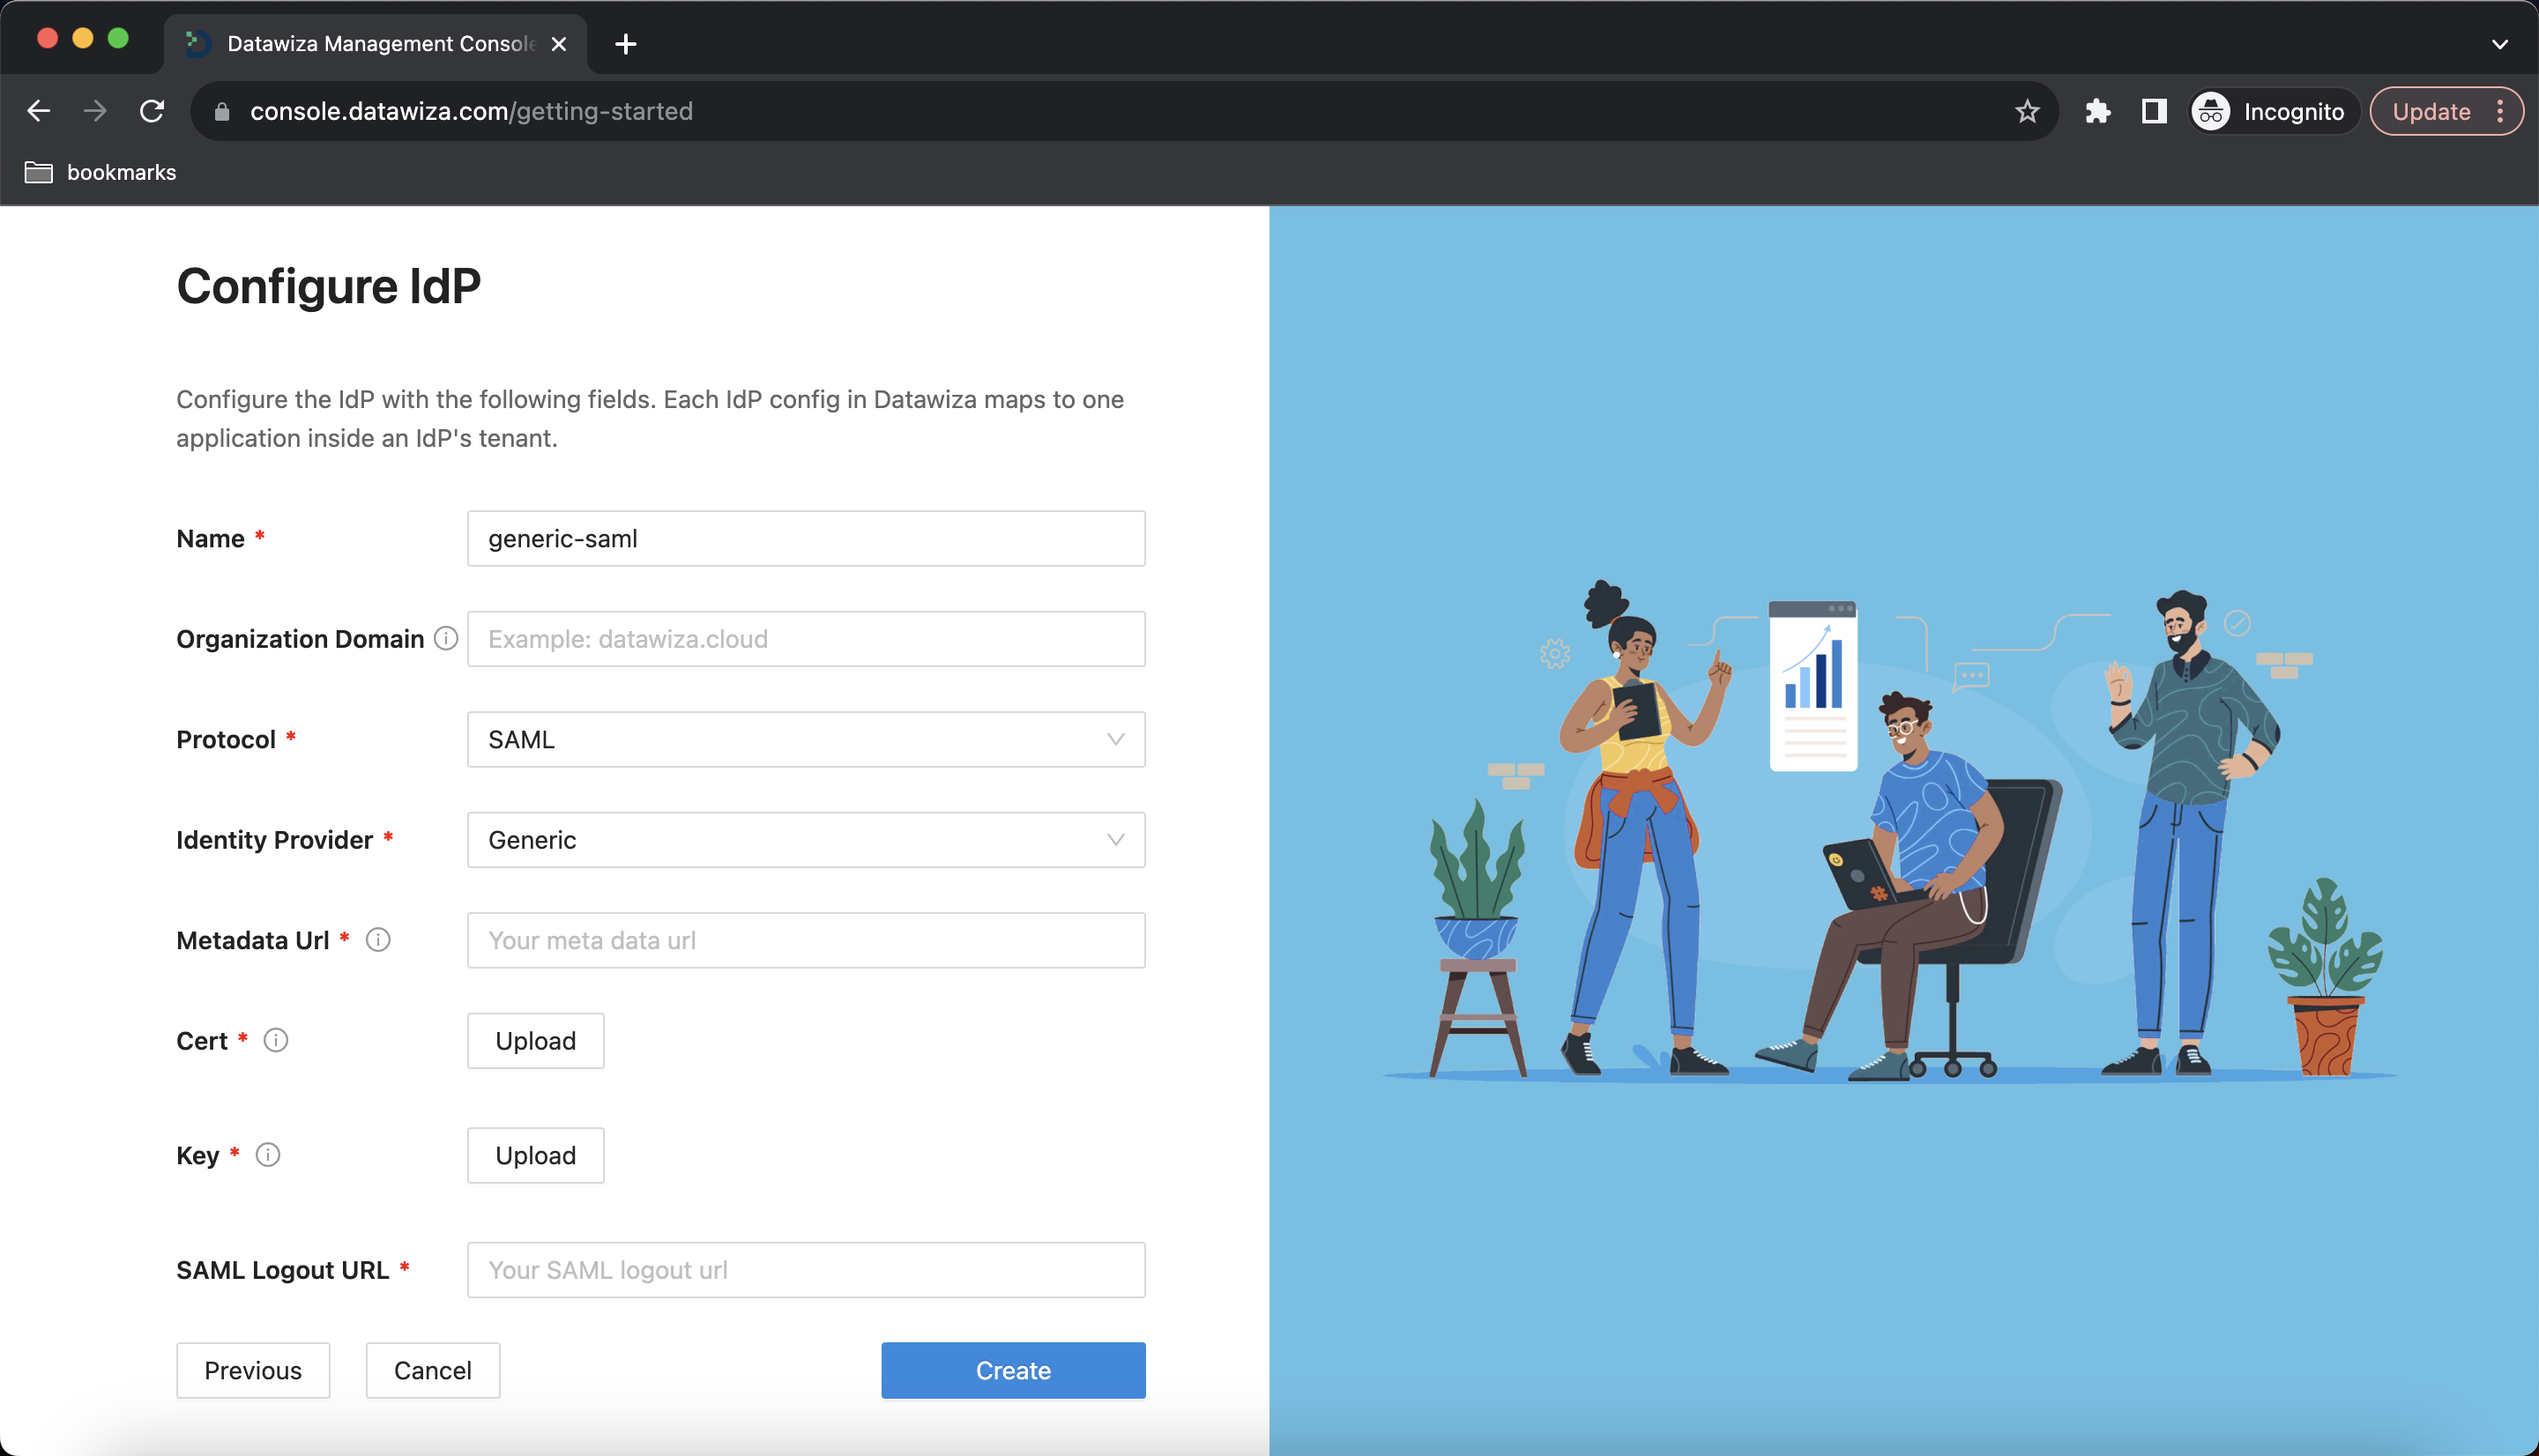
- Select Create.
Install and run Datawiza Access Proxy
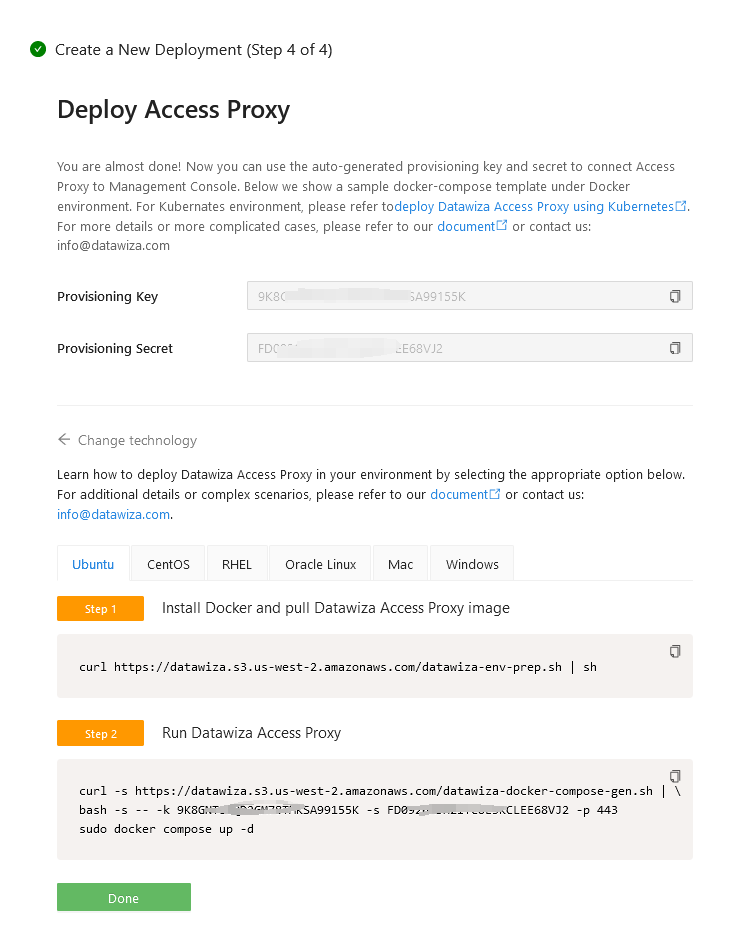
Once clicking on the Create button, the basic configuration on the management console is finished. You will see the final step of the guide, which presents you with a page showing the simple steps to deploy Datawiza Access Proxy (DAP) with your application. Note down the commands for your deployment. The first command will download Docker and Datawiza Access Proxy image, and the second command will create a Docker Compose file and run Datawiza Access Proxy. You can refer to Install and Run Datawiza Access Proxy by command for more information.
(Optional) SSL Configuration
- By default, when you set up this application, it will use the Datawiza self-sign certificate, but you still have the chance to replace it with your own certificate. Select the Advanced tab. Click the edit button, then upload your own certificate.
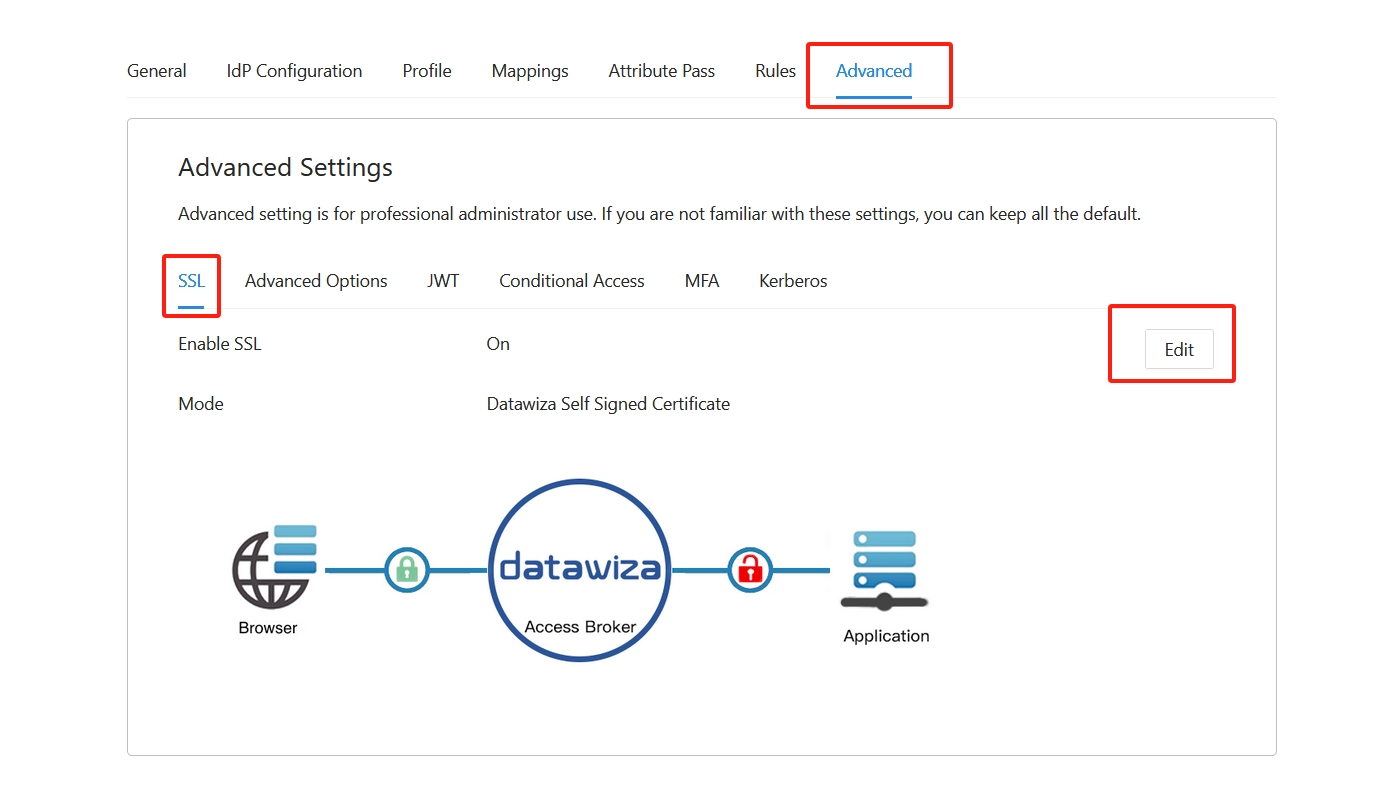

- Select Save.
Summary
In this article, you learned how to:
- Configure and Deploy the Datawiza Access Proxy
- Integrate the Datawiza Access Proxy with Oracle EBS
- Enable Shibboleth SSO login for Oracle EBS
If you have any questions, don't be afraid to contact us through support email (support@datawiza.com)!