Deploy Datawiza Access Proxy
After you successfully complete the configuration on IdP side and DCMC side, you are ready to deploy DAP with your app to enable SSO and granular access control.
You deploy DAP like you would deploy any other reverse-proxy, e.g, nginx. Most of DAP's configuration should have been done on the DCMC. You can use either Docker or Kubernetes to run the DAP. Below are Docker-specific instructions. Refer to Deploy DAP with Kubernetes for Kubernetes-specific instructions.
You can use docker-compose or docker run to run DAP or use our provide script to run. The following instructions demonstrate using two ways to start Datawiza Access Proxy.
Info
If you are using latest version of Docker Desktop, Docker Compose might have been installed by default. You can use docker compose syntax to replace docker-compose. If you Docker version does not have pre-installed Docker Compose, you still can choose to install its standalone mode.
Install and Run Datawiza Access Proxy by command
If you have followed previous step-by-step instructions of Datawiza Cloud Management Console (DCMC) Configuration to the end, you should see a screen like below, which provides you two commands to install Docker and create a Docker Compose file for you.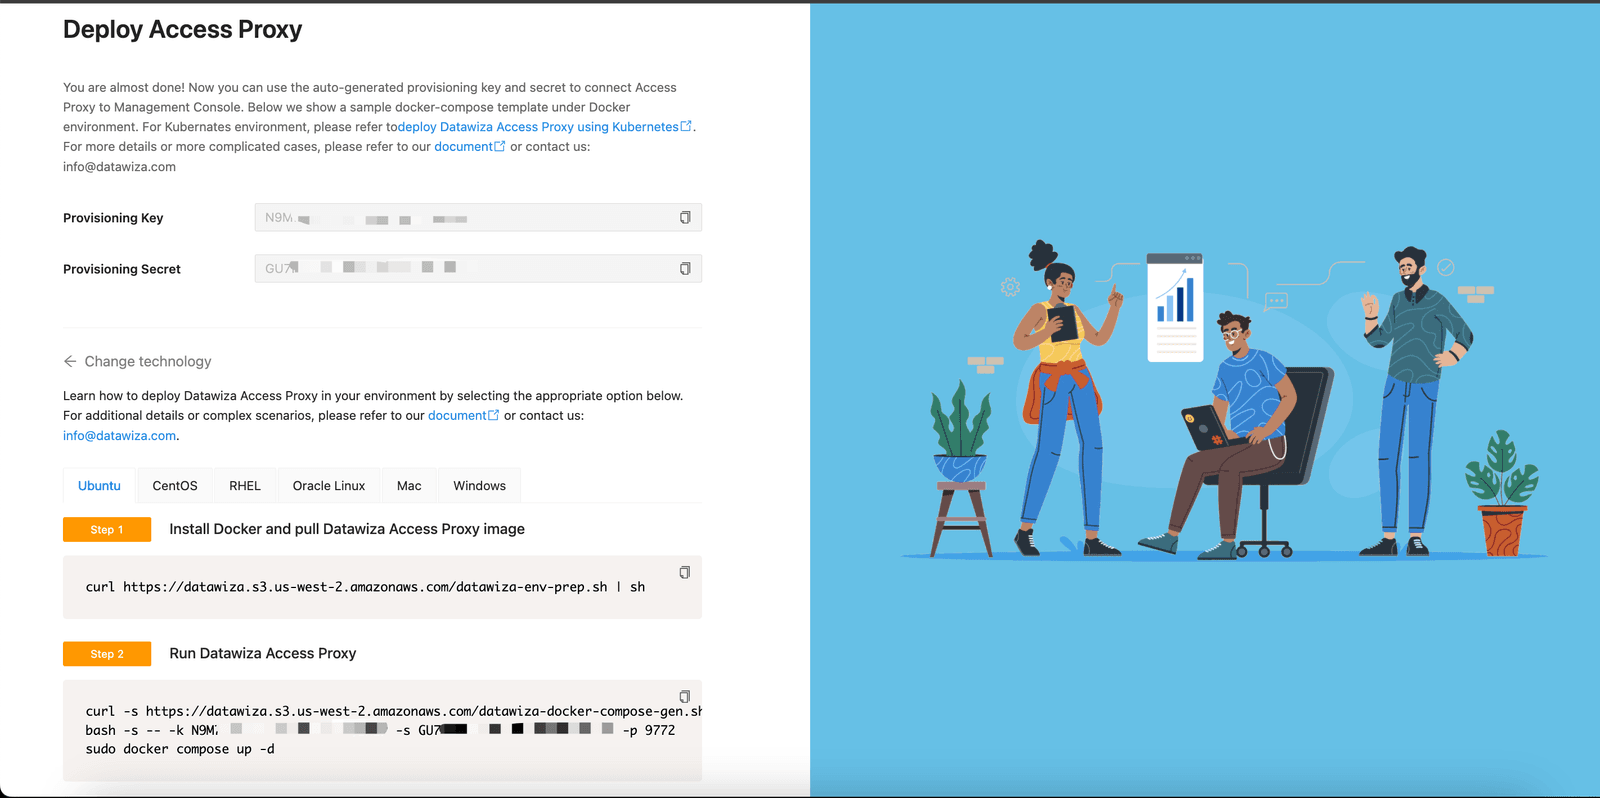
You can also copy the commands from here and edit the content as you need:
curl https://datawiza.s3.us-west-2.amazonaws.com/datawiza-env-prep.sh | sh
Upon execution of this command, Docker should be successfully installed on your server, and the Datawiza Access Proxy image downloaded. You may then proceed with the next command:
curl -s https://datawiza.s3.us-west-2.amazonaws.com/datawiza-docker-compose-gen.sh | \
bash -s -- -k YOUR_PROVISIONING_KEY -s YOUR_PROVISIONING_SECRET -p 443
sudo docker compose up -d
Please remember to replace the placeholder values with your own provisioning key and secret.
Install and Run Datawiza Access Proxy by manual
Create Docker Compose YAML file
There are several ways to create the docker compose file. Here, if you are using a linux based system., etc Ubuntu or Mac OS, you can use the following command to create the file. Keep in mind, you need to name this file as docker-compose.yml. Otherwise you have to specify the file name when running the start command.
vi docker-compose.yml
Info
It is better to note down the directory path where the docker compose file is located, You will need this file to stop or restart Datawiza Access Proxy in the future. Additionally, if your provisioning key has been revoked in the Datawiza Cloud Management Console (DCMC), you will need to replace the new key pair in the configuration file. Having the directory path readily available will make it easier for you to locate and modify the file when necessary.
Copy the content into the YAML file
For convenience, you can also copy the YAML file from here and edit the content as you need:
version: '3'

services:
  datawiza-access-proxy:
    image: registry.gitlab.com/datawiza/access-proxy
    container_name: datawiza-access-proxy
    restart: always
    ports:
      - "9772:9772"
    environment:
      PROVISIONING_KEY: replace-it-with-your-PROVISIONING-KEY
      PROVISIONING_SECRET: replace-it-with-your-PROVISIONING-SECRET
Please remember to replace the placeholder values with your own provisioning key and secret. If you happen to miss the instructions or cannot find your provisioning key and secret because it is only displayed once, you can follow these steps to re-create the provisioning key and secret:
- Navigate to the "Provisioning Keys" tab in the Datawiza Cloud Management Console (DCMC).
- Click on the "Create Key" button.
- Provide the necessary details and configurations.
- Click on the "Create" button to generate a new provisioning key and secret.
Note
Make sure that your docker-compose.yml file does not contain any tabs. They aren't allowed in YAML!
Login Docker Registry
Because our docker image is stored in a private registry, you need to login into our registry before you can start download this image.
docker login registry.gitlab.com -u datawiza-deploy-token -p {registry_token}
This token will displayed on the finished page or you can find it under the Quick Start sub-tab. 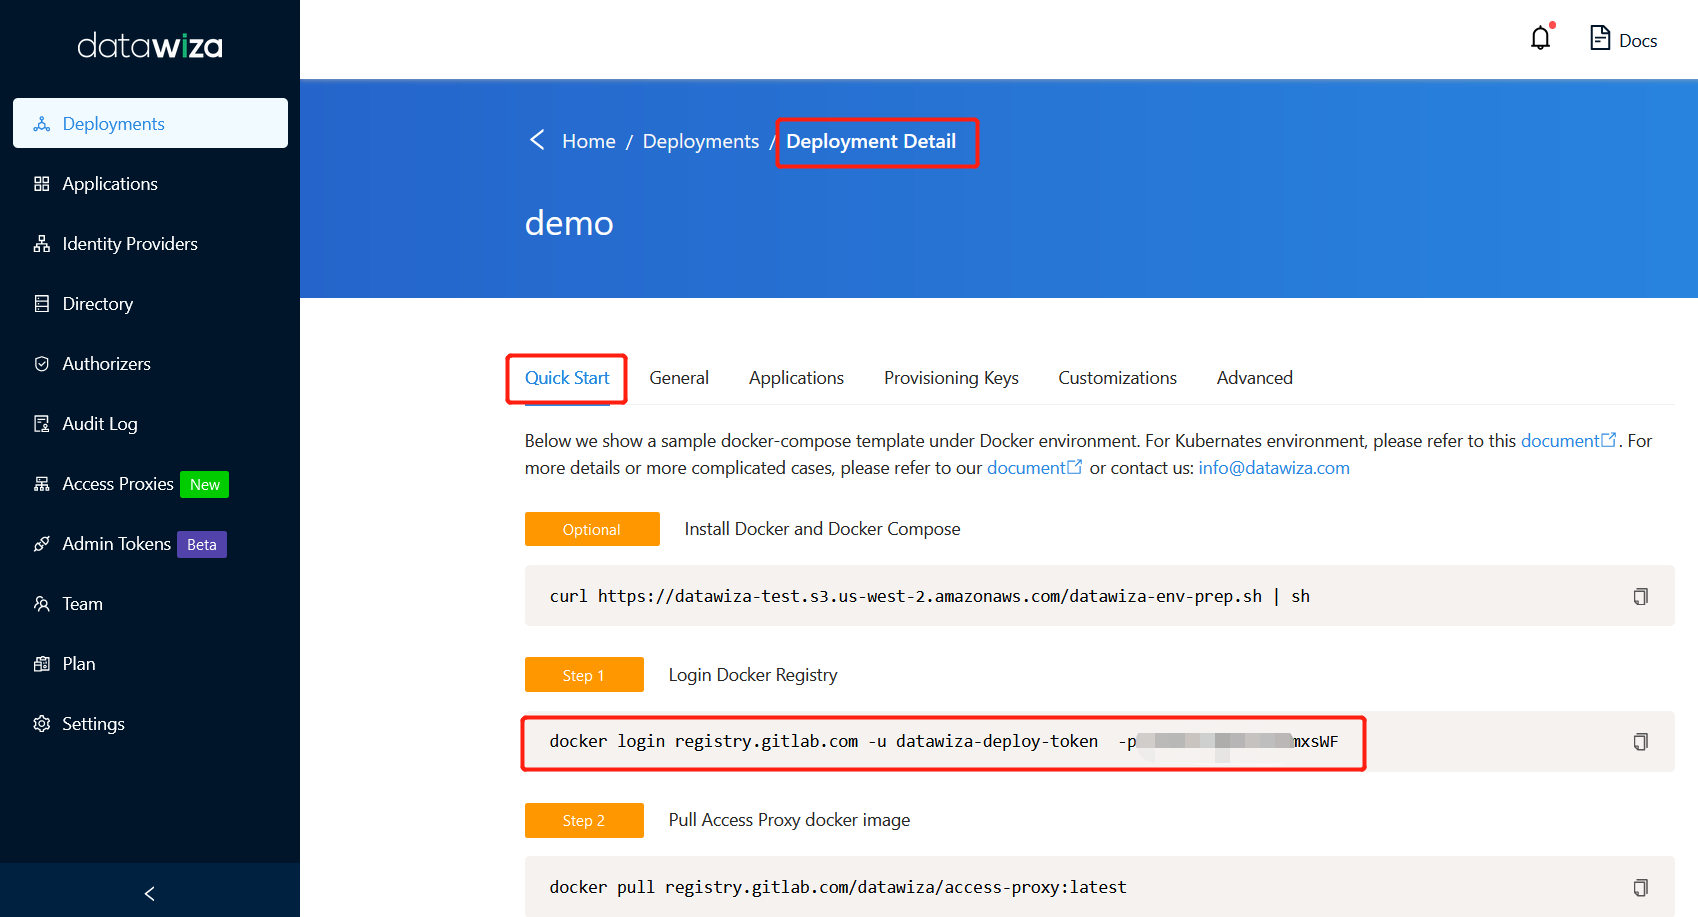
Start Datawiza Access Proxy
Use the following command to start DAP.
docker compose up -d
If you still having trouble to login the registry or start Datawiza Access Proxy, please contact us at info@datawiza.com.
Start DAP using Docker or Podman Directly
If you prefer not to use Docker Compose, you can run the DAP container directly using the run command. This is useful for quick testing or environments where you prefer to manage containers individually without a YAML file.
Using Docker Run
To start the proxy with Docker, use the following command. Replace the placeholders with your actual keys:
docker run -d --name datawiza-access-proxy \
  -p 9772:9772 \
  -e PROVISIONING_KEY=YOUR_PROVISIONING_KEY \
  -e PROVISIONING_SECRET=YOUR_PROVISIONING_SECRET \
  registry.gitlab.com/datawiza/access-proxy
Using Podman Run
DAP is fully compatible with Podman. If you are using a Red Hat-based system or prefer a daemonless container engine, run:
podman run -d --name datawiza-access-proxy \
  -p 9772:9772 \
  -e PROVISIONING_KEY=YOUR_PROVISIONING_KEY \
  -e PROVISIONING_SECRET=YOUR_PROVISIONING_SECRET \
  registry.gitlab.com/datawiza/access-proxy
Rootless Podman: If running in rootless mode, ensure the host port (e.g., 9772) is not within the privileged range (0-1023) unless you have configured your system to allow it.
Notes
- "9772:9772" maps docker host's port 9772 to container's port 9772. If your public domain uses another port, e.g., 8080, you should replace "9772:9772" with "8080:8080".
- If you are trying to deploy DAP with your own application, make sure that it is being hosted on the Docker network. Perform an
ip addr show docker0and host your application at this IP address with a given port number. Make sure this is consistent with theUpstream Serverfield in the DCMC. - Set
PROVISIONING_KEYandPROVISIONING_SECRETto the values you get from Step2: Datawiza Cloud Management Console. - If you get the following error when trying to run your
docker-composecommand, you will have to add your current user to the docker group using thegroupaddandusermodcommands. Follow the instructions here.
Got permission denied while trying to connect to the Docker daemon socket at unix:///var/run/docker.sock: Get http://%2Fvar%2Frun%2Fdocker.sock/v1.40/containers/json: dial unix /var/run/docker.sock: connect: permission denied
What is Next
From now on, you have successfully set up and started Datawiza Access Proxy, you can immediately enjoy the benefits of Single Sign-On (SSO) by visiting http://localhost:9772 in your browser.
For the advanced sections of this quick start tutorial, you can explore the following topics: