How to Restrict User Access to Datawiza Cloud Management Console Using Microsoft Entra ID
Managing user access to Datawiza Cloud Management Console (DCMC) is a critical part of building a secure and functional IT environment. Microsoft Entra ID offers robust tools for identity and access management, enabling administrators to control who can access specific applications and ensuring resources are only available to authorized users.
In this tutorial, we explore how you can restrict user access to DCMC with Microsoft Entra ID.
Why Restrict Access to DCMC?
Not every user in your organization needs access to DCMC. In fact, allowing unnecessary access could increase security risks and potentially expose sensitive data. Restricting access helps:
- Prevent unauthorized data access.
- Minimize security risks by adhering to the principle of least privilege.
- Simplify user management and improve organizational compliance with regulations.
With Microsoft Entra ID, you can restrict access by assigning DCMC to specific users, groups, or even conditions based on roles or sign-in behavior.
How to Restrict User Access to DCMC in Entra ID
Restricting access in Entra ID can generally be approached in the following ways:
Assign Access via Users or Groups: Restrict access by granting users or groups specific assignments to an application.
Use Conditional Access Policies:
Set policies that allow or block access to applications based on user, location, device compliance, and other signals.
Let's walk through these 2 options.
Option 1: Restrict Access Using Entra ID Users or Groups
The simplest and most scalable way to control access is to use Entra ID users and security groups.
1.1. Find the Application in Entra ID
Before restricting access, find the application for DCMC in your Entra ID tenant. To do this:
- Go to the Azure Portal.
- Navigate to Microsoft Entra ID > Enterprise Applications.
- Search for Datawiza Management Console.
1.2. Assign Access to Specific Users or Groups
Once you find the application, assign only the users and groups you want to allow access:
- Navigate to the application in Enterprise Applications.
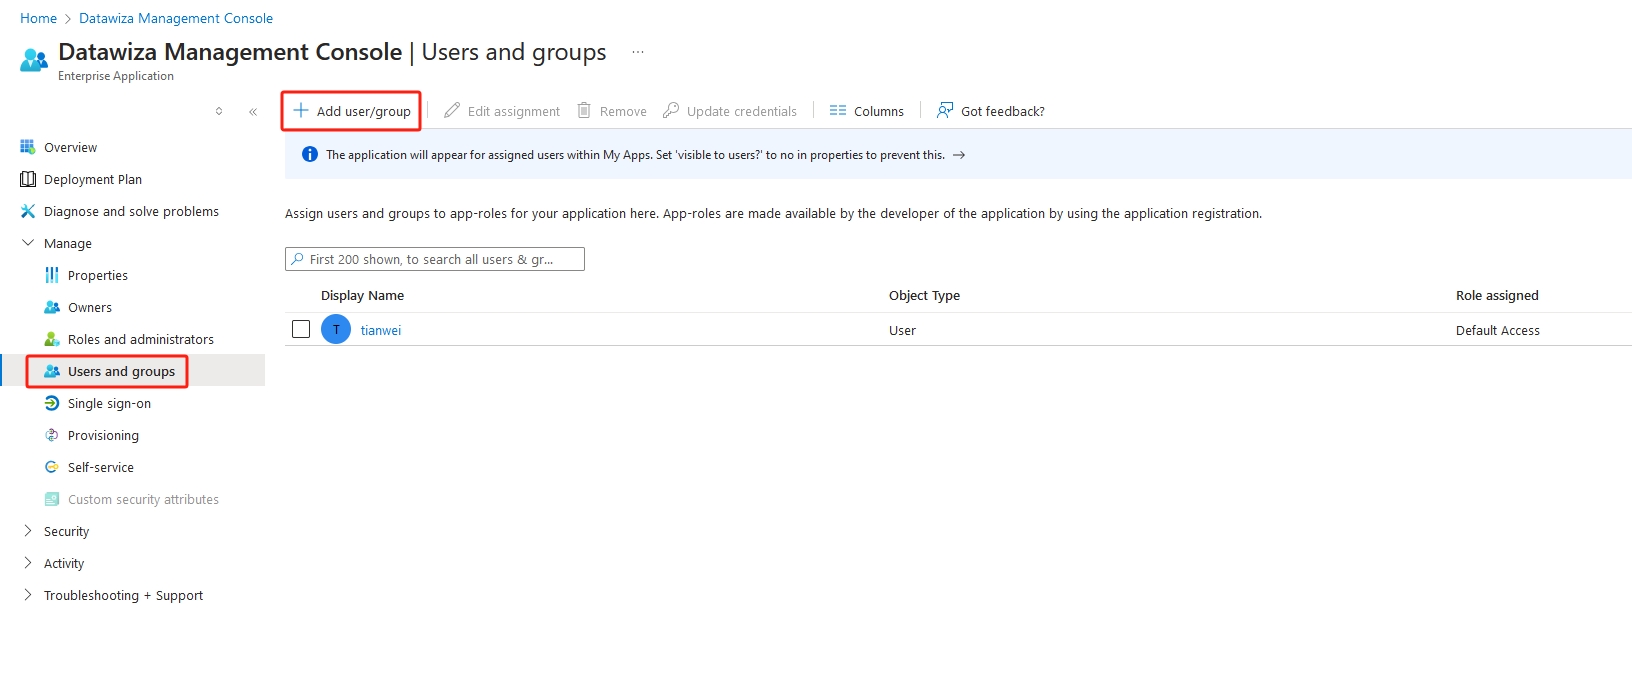
- Go to Users and Groups in the left-hand menu.
- Click + Add user/group.
- Select the specific users or groups that should have access and click Assign.

1.3. Enable User Assignment Required
To prevent unassigned users from accessing the app:
- Navigate to the application in Enterprise Applications.
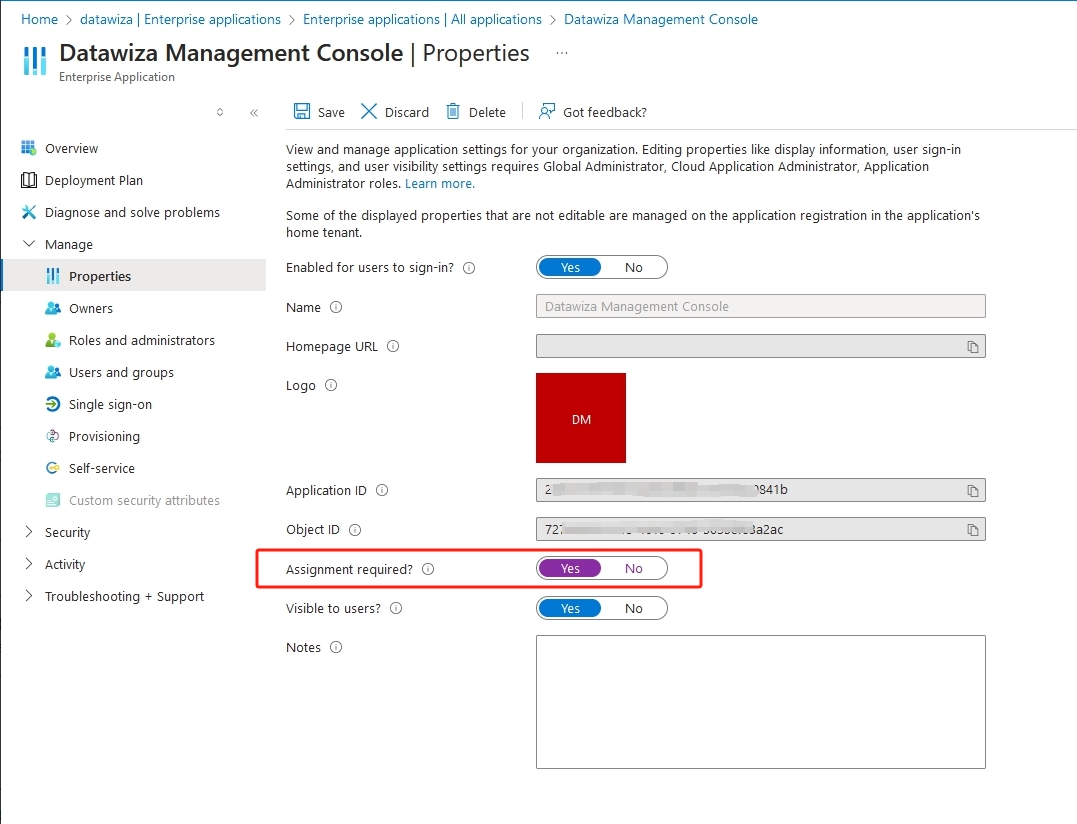
- Go to Properties.
- Set User assignment required? to Yes.
- Click Save.

Now only the assigned users or members of the assigned group will have access to that application.
Option 2: Restrict Access with Conditional Access Policies
If you need more advanced access restrictions, such as enforcing multifactor authentication (MFA) or blocking access based on geographic location, you can use Entra ID Conditional Access.
2.1. Create a Conditional Access Policy
- Go to the Microsoft Entra ID blade in the Azure Portal.
- Select Security > Conditional Access.
- Click + New policy.
- Name your policy and specify the conditions under which users can access the application.
2.2. Apply Conditions and Grant Controls
Define the conditions under which access is allowed, including the following:
- Users or Groups: Assign the policy to specific users or groups.
- Cloud Apps or Actions: Select the app (Datawiza Cloud Management Console) you're securing under "Cloud apps."
- Conditions: Define conditions like location, device platform, and sign-in risk levels.
- Access Controls: Set requirements such as allowing access only if MFA is enabled, or blocking access entirely.
Enable the policy by toggling On, then save your settings.
Monitor and Troubleshoot Access Controls
After implementing restrictions, an equally important step is monitoring and troubleshooting access to ensure everything works as expected. Entra ID provides auditing and reporting tools to help you:
- Check sign-in logs to understand who accessed the application and when.
- Identify failed login attempts that may indicate credential misuse or malicious activity.
How to Monitor Access
- Go to Microsoft Entra ID > Sign-ins in the Azure portal.
- Filter by users and applications to track access-related activity.
Best Practices for Restricting Access with Entra ID
- Use security groups for managing access at scale.
- Regularly review membership of security groups to ensure outdated roles or employees no longer have access.
- Enable Entra ID Identity Protection to detect risky sign-ins and enforce policies dynamically.
- Always enable MFA for sensitive applications to protect against unauthorized access.
Conclusion
In this tutorial, we explored how you can use Microsoft Entra ID to implement access restrictions and protect DCMC. By following the steps and best practices outlined, you can ensure that only authorized users have access to Datawiza Management Console and its sensitive data.
