Integrate Your Custom Web Application with Datawiza Access Proxy to Enable MFA and/or SSO
Overview
This tutorial shows how to add modern single sign on (SSO) login and multi-factor authentication (MFA) to your legacy apps or on-prem applications without modifying source code. Learn more about adding modern SSO and MFA to your legacy apps or on-prem applications with Datawiza.
Please note, this tutorial assumes prior knowledge of using Datawiza Access Proxy (DAP). If you're new to DAP, refer to Introduction to Datawiza Access Proxy to familiarize yourself with its functionalities. Our main objective here is to help you modify a couple of lines of your existing code so that you can integrate it with DAP.
Our tutorial is framed around an existing web application "WebApp" which currently relies on username-based authentication. By integrating with DAP, you can modernize its authentication with modern identity providers (IdPs), like Microsoft Entra ID, Azure AD B2C, Okta, Auth0, Ping Identity, Amazon Cognito and others.
We assume that the user has been successfully authenticated by DAP. Following authentication, DAP inserts a specific HTTP header, x-dw-username, in plaintext. Alternatively, it may insert an HTTP header, dw-token, in JWT format. The choice between these options depends on the configured settings of DAP. See the table below for the details of these headers.
| Header Name | Format | Value |
|---|---|---|
| x-dw-username | Plaintext | This user’s username in plaintext |
| dw-token | JWT | A JWT (JSON Web Token) including user's username |
When the application sees this special header, x-dw-username or dw-token, it should treat the user as an authenticated user. This tutorial provides guidance on how to implement such logic in the application and also the logic of logout. We will address both scenarios, whether the special header isx-dw-username or dw-token.
When preparing a Proof of Concept (PoC), we suggest employing the plaintext HTTP header,x-dw-username, for the sake of simplicity. However, for your production system, you might want to think about integrating the JWT token,dw-token, at a later stage. With JWT, your custom web application and DAP will share a secret. DAP will utilize this secret to sign the token, and subsequently, you can employ the same secret to verify it.
A Developer Tool
While developing your code, you might be pleased to learn that it's not necessary to keep DAP up and running to transfer headers. In fact, some useful browser extensions, e.g., ModHeader, are available to facilitate header-related development. To learn more about ModHeader and how to use it, please refer to ModHeader.
Here is a screenshot of ModHeader. 
For example, we can open the ModHeader and input the following values.
| Header Name | Value |
|---|---|
| x-dw-username | john |
Or
| Header Name | Value | Note |
|---|---|---|
| dw-token | eyJhbGciOiJIUzI1NiIsInR5cCI6IkpXVCJ9 .eyJ1c2VybmFtZSI6ImpvaG4ifQ .xhxiOgF2WzKr7QuxpQgdwZCxRwYUM23gHbA9NtLR3aU | The secret in this example is Your_Secret_Here |
Handling The Login Process of the Custom App
The process of determining user authentication will need a revision. Previously, confirmation of an active user was carried out by verifying the validity of the current session. Now, we'll adjust this logic to accommodate the new authentication method.
You can retain the initial session check. Nonetheless, if a user does not have a valid session, proceed by confirming the existence of a legitimate header. If a valid header is found, you can confidently consider this user as authenticated. This alternative check using the x-dw-username or dw-token header broadens the scope of user authentication in your application, adding an extra layer of flexibility.
When header x-dw-username is used
public class AuthFilter implements Filter {
    public void doFilter(ServletRequest req, ServletResponse res, FilterChain chain) {
        HttpServletRequest request = (HttpServletRequest) req;
        HttpServletResponse response = (HttpServletResponse) res;
        HttpSession session = request.getSession(false);
+       String headerUsername = request.getHeader("x-dw-username");

        if ((session != null && session.getAttribute("user" != null))
+           || headerUsername != null) {
            // the request has a valid user session or a valid username header
            chain.doFilter(req, res);
        } else {
            response.sendRedirect(request.getContextPath() + "/login.jsp");
        }

    }
}
session_start();

if ((isset($_SESSION['user']))
+   || (isset($_SERVER['HTTP_X_DW_USERNAME']))) {
    // the request has a valid user session or a valid username header
    // Continue processing
} else {
    // Redirect to login page
    header('Location: /login.php');
    exit();
}
// Implement FilterAttribute and IAuthorizationFilter
public class AuthFilter : ActionFilterAttribute, IAuthorizationFilter
{
    // OnAuthorization runs before the action method is called
    public void OnAuthorization(AuthorizationContext filterContext)
    {
        // Get user from session
        var user = HttpContext.Current.Session["user"];

        // Get username header
+       var headerUsername = HttpContext.Current.Request.Headers["x-dw-username"];

        // If the user session is not valid or headerUsername is not valid
        if (user != null
+           || headerUsername != null)
        {
            // the request has a valid user session or a valid username header
            // Continue processing

        } else
        {
            // Redirect to login page
            filterContext.Result = new RedirectResult("~/Account/LogOn");
        }
    }
}
When header dw-token is used
public class AuthenticationFilter implements Filter {

    @Override
    public void doFilter(ServletRequest req, ServletResponse res, FilterChain chain): throws IOException, ServletException {
        HttpServletRequest request = (HttpServletRequest) req; HttpServletResponse response = (HttpServletResponse) res; HttpSession session = request.getSession(false);

        String requestURI = request.getRequestURI();

        // Get the user from session and authentication header
        Object user = session != null ? session.getAttribute("user") : null;
+       String authToken = request.getHeader("dw-token");

        // Check if either the user
        if ((user != null)
+           || (authToken != null && isValidUserToken(authToken))) {
            chain.doFilter(req, res);
        } else {
          if (requestURI.endsWith("login")) {
              chain.doFilter(req, res);
          } else {
              response.sendRedirect(request.getContextPath() + "/login");
          }
        }
    }

+   /* Use this method to validate authToken in JWT format
+   * @param authToken, a JWT token containing x-dw-username
+   * @return true if the token is valid, false otherwise
+   **/
+   private boolean isValidUserToken(String authToken) {
+       // Your logic to validate/authenticate the token comes here
+       // return true if it is valid, otherwise return false
+       String secret = "Your_Secret_Here";
+       try {
+           Claims claims = Jwts.parserBuilder()
+                   .setSigningKey(secret.getBytes())
+                   .build()
+                   .parseClaimsJws(authToken)
+                   .getBody();
+
+           if (claims.get("username") != null) {
+               // Username exists in the token
+               return true;
+           } else {
+               return false;
+           }
+       } catch (ExpiredJwtException e) {
+           // token expired
+           // some code to handle the exception properly
+           return false;
+       } catch (JwtException e) {
+           // any other exceptions
+           // some code to handle the exception properly
+           return false;
+       }
+   }
}
class AuthenticationFilter
{
    public function handle($request, Closure $next) {

        // Get the user from session and authentication header
        $user = $request->session()->get('user', null);
+       $authToken = $request->header('dw-token');

        if (($user != null)
+           || ($authToken != null && $this->isValidUserToken($authToken)))
            return $next($request);

        if (Str::endsWith($request->getRequestUri(), 'login')) {
            return $next($request);
        } else {
            return redirect()->to('login');
        }
    }

+   /**
+   * Use this method to validate authToken in JWT format
+   * @param authToken, a JWT token containing x-dw-username
+   * @return true if the token is valid, false otherwise
+   **/
+   private function isValidUserToken($authToken) {
+       // Your logic to validate/authenticate the token comes here
+       // return true if it is valid, otherwise return false
+       $secret = 'Your_Secret_Here';
+       try {
+           $decoded = JWT::decode($authToken, $secret, array('HS256'));
+           if ($decoded->username != null) {
+               // user exist
+               return true;
+           } else {
+               return false;
+           }
+
+       } catch (\Firebase\JWT\ExpiredException $e) {
+           // token expired
+           // some code to handle the exception properly
+           return false;
+       } catch (\Exception $e) {
+           // any other exception
+           // some code to handle the exception properly
+           return false;
+       }
+   }
}
public class AuthenticationMiddleware {
    private readonly RequestDelegate _next;

    public AuthenticationMiddleware(RequestDelegate next) {
        _next = next;
    }

    public async Task InvokeAsync(HttpContext context) {
        var user = context.Session.GetString("user");
+       var authToken = context.Request.Headers["dw-token"];

        if (user != null) {
            await _next(context);
+        } else if (authToken.Count > 0 && IsValidUserToken(authToken, out string validatedUsername)){
+            // If the token is valid, then issue a session
+            context.Session.SetString("user", validatedUsername);
+            await _next(context);
        } else {
            if (context.Request.Path.Value.EndsWith("login"))
                await _next(context);
            else
                context.Response.Redirect("/login");
        }
    }

+   /**
+   * Use this method to validate authToken in JWT format
+   * @param authToken, a JWT token containing x-dw-username
+   * @param out validatedUsername, a validated username
+   * @return true if the token is valid, false otherwise
+   **/
+   private bool IsValidUserToken(string authToken, out string? validatedUsername) {
+       // Your logic to validate/authenticate the token comes here
+       // return true if it is valid, otherwise return false
+       string secret = "Your_Secret_Here";
+       var tokenHandler = new JwtSecurityTokenHandler();
+       // Assume you are using HS256 algo to encrypt
+       SymmetricSecurityKey signingKey = new SymmetricSecurityKey(Encoding.ASCII.GetBytes(secret.PadRight((256 / 8), '\0')));
+       try {
+           var tokenValidationParameters = new TokenValidationParameters {
+               ValidateIssuerSigningKey = true,
+               IssuerSigningKey = signingKey,
+               ValidateIssuer = false,
+               ValidateAudience = false,
+               ValidateLifetime = false,
+           };
+
+           var claimsPrincipal = tokenHandler.ValidateToken(authToken, tokenValidationParameters, out var rawValidatedToken);
+
+           if (((JwtSecurityToken)rawValidatedToken).Claims.Any(x => x.Type == "x-dw-username")) {
+               // x-dw-username exists in the token
+               validatedUsername = claimsPrincipal.Claims.FirstOrDefault(c => c.Type == "x-dw-username").ToString();
+               return true;
+           }
+           else {
+               validatedUsername = null;
+               return false;
+           }
+       }
+       catch (Exception) {
+           // Any other exception resulting in validation failure
+           validatedUsername = null;
+           return false;
+       }
+   }
}
Handling The Logout Process of the Custom App
When handling user logout operations, our approach will change somewhat. Earlier, the procedure involved clearing the user's session and then redirecting to the login page. Now, the SSO mechanism necessitates us to do more.
In addition to resetting their session, we'll need to inform and clear the DAP session as well. We achieve this by redirecting the user to a specific path, /datawiza/ab-logout. This extra step ensures that both application and DAP sessions terminate simultaneously, maintaining sync and security between the two systems.
// and here is logout related configuration
.logout()
    .logoutUrl("/logout") // custom logout URL
-   .logoutSuccessUrl("/login") // where to redirect after logout
+   .logoutSuccessUrl("/datawiza/ab-logout") // redirect to this datawiza endpoint to clear datawiza session
    .invalidateHttpSession(true)  // it should invalidate session
    .deleteCookies ("JSESSIONID") // it should delete your cookies
    .permitAll();
function logout(){
-  $logoutSuccessUrl = "/login";
+  $logoutSuccessUrl = "/datawiza/ab-logout";

  // Clearing session
  $_SESSION = array();

  // Deleting session cookie.
  if (ini_get("session.use_cookies")) {
      $params = session_get_cookie_params();
      setcookie(session_name(), '', time() - 42000,
          $params["path"], $params["domain"],
          $params["secure"], $params["httponly"]
      );
  }

  // Invalidating the session.
  session_destroy();

  // Redirecting to the logout success url.
  header("Location: $logoutSuccessUrl");
  exit;
}
[HttpPost]
public async Task<IActionResult> Logout()
{
    // Clearing authentication cookies
    await HttpContext.SignOutAsync(CookieAuthenticationDefaults.AuthenticationScheme);

    // Clearing session
    HttpContext.Session.Clear();

    // Redirecting to the logout success url.
-    return Redirect("/login"); // where to redirect after logout
+    return Redirect("/datawiza/ab-logout"); // redirect to this datawiza endpoint to clear datawiza session
}
(Optional) Changing the default logout redirect page
By default, DAP redirects the user to its default logout page, /datawiza/login.html. But, you may wish to redirect users to a different page upon logout, possibly something more tailored to your application's design or workflow.
To change the logout redirect, navigate to the advanced settings page on the Datawiza console. Here, you can modify the Logout Redirect URI value to your desired destination page.
Please refer to the screenshot below to better understand these steps.
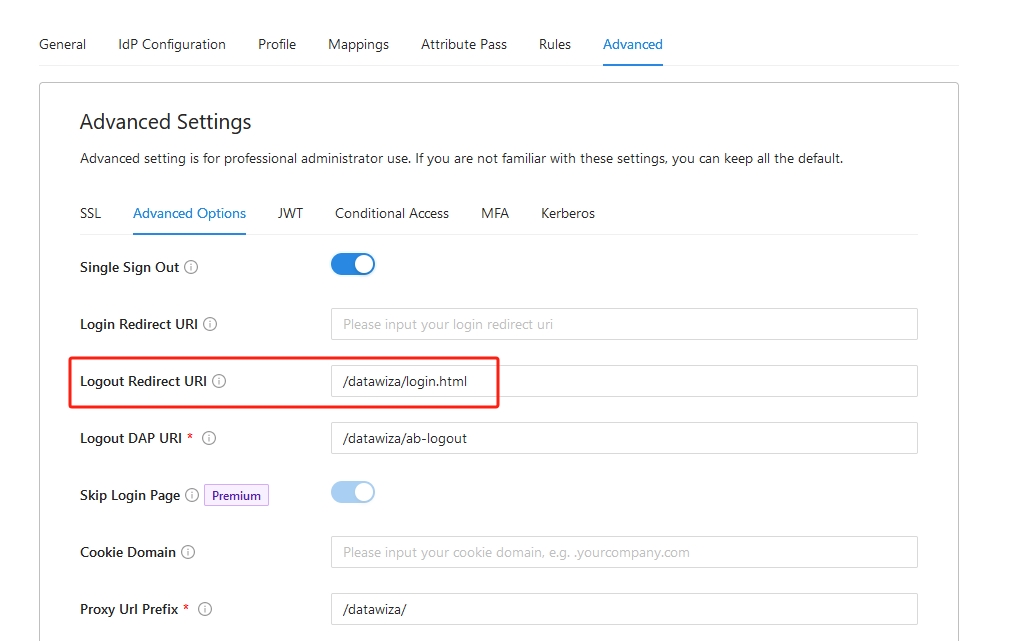 Don't forget to save your settings once you've altered the URI. This way, you can personalize the logout user experience to better suit your application's needs.
(Optional) Single logout IdP
For enhanced security in scenarios like B2C (e.g., using Auth0, Microsoft External ID, or other social logins), you can configure your application to terminate the user's session not only within your app but also at the Identity Provider (IdP). This is known as Single Logout (SLO).
SLO is recommended when you want the logout action to clear the user's central identity session, providing a more secure and seamless end-user experience.
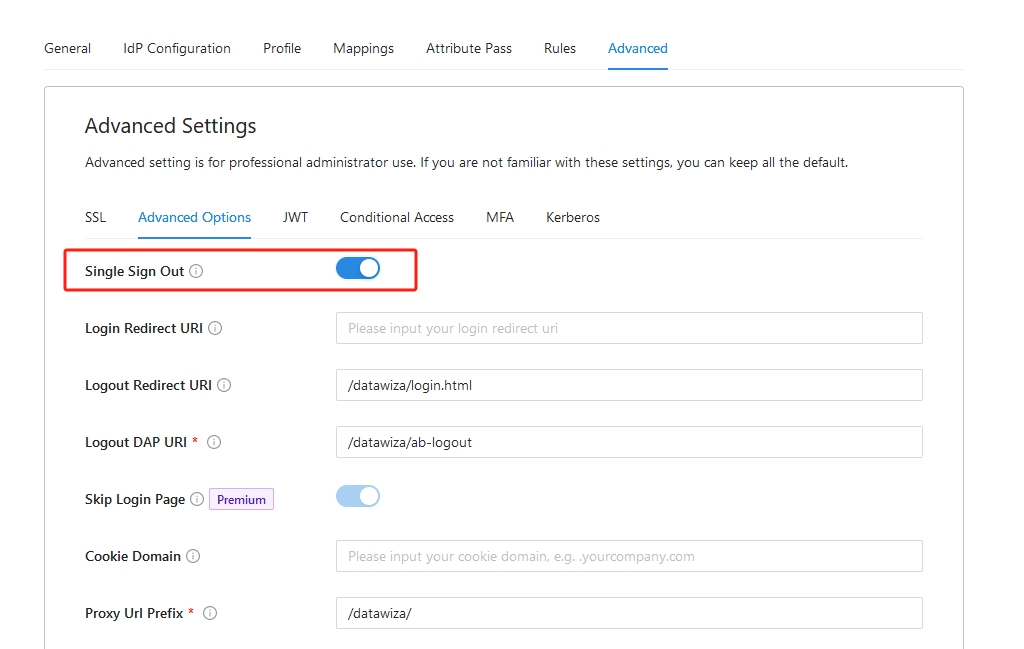
How to Enable Single Logout
- Navigate to your application's Advanced Settings in the Datawiza console.
- Locate and check the Enable Single Logout option.
- Save your configuration.
Note
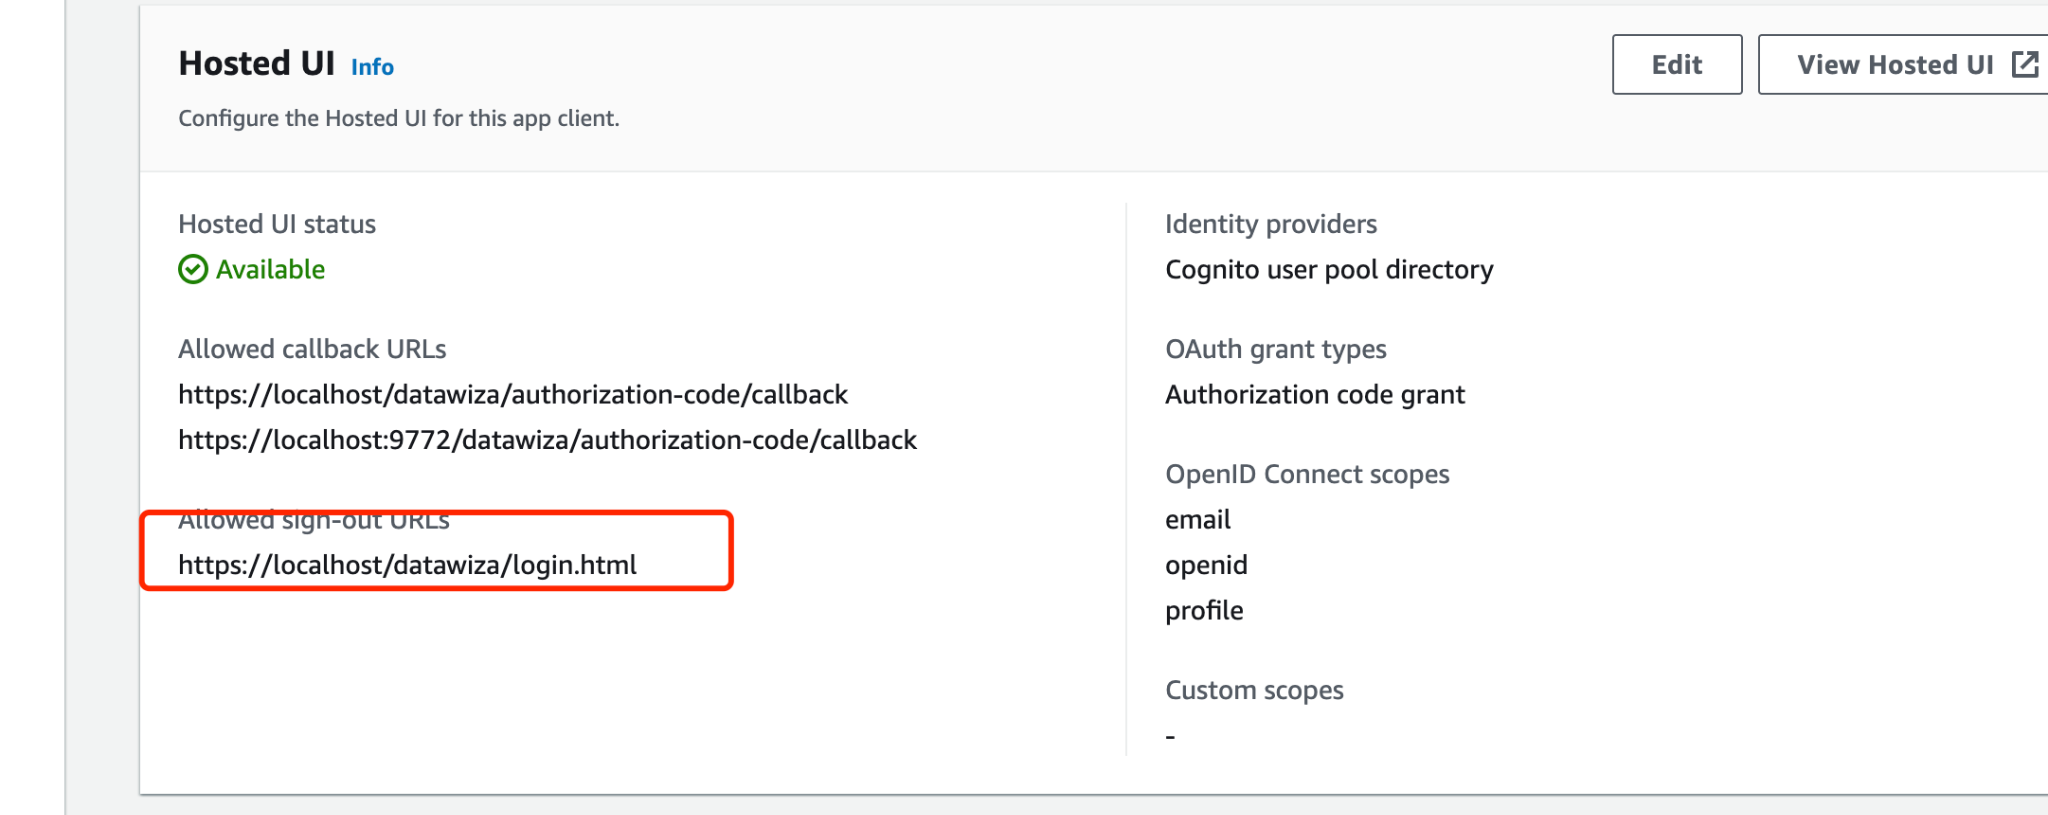
If you enable the Single Sign Out option, it's crucial to ensure that the Logout Redirect URI matches the settings on your Identity Provider (IdP) side.
The corresponding setting in IdP is frequently labeled as Allowed sign-out URL. However, the terminology may vary across different IdPs. By aligning these settings, you can ensure a smooth and secure login and logout experience for your users. Always verify this match to avoid unnecessary login issues or restrictions.
Summary
In this guide, you've learned how to adjust your custom application's code with minimal code changes to integrate with DAP, enabling modern auth to your custom application.
If you encounter any issues or have any questions about the process, don't hesitate to reach out to our support team. We're here to help you every step of the way.