
Okta Auth for ChatGPT MCP Servers with Datawiza Agent Gateway
Overview
This tutorial shows how to add Okta authentication to an existing MCP server using Datawiza Agent Gateway — without modifying the server itself.
Datawiza Agent Gateway sits in front of your MCP server, handles the Okta login flow, validates the user, enforces access policy, and forwards only authenticated MCP traffic to the backend. Your MCP server stays focused on its tools and never needs to implement enterprise OAuth.
Architecture
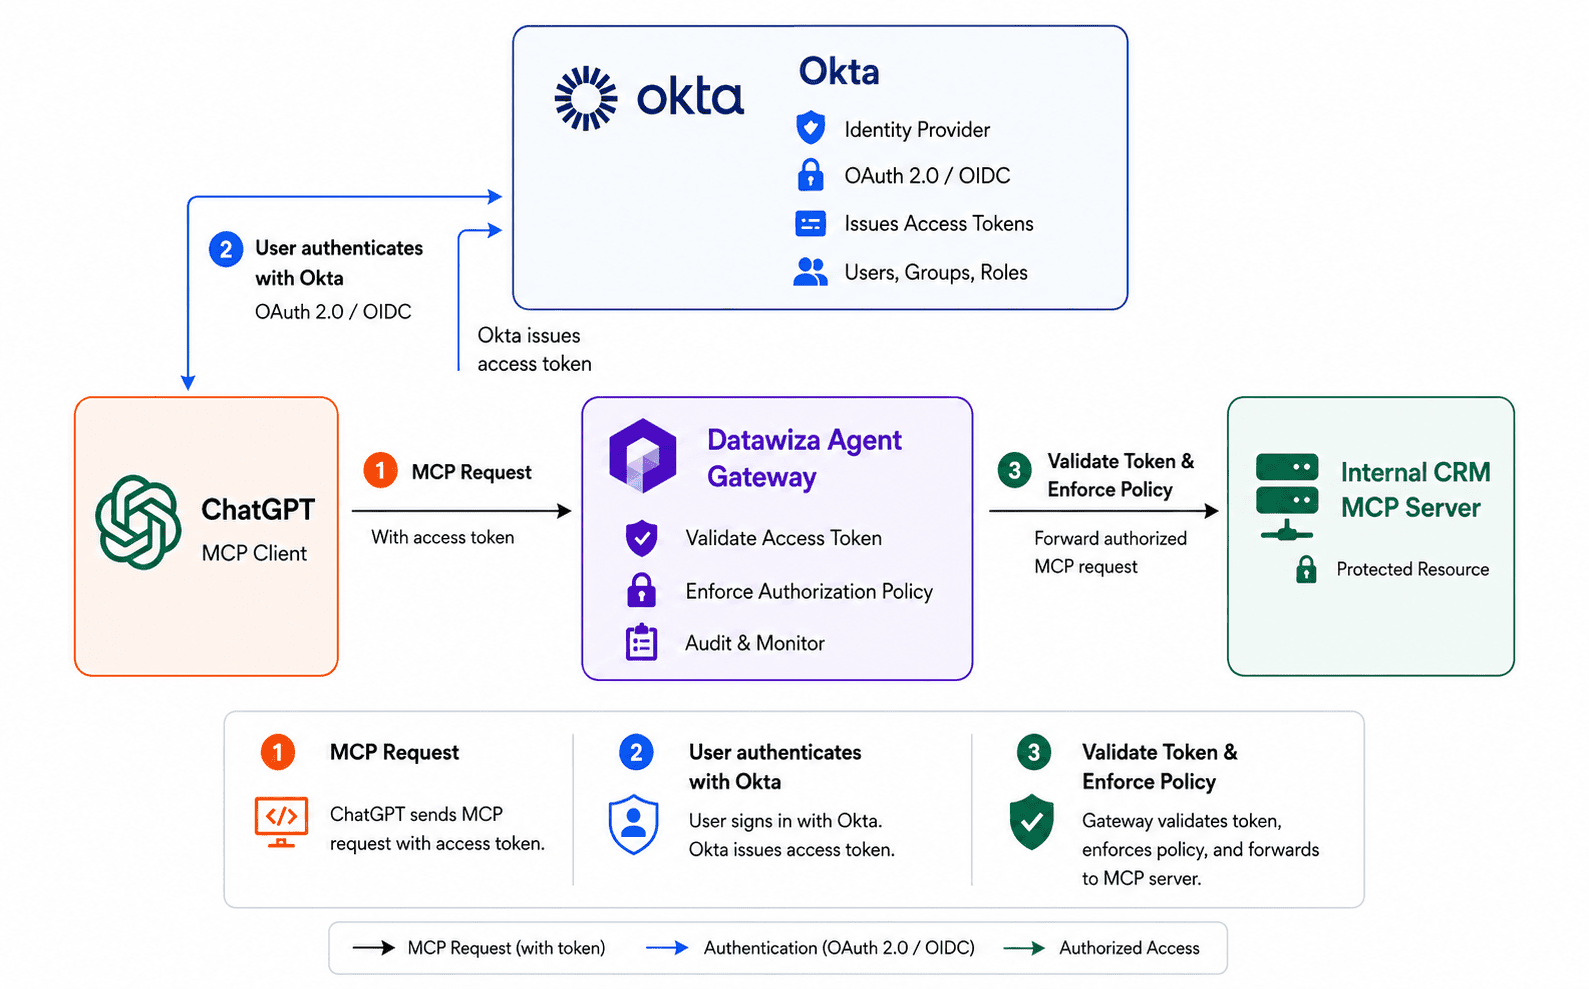
MCP over HTTP supports authorization at the transport layer. Protected MCP servers can require OAuth-style bearer tokens before granting access to tools. Since authorization is optional in the MCP spec, many internal servers skip it entirely — which is exactly where a gateway pattern adds value.
What You Will Build
By the end of this tutorial you will have a Datawiza-protected public endpoint sitting in front of your existing internal MCP server:
https://crm-mcp.company.com/mcp     ← protected endpoint ChatGPT connects to
http://internal-crm-mcp:3000/mcp    ← your existing MCP server (stays internal)
ChatGPT connects only to the protected endpoint. The internal MCP server is unreachable from outside your network.
The examples throughout this tutorial use a sample internal CRM server as the backend. This is illustrative — you will substitute your own MCP server. The sample server exposes three tools:
| Tool | Description |
|---|---|
get_customer_profile | Retrieve a customer's profile by ID |
list_customer_orders | List recent orders for a customer |
create_support_ticket | Open a support ticket on behalf of a customer |
Why This Pattern Matters
Many MCP servers are easy to build but do not include enterprise-grade authentication. This is risky when tools expose CRM records, orders, tickets, finance data, or internal APIs.
With Datawiza Agent Gateway, responsibilities stay separate:
- MCP server developers build business tools.
- Identity teams manage authentication and access policy.
- ChatGPT users authenticate with Okta before any tool is available.
Prerequisites
An Okta organization (developer or production) with admin access
Permission to create a custom Authorization Server in Okta (add a scope and an access policy rule) and to create App Integrations — in production orgs this requires Okta's API Access Management feature (included by default in Developer/Integrator Free orgs). Creating a dedicated server is preferred; if you don't have this permission, reusing the built-in
defaultAuthorization Server also works and needs the same feature — see the tip in Step 1.A Datawiza Agent Gateway Console (DAGC) account
A Linux host reachable from the internet on port 443 to run the gateway container
Docker and Docker Compose installed on the gateway host (the setup script in Step 2.5 can install these for you)
A public hostname for the protected MCP endpoint
A TLS certificate from a trusted CA for that hostname
An existing MCP server accessible on your internal network
A ChatGPT Plus, Pro, Business, or Enterprise plan with custom MCP connectors available (some plans gate this behind a Developer mode setting — see Step 3)
Write-capable tools may be restricted on some plans
OpenAI's own documentation is inconsistent about which plans support write-capable (not just read/fetch) MCP tools — some pages describe full support on Plus/Pro, others reserve it for Business/Enterprise/Edu. This tutorial's sample server includes
create_support_ticket, a write action, so if you're on Plus or Pro, verify that tool actually runs in your account before relying on this pattern for write operations.
Step 1: Configure Okta
Okta separates MCP authorization across two objects:
- The Authorization Server, which defines the audience, issuer, and scope the protected MCP endpoint accepts — the resource side. This tutorial creates a dedicated custom Authorization Server for this integration, so its scope and access policy stay isolated from every other app in your Okta tenant.
- An App Integration, which is what ChatGPT actually signs users into — the client side, holding the redirect URI and requesting the Authorization Server's scope on the user's behalf.
This mirrors standard OAuth practice: the Authorization Server is never involved in a browser redirect, and the App Integration never defines API scopes directly.
Reusing the built-in default Authorization Server instead
If you'd rather reuse Okta's built-in default Authorization Server instead of creating a dedicated one — e.g., you already lean on it for other APIs — the same scope and policy steps apply there. Skip Step 1.1 and use default's own Issuer and Audience (Security > API > Authorization Servers > default) for the rest of this tutorial. Wherever the rest of this tutorial refers to the CRM MCP Gateway Authorization Server, use default; wherever it says api://crm-mcp-gateway/access, use api://default/access. In Step 2.3, enter default's own Issuer and Audience (the Audience is typically api://default). Other uses of the name CRM MCP Gateway, such as the DAGC deployment name and the scope's display phrase and description, can stay as written.
Other apps in your tenant may already use default. Follow Step 1.4 to restrict access to the MCP scope while preserving those apps' required access.
1.1 Create a Custom Authorization Server
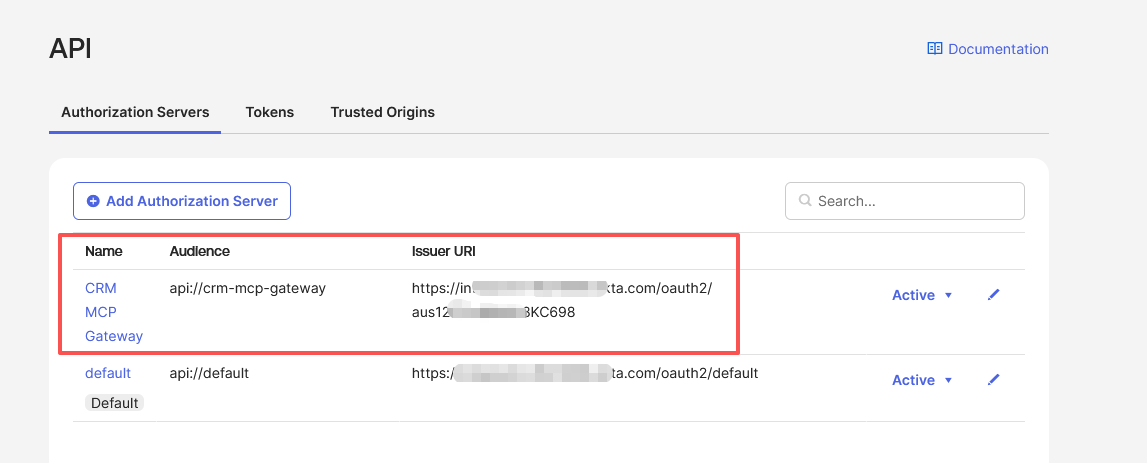
In the Okta admin console, go to Security > API > Authorization Servers, and click Add Authorization Server.
Fill in:
Field Value Name CRM MCP GatewayAudience api://crm-mcp-gatewayDescription Issues tokens for ChatGPT to access the CRM MCP Gateway.Click Save. Back on the Authorization Servers list, find the
CRM MCP Gatewayrow and copy its Issuer URI:https://<your-okta-domain>/oauth2/<authorization-server-id>You'll use this Issuer URI, together with the Audience shown in the same row, in Step 2.3.
1.2 Add a Custom Scope
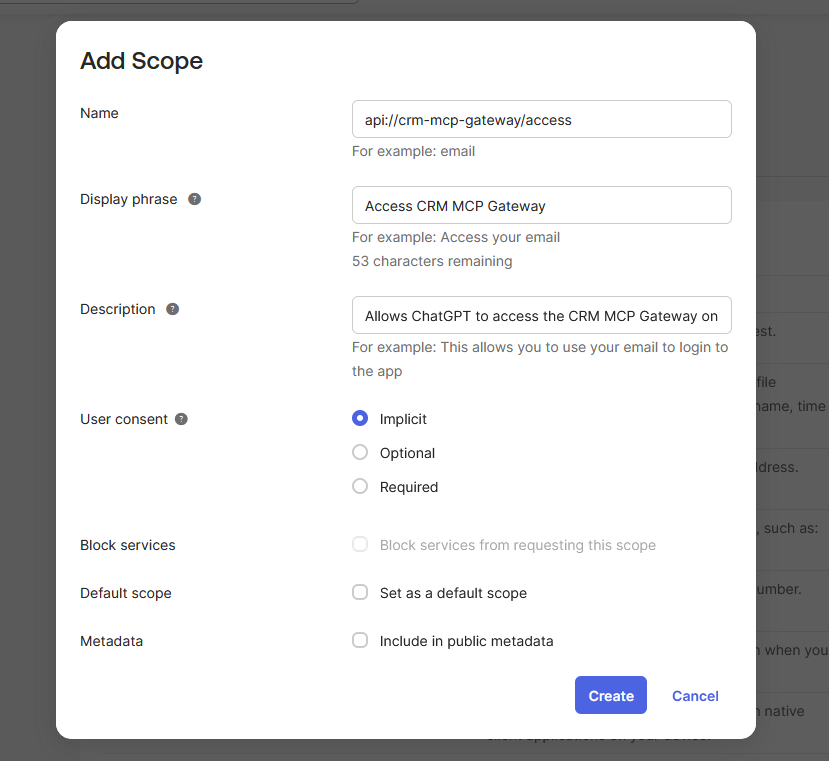
On the Authorization Servers list, click
CRM MCP Gatewayto open it, then go to the Scopes tab and click Add Scope.Fill in:
Field Value Name api://crm-mcp-gateway/accessDisplay phrase Access CRM MCP GatewayDescription Allows ChatGPT to access the CRM MCP Gateway on behalf of the signed-in user.Click Create.
1.3 Register the App Integration
This is the app ChatGPT actually signs users into.
Go to Applications > Applications and click Create App Integration.
Choose OIDC - OpenID Connect as the sign-in method and Native Application as the application type, then click Next.
ChatGPT's custom connector form lets you register your own OAuth client and doesn't require a client secret — so it authenticates as a public client using authorization code + PKCE. Native Application is Okta's public-client integration type: it supports PKCE and lets you add an arbitrary redirect URI, unlike Web Application, which expects a client secret.
Fill in:
Field Value App integration name ChatGPT CRM MCP ClientGrant type Leave the default Authorization Code checked, and also check Refresh Token Sign-in redirect URIs Leave the default placeholder for now Controlled access Assign to the groups that should be able to use this connector, or Allow everyone in your organization to access Enable Refresh Token to avoid repeated logins
Without the Refresh Token grant, ChatGPT has no way to renew the access token once it expires — the user has to manually reconnect the connector every time. Checking it lets ChatGPT silently obtain a new access token in the background, so the user stays connected across sessions.
Redirect URI is unique per connector, not fixed
ChatGPT doesn't use one shared redirect URI across all custom connectors. Each connector gets its own callback URL (e.g.
https://chatgpt.com/connector/oauth/S2tqhGpwDpxd), generated when you configure OAuth for that connector in Step 3.1. You'll come back and replace the placeholder redirect URI with that connector-specific value once ChatGPT generates it.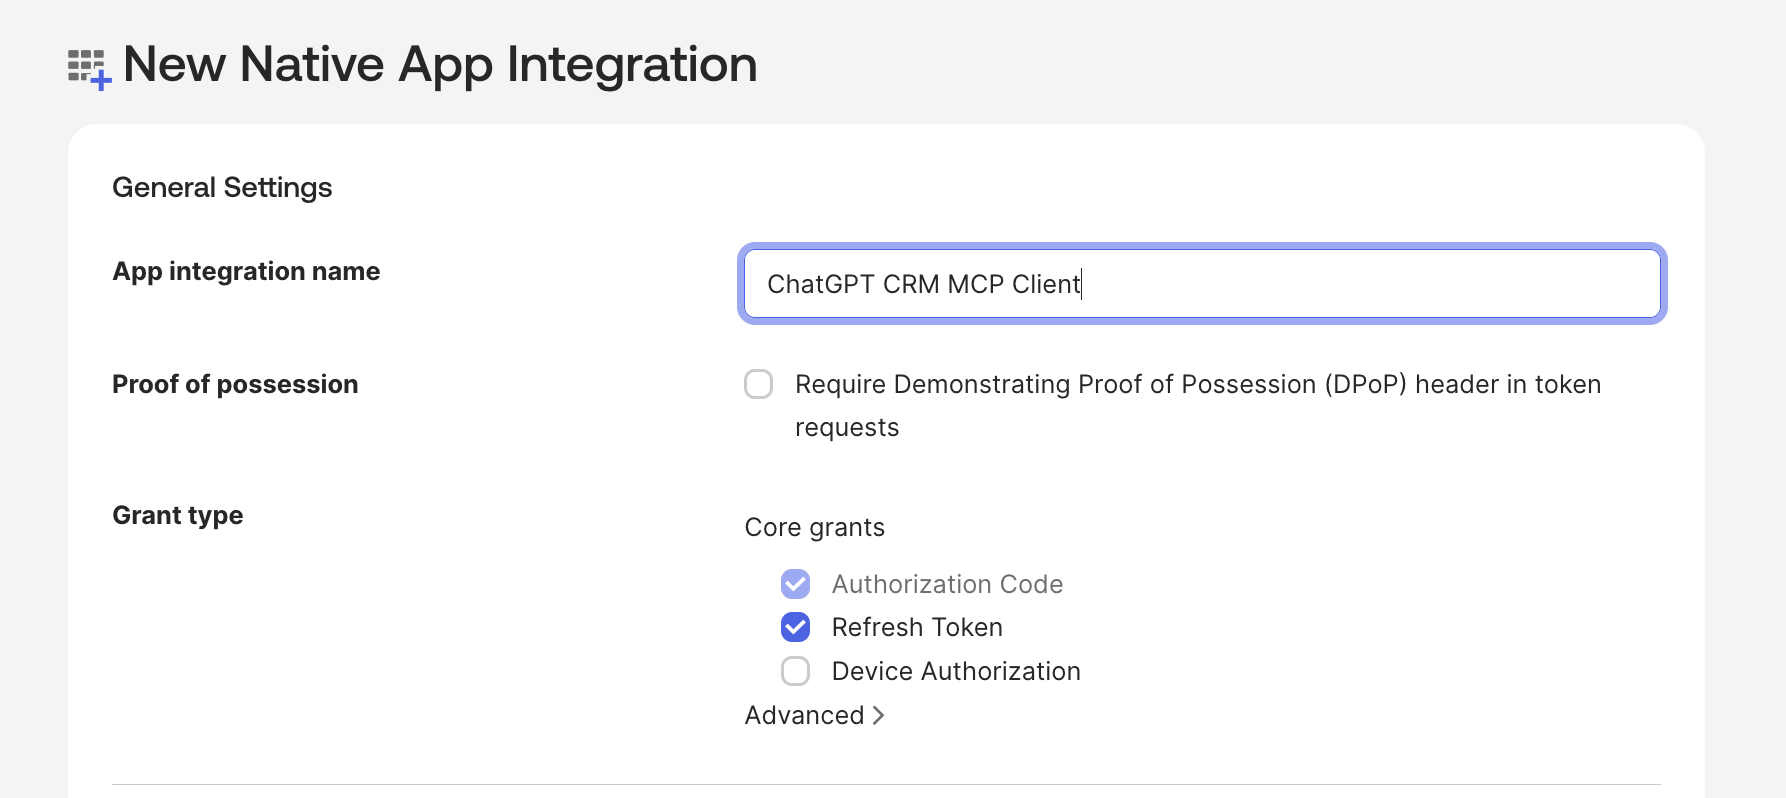
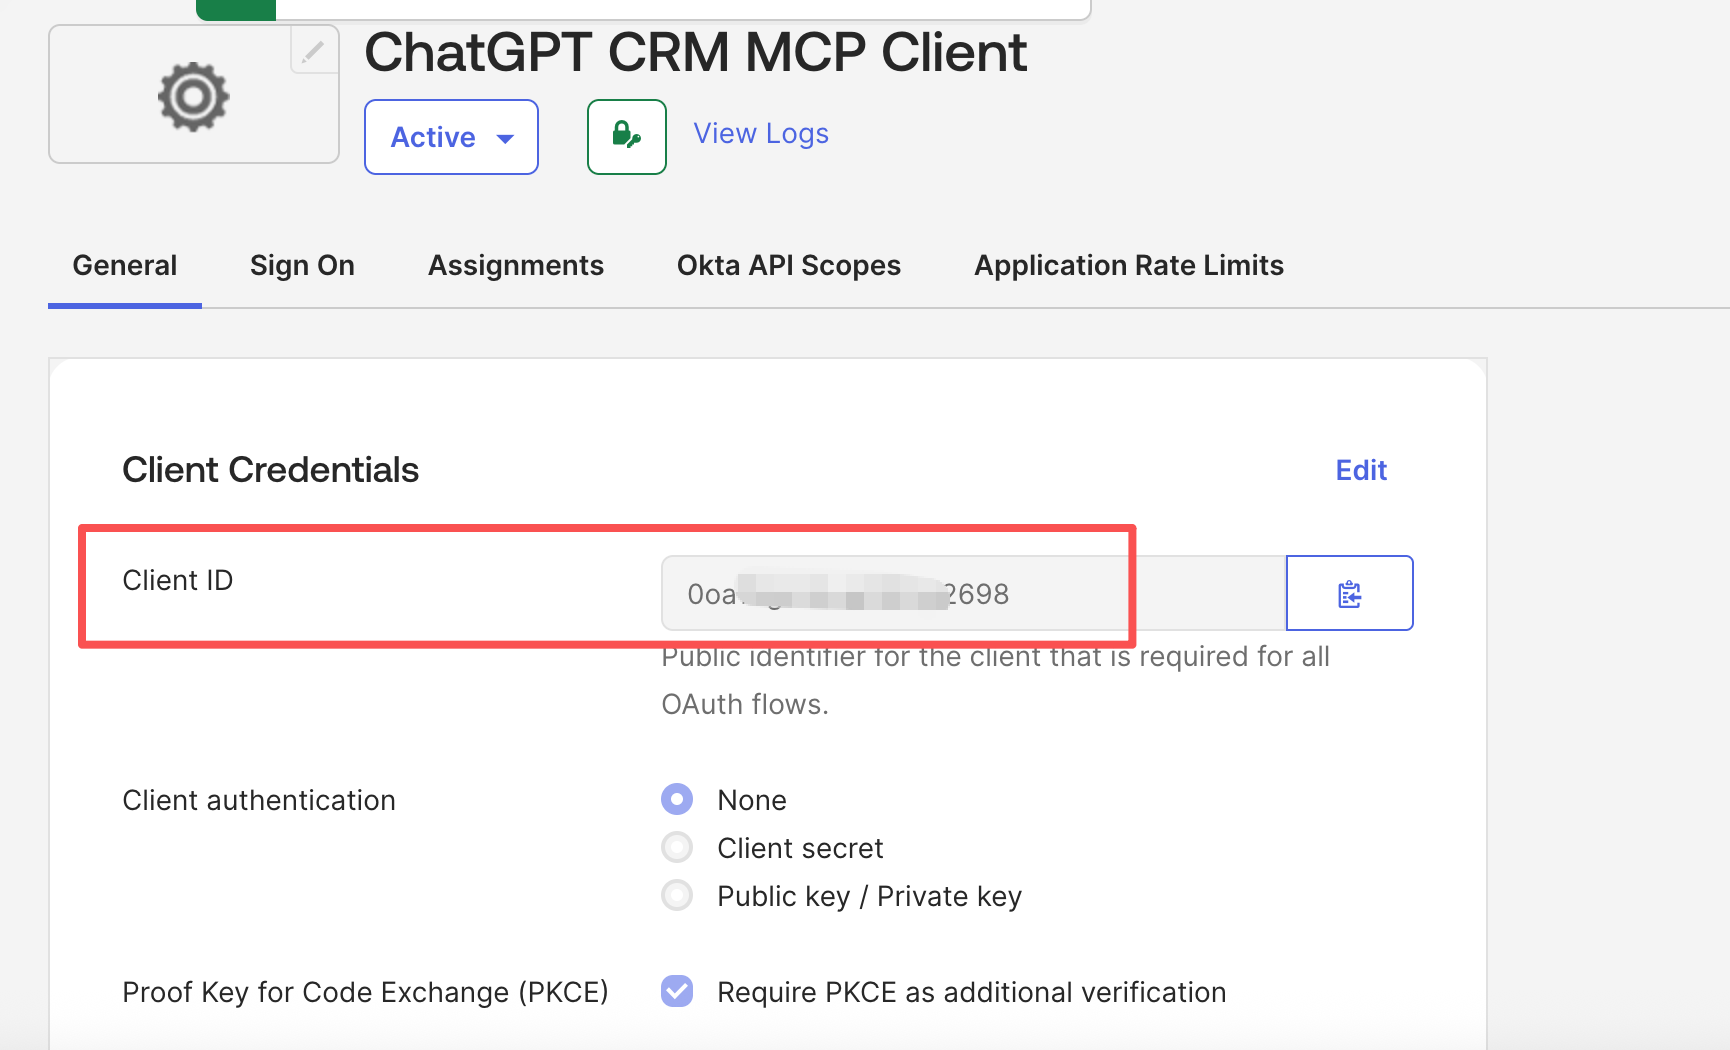
Click Save. On the app's General tab, copy the Client ID — you'll need it in Step 3.
Assignment is required
Unlike an Entra ID single-tenant app, an Okta App Integration only lets in the users or groups you explicitly assign on its Assignments tab (unless you chose Allow everyone in your organization to access in the step above). If a user's sign-in fails with "You do not have access," check this app's assignments.
1.4 Restrict the Access Policy
Datawiza validates a token's issuer, audience, and scope, but not which client requested it — so whoever can obtain a token carrying api://crm-mcp-gateway/access can call the MCP endpoint. Create an access policy assigned only to ChatGPT CRM MCP Client, then add the rule below.
Adding this policy isn't enough on its own if a broader policy already exists: a policy assigned to All clients still matches every client a narrower, client-specific policy doesn't cover, regardless of which policy has higher priority. Check the Access Policies tab for any existing policy granting Any scopes to All clients, and narrow its scopes so it can't also hand out the MCP scope.
If you reused `default`
default typically ships with its own Default Policy granting Any scopes to All clients. Don't just add a new policy for ChatGPT CRM MCP Client and leave that one in place — edit the Default Policy Rule's Scopes requested setting and replace Any scopes with an explicit list that excludes api://default/access, keeping whatever scopes your other apps already rely on.
Go to the Access Policies tab of the
CRM MCP GatewayAuthorization Server and click Add New Access Policy.Set Assigned to to
ChatGPT CRM MCP Clientspecifically — notAll clients.Add a rule:
Field Value Rule Name ChatGPT CRM MCP AccessGrant type is Authorization CodeUser is Any user assigned the app Scopes requested The following scopes: openid,profile,offline_access, andapi://crm-mcp-gateway/accessClick Create Rule (or Save).
Step 2: Configure Datawiza Agent Gateway
2.1 Sign in and click Getting Started
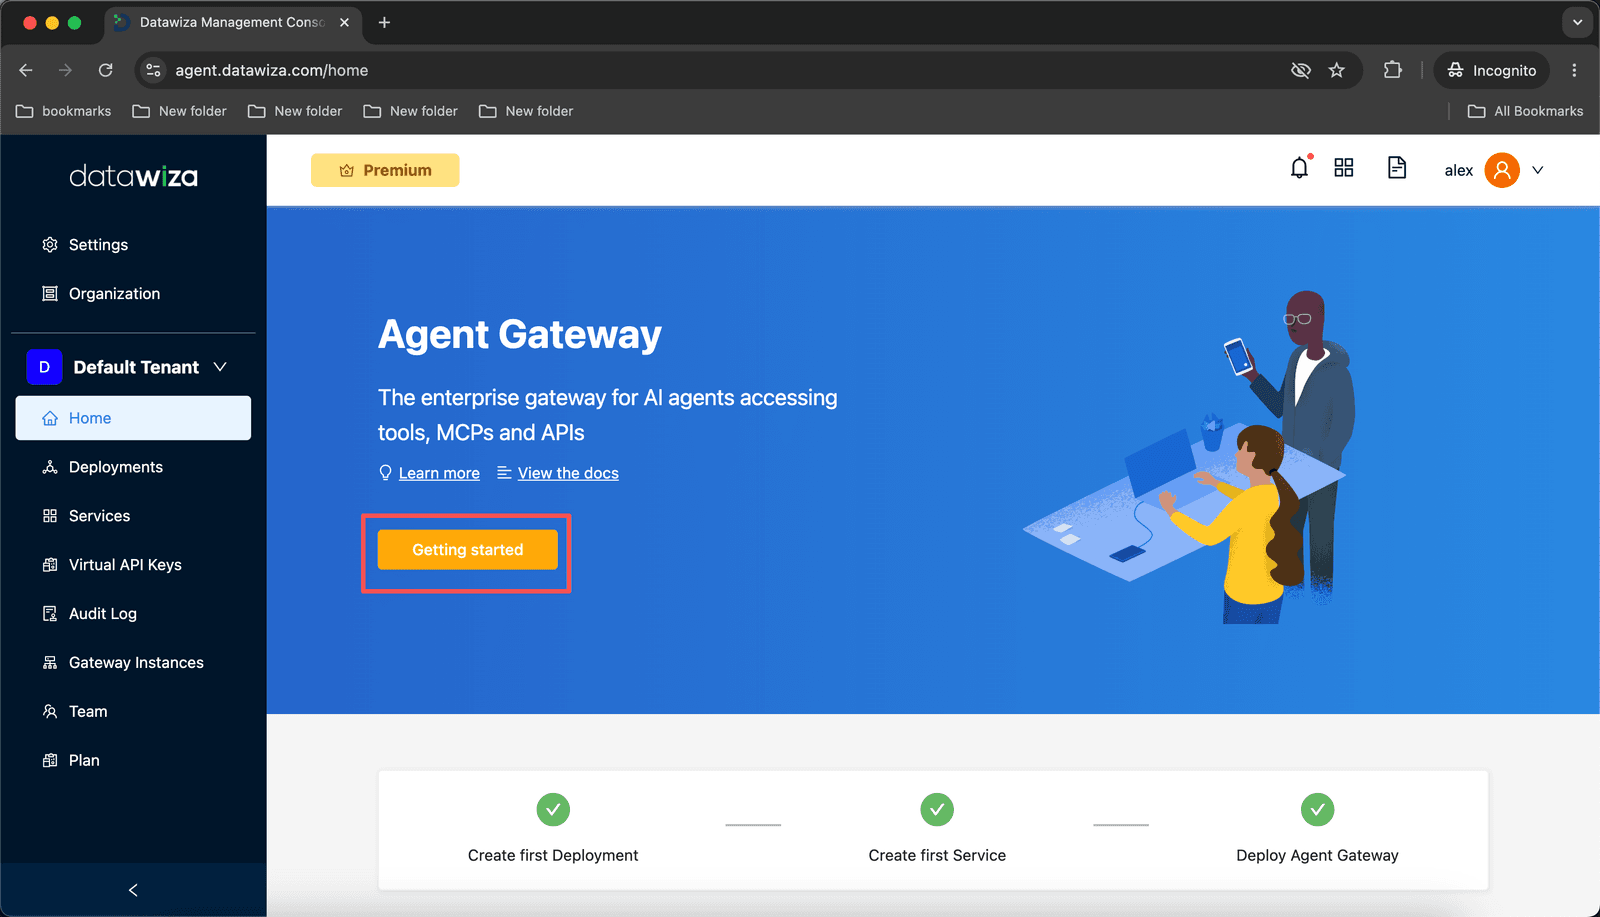
Log into Datawiza Agent Gateway Console (DAGC) and click the Getting Started button on the home page.
2.2 Name your Deployment
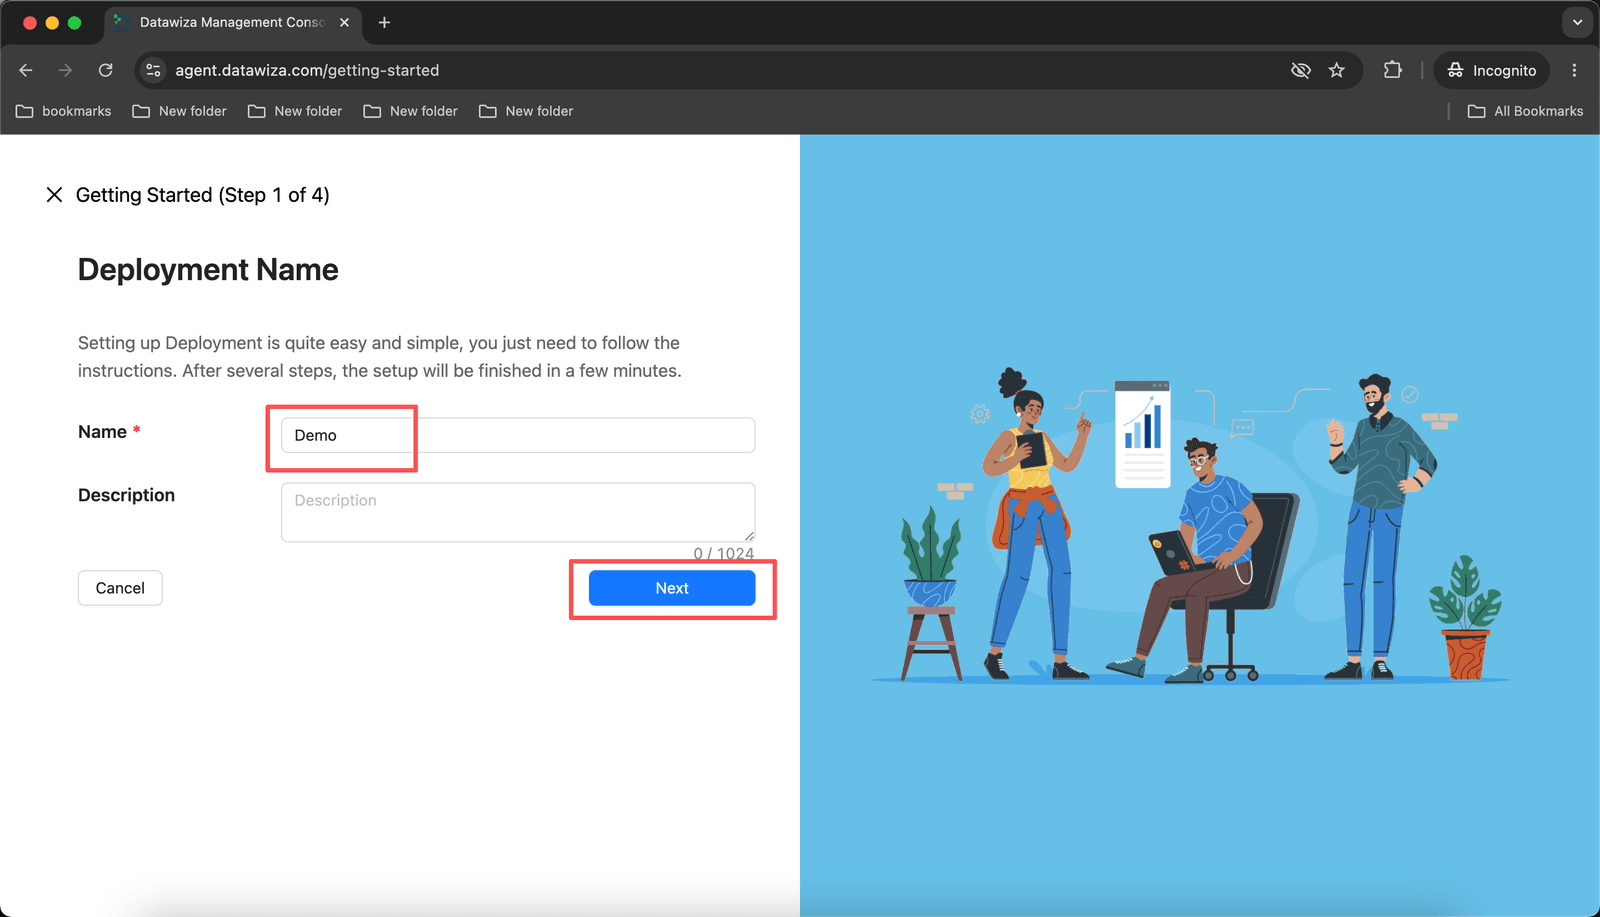
The Getting Started wizard opens at Step 1 of 4 — Deployment Name.
- Enter a
Namefor the deployment (e.g.,CRM MCP Gateway). - Click Next.
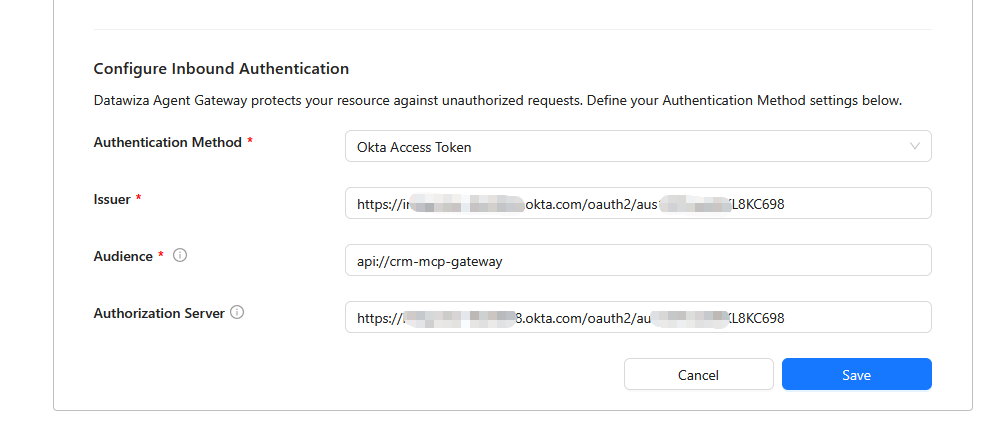
2.3 Add a Service
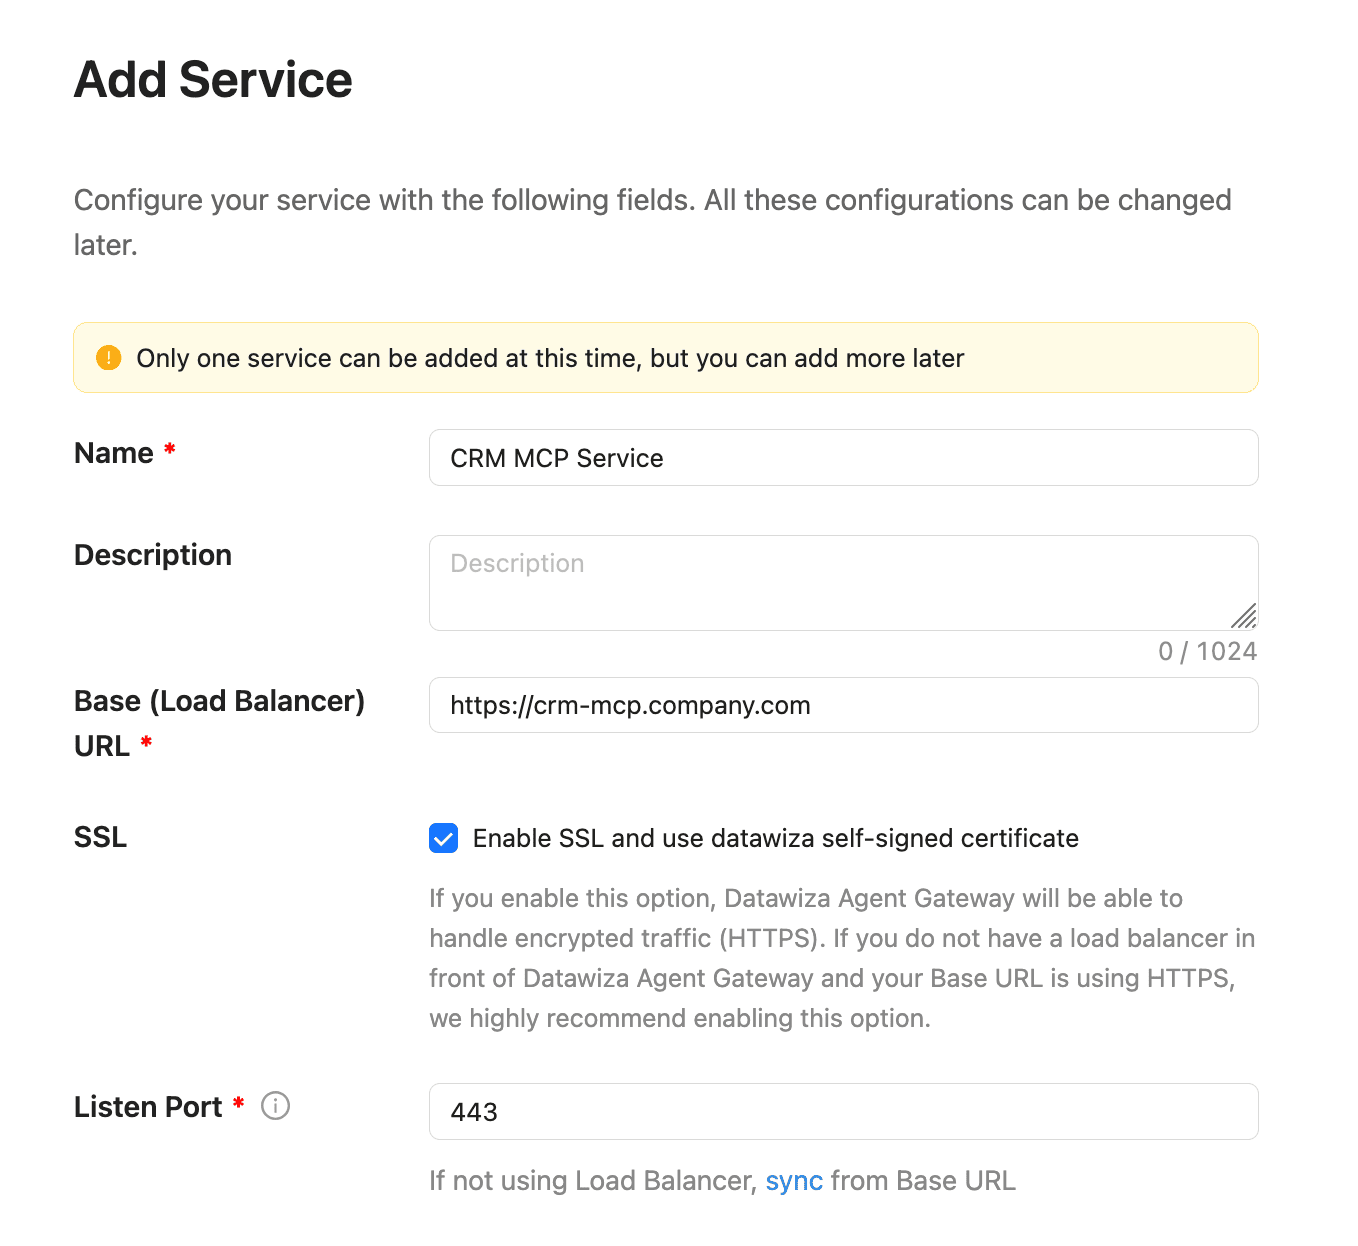
Step 2 of 4 — Service defines the public-facing MCP endpoint that ChatGPT connects to.
| Field | Value |
|---|---|
| Name | CRM MCP Service |
| Base (Load Balancer) URL | Your public gateway URL, e.g. https://crm-mcp.company.com |
| SSL | Enable — check Enable SSL and use datawiza self-signed certificate |
| Listen Port | 443 |
| Authentication Method | Okta Access Token |
| Issuer | The CRM MCP Gateway Authorization Server's Issuer from Step 1.1, e.g. https://<your-okta-domain>/oauth2/<authorization-server-id> |
| Audience | The Audience you set in Step 1.1 — api://crm-mcp-gateway if you used the suggested value |
| Authorization Server | The same URL as Issuer above |
Click Next.
Authorization Server matches the Issuer here
For Okta, the token's iss claim and the metadata endpoint DAGC uses to fetch signing keys are the same URL, so Authorization Server repeats the Issuer value. (This differs from Entra ID, where the v1.0 issuer and the v2.0 metadata endpoint diverge.)
ChatGPT rejects self-signed certificates
The wizard only offers the Datawiza self-signed certificate, and ChatGPT rejects it. After deploying in Step 2.5, replace it with a trusted CA certificate — see Step 2.6.
2.4 Add a Backend
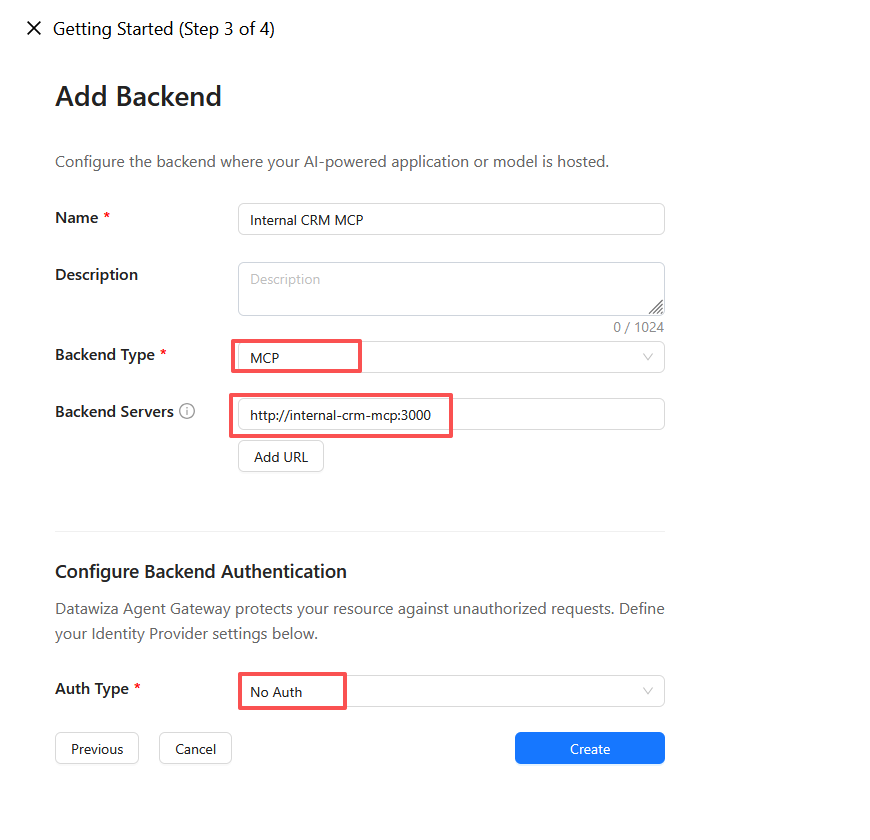
Step 3 of 4 — Backend points the gateway at your existing internal MCP server.
| Field | Value |
|---|---|
| Name | Internal CRM MCP |
| Type | MCP |
| Backend Servers | http://internal-crm-mcp:3000 |
| Auth type | No Auth |
Click Create.
2.5 Deploy the Gateway
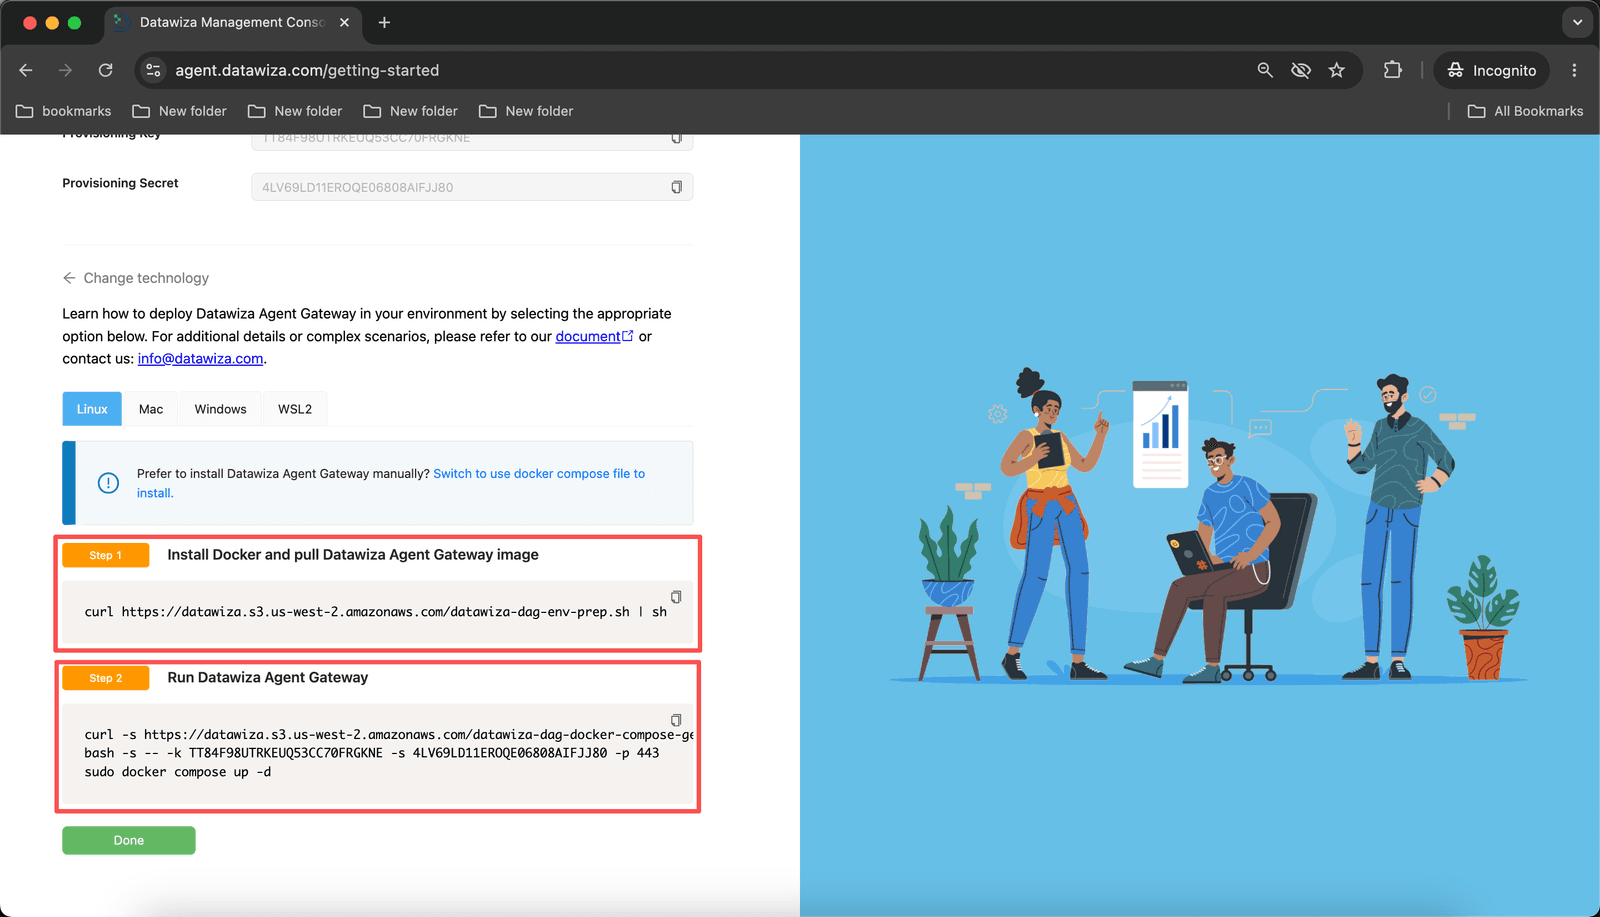
Step 4 of 4 — Deploy shows your provisioning credentials and the startup commands.
Note the Provisioning Key and Provisioning Secret shown at the top.
Run the two commands on your gateway host:
# Install Docker and pull the Datawiza Agent Gateway image
curl https://datawiza.s3.us-west-2.amazonaws.com/datawiza-dag-env-prep.sh | sh

# Start Datawiza Agent Gateway
curl -s https://datawiza.s3.us-west-2.amazonaws.com/datawiza-dag-docker-compose-prep.sh \
  | bash -s -- -k <PROVISIONING_KEY> -s <PROVISIONING_SECRET> -p 443 \
  && sudo docker compose up -d
Click Done.
The gateway pulls its full configuration from DAGC automatically.
2.6 Replace the Self-Signed Certificate
The service is currently using the Datawiza self-signed certificate from Step 2.3. Before connecting ChatGPT, replace it with a certificate from a trusted CA by following SSL Certificates in Datawiza Agent Gateway: go to Services in DAGC, open this service's Advanced tab, click Edit, then Update Certificate to upload your PEM-format certificate and private key.
Step 3: Add the Protected MCP Endpoint to ChatGPT
ChatGPT's connector setup lets you register your own OAuth client and pass in the Okta App Integration's Client ID directly.
Developer mode may be required
Some ChatGPT plans and workspace configurations gate custom MCP connectors behind a Developer mode setting. If you don't see a way to create a custom connector, check your account or workspace settings for a Developer mode toggle — its exact location varies by plan and has changed over time, so check OpenAI's help center if it isn't where you expect.
ChatGPT desktop app
If you use the ChatGPT desktop app, complete this connector setup in the ChatGPT web version first — it isn't available from the desktop app's own settings.
3.1 Create the Connector
Go to Apps in your ChatGPT workspace or account settings, and click Create.
Fill in:
Field Value Name Internal CRM MCPConnection Server URL MCP Server URL https://crm-mcp.company.com/mcpAuthentication OAuthExpand Advanced OAuth settings and set Registration method to User-Defined OAuth Client. This tells ChatGPT to use your own Okta App Integration instead of attempting Dynamic Client Registration (DCR) or a Client Identifier Metadata Document (CIMD) — Datawiza Agent Gateway's protected endpoint doesn't advertise support for either.
Copy the Callback URL shown in this panel (e.g.
https://chatgpt.com/connector/oauth/S2tqhGpwDpxd) — ChatGPT generates it specifically for this connector.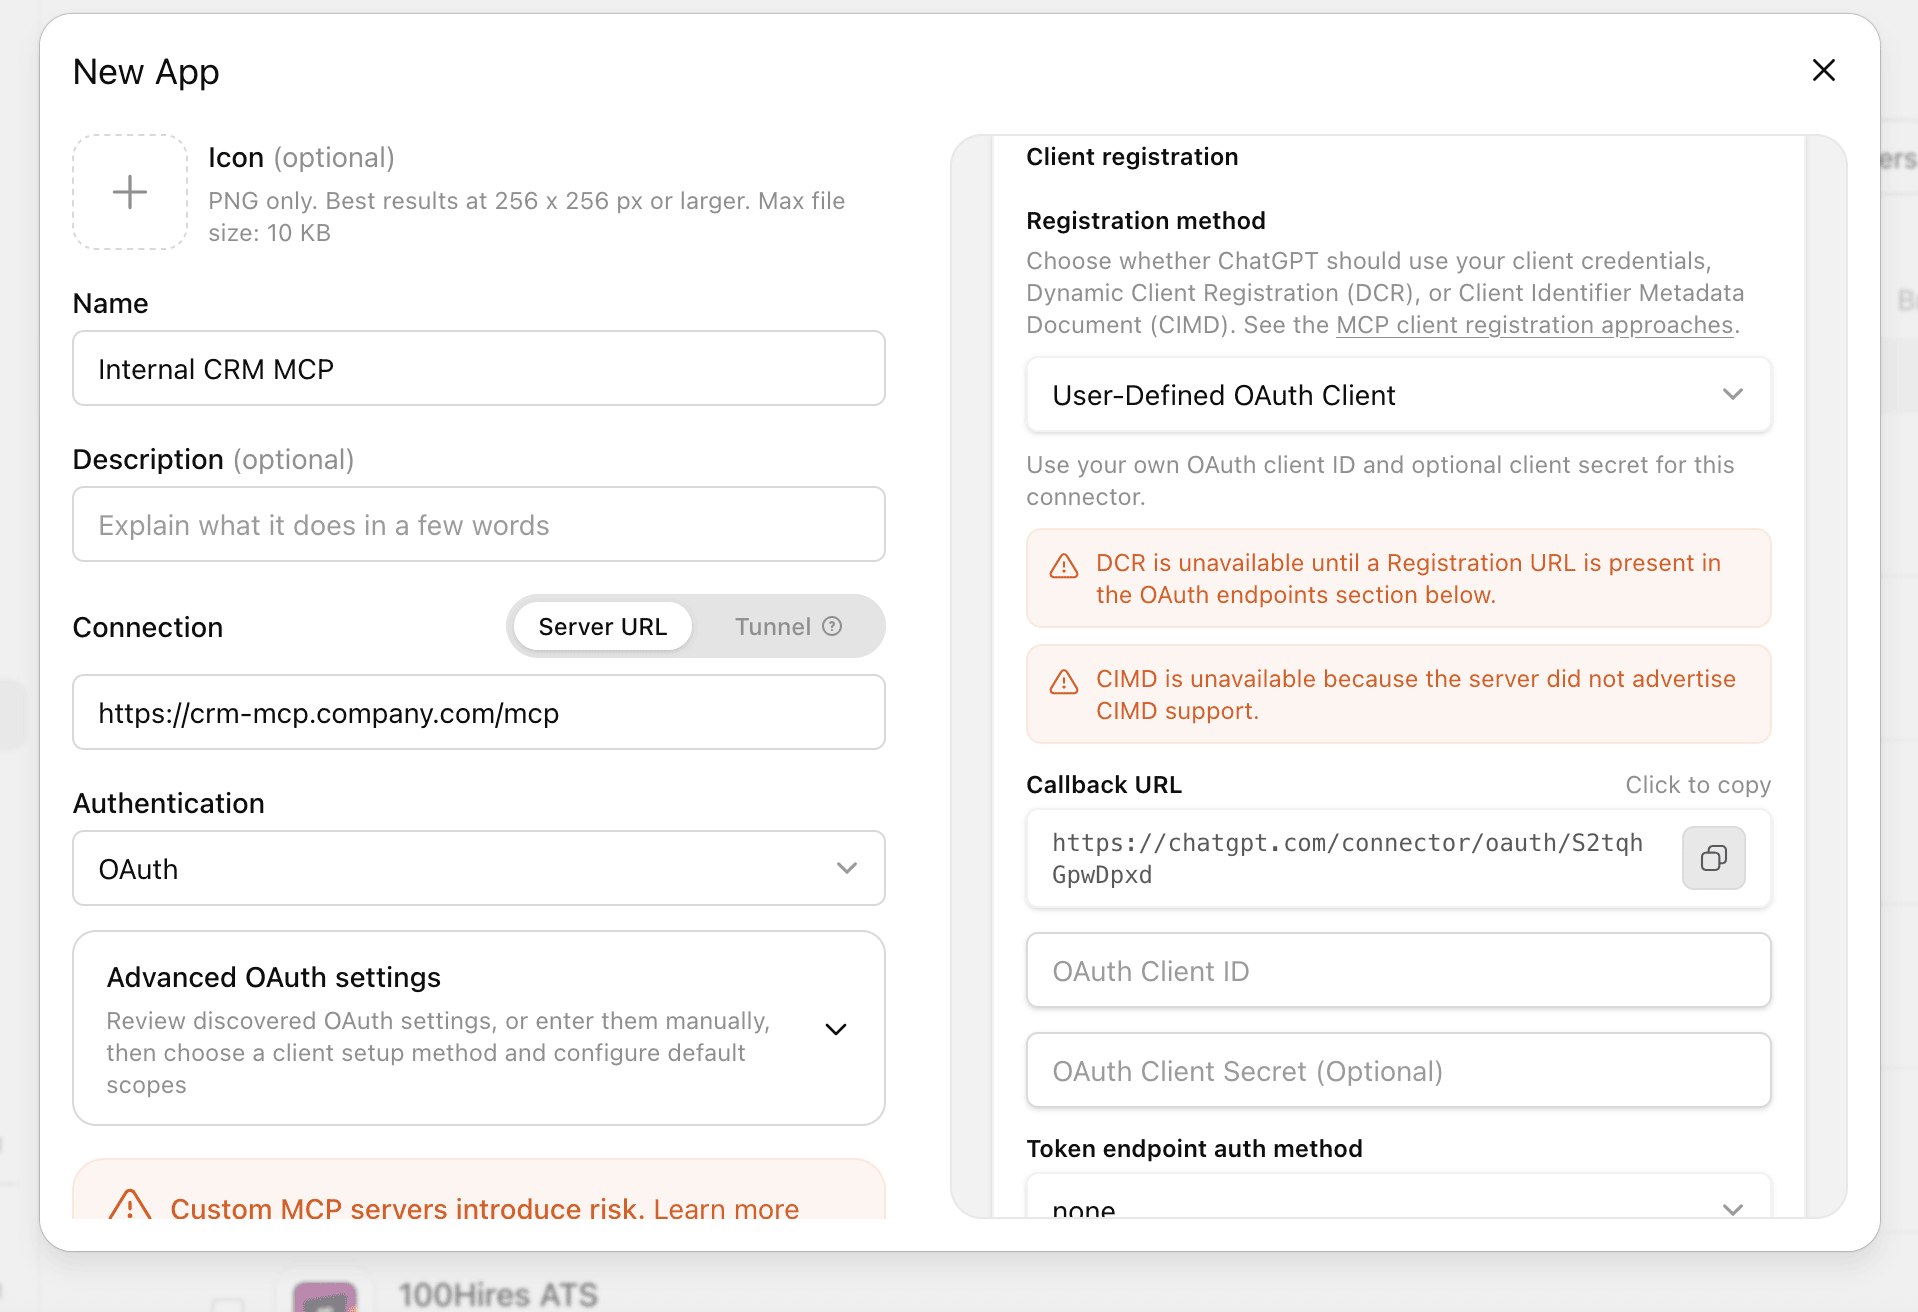
Register that callback URL in Okta before continuing:
- In the Okta admin console, open
ChatGPT CRM MCP Client> General > Edit. - Under Sign-in redirect URIs, replace the placeholder with the callback URL and click Save.
- In the Okta admin console, open
Back in ChatGPT, finish the Client registration panel:
Field Value OAuth Client ID The Client ID of ChatGPT CRM MCP Clientfrom Step 1.3OAuth Client Secret Leave blank — this is a public client Click Create.
On a ChatGPT Business or Enterprise workspace, a workspace admin also needs to publish the connector — from its detail page in the Apps admin console — before it's available to use. Publishing rolls it out to the whole organization, so individual users don't need to configure it themselves.
Step 4: Verify Unauthenticated Access Is Blocked
Before testing with ChatGPT, confirm the gateway is rejecting unauthenticated requests:
curl -ik https://crm-mcp.company.com/mcp
Expected response:
HTTP/1.1 401 Unauthorized
This confirms that Datawiza is intercepting traffic and no unauthenticated request can reach the backend MCP server.
Step 5: Sign In with Okta
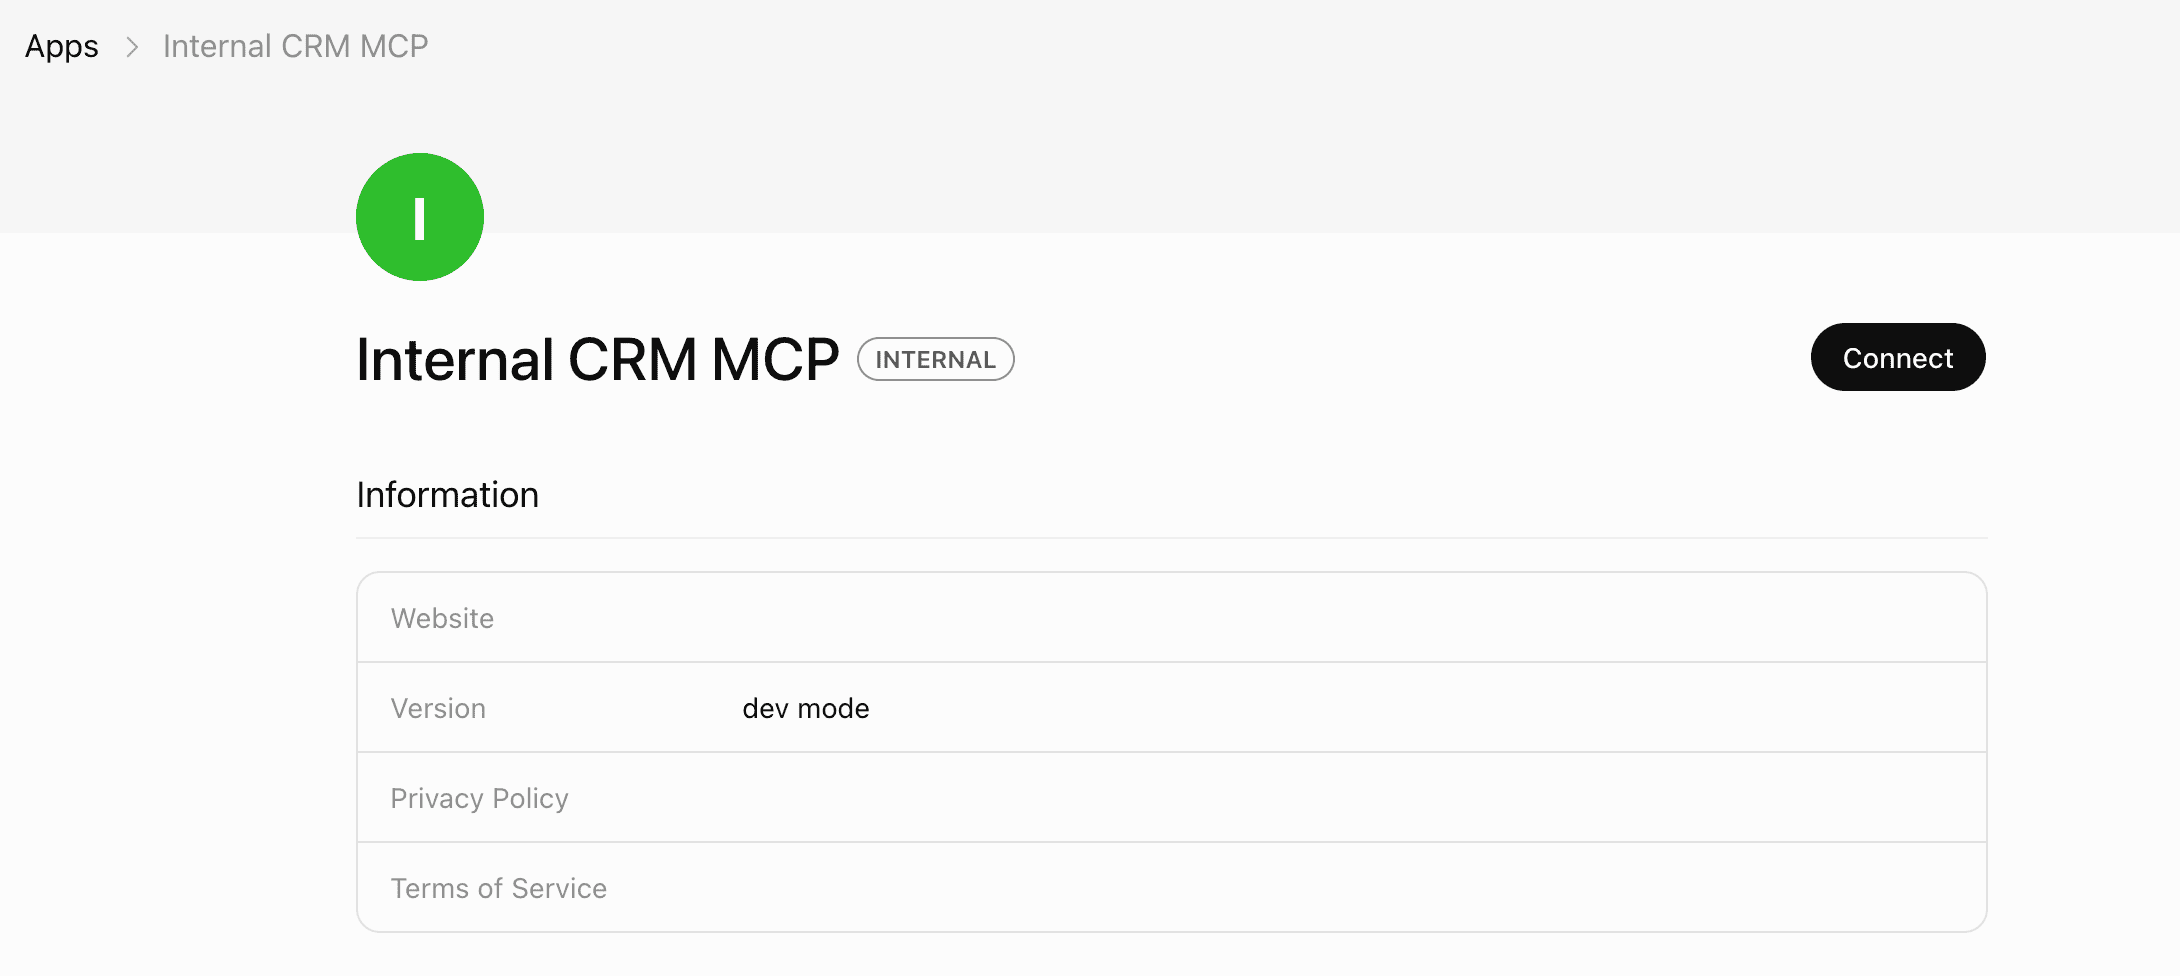
When you finish creating the connector, ChatGPT shows its detail page with a Connect button. Clicking it starts the Okta sign-in flow using the Client ID you entered. Datawiza validates the resulting access token on every request.
Click Connect on the connector's detail page.
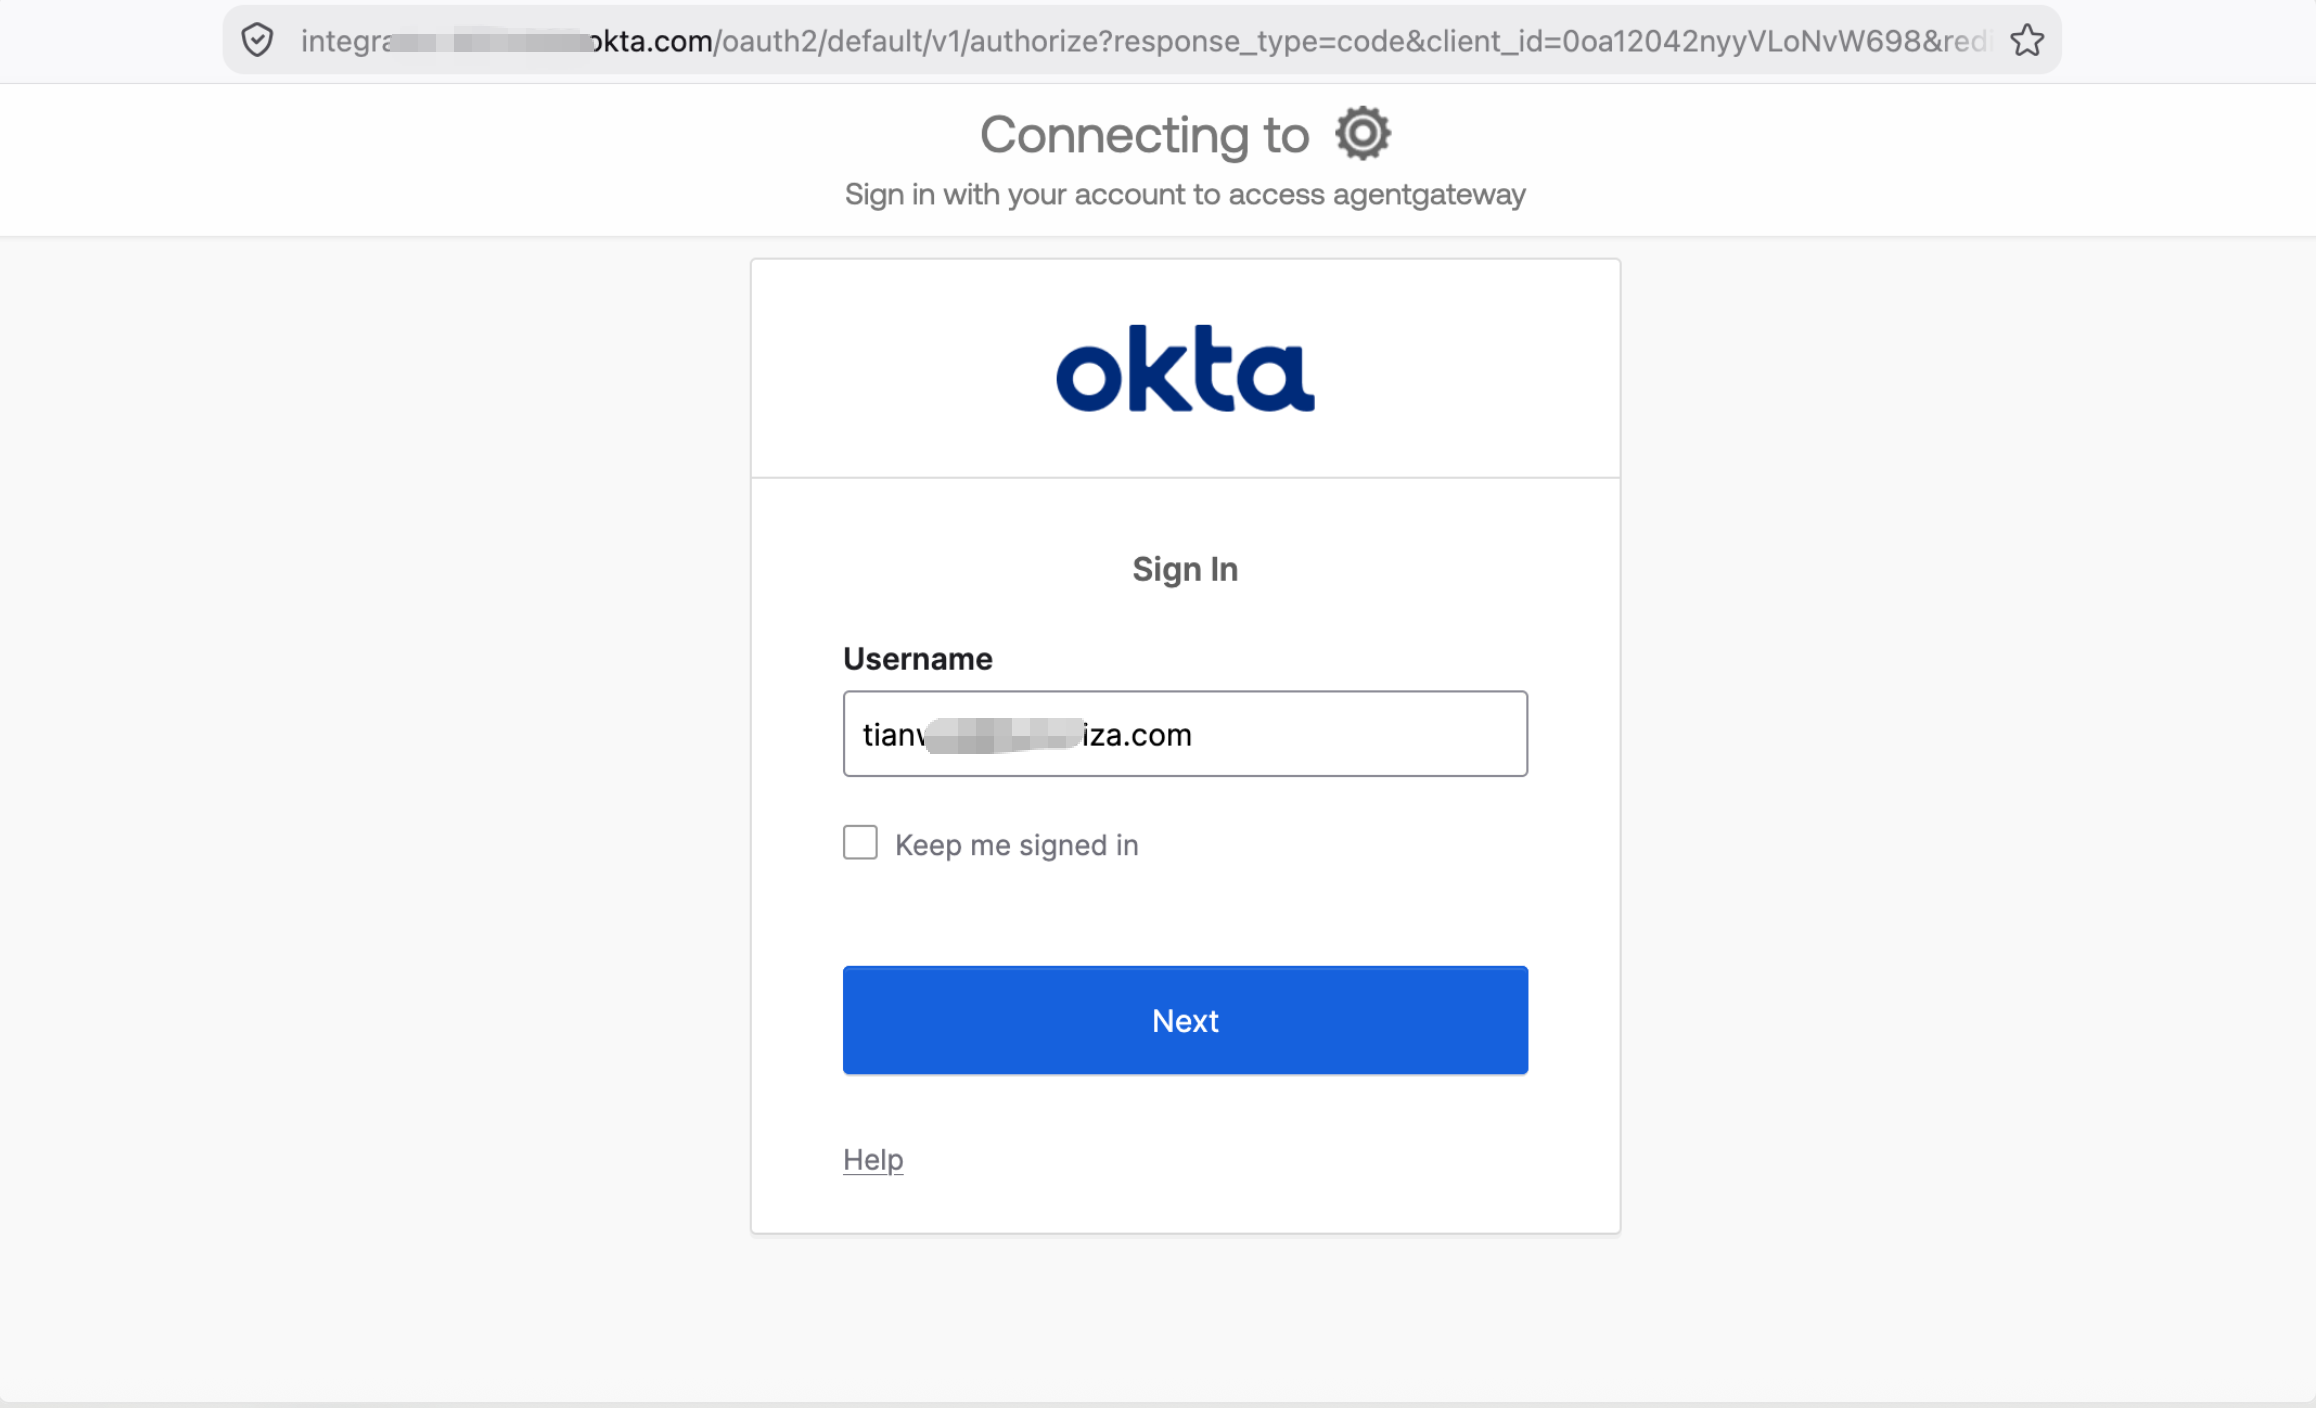
ChatGPT opens a browser popup prompting you to authenticate.
The popup redirects to the Okta login page. Sign in with your enterprise account.
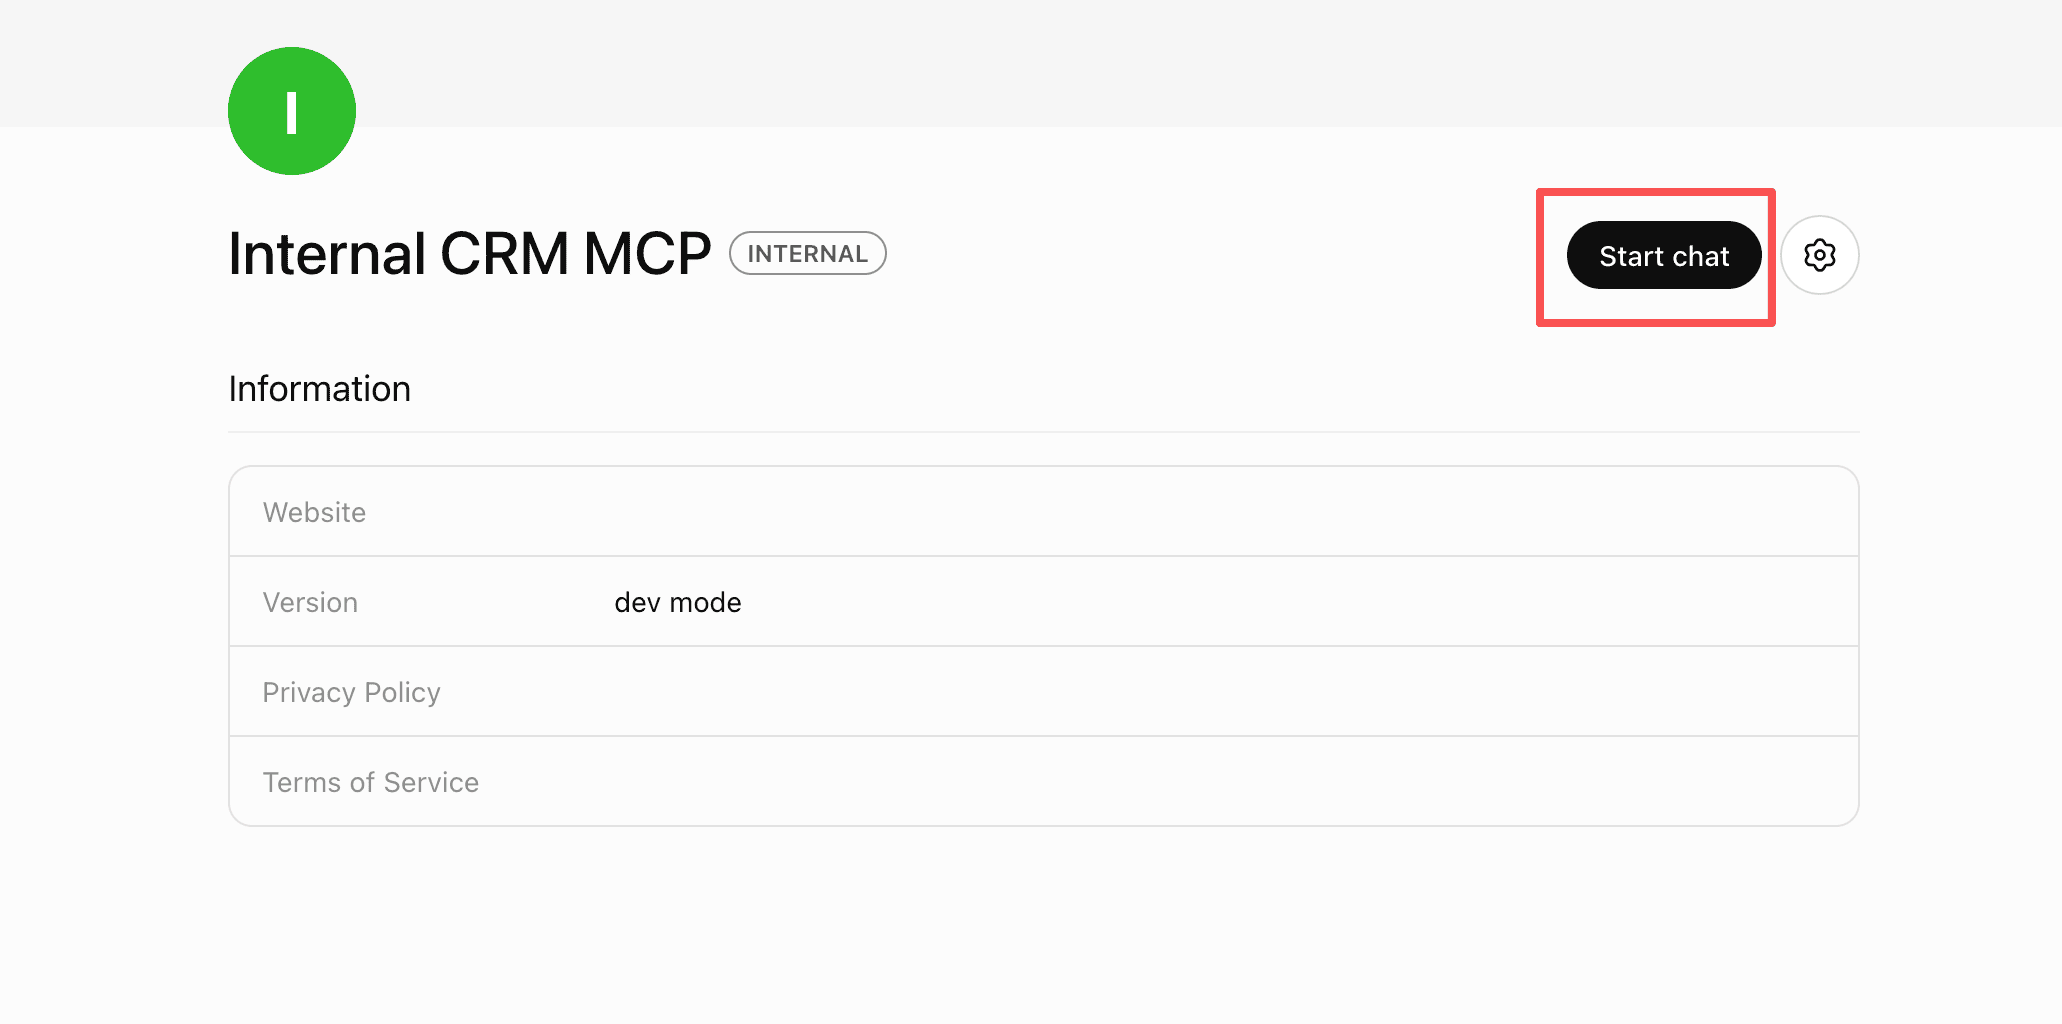
After a successful sign-in, Okta redirects back to the connector's callback URL you registered in Step 3.1 (e.g.
https://chatgpt.com/connector/oauth/S2tqhGpwDpxd). ChatGPT stores the access token and attaches it as a bearer token to each MCP request. Datawiza validates the token — checking the issuer, the MCP endpoint audience, and theapi://crm-mcp-gateway/accessscope — before forwarding the request to the backend.ChatGPT replaces the Connect button with Start chat, and its tools become available to attach in a chat.
A successful sign-in doesn't guarantee the right scope
Datawiza rejects any token that lacks the api://crm-mcp-gateway/access scope, even when the sign-in itself succeeded. If tool calls fail with 401 Unauthorized right after connecting, the token Okta issued likely doesn't carry that scope — check that the access policy rule from Step 1.4 actually grants it to ChatGPT CRM MCP Client.
Once connected, ChatGPT can call MCP tools for the duration of the session. An expired or missing token returns 401 Unauthorized and triggers a new login prompt the next time the connector is used.
Step 6: Call MCP Tools from ChatGPT
With the MCP server connected, attach it to a chat and test tools to confirm end-to-end authentication is working.
- Start a new chat in ChatGPT.
- Click the + icon next to the message box, select More, and choose the Internal CRM MCP connector.
Get a customer profile
In ChatGPT, type:
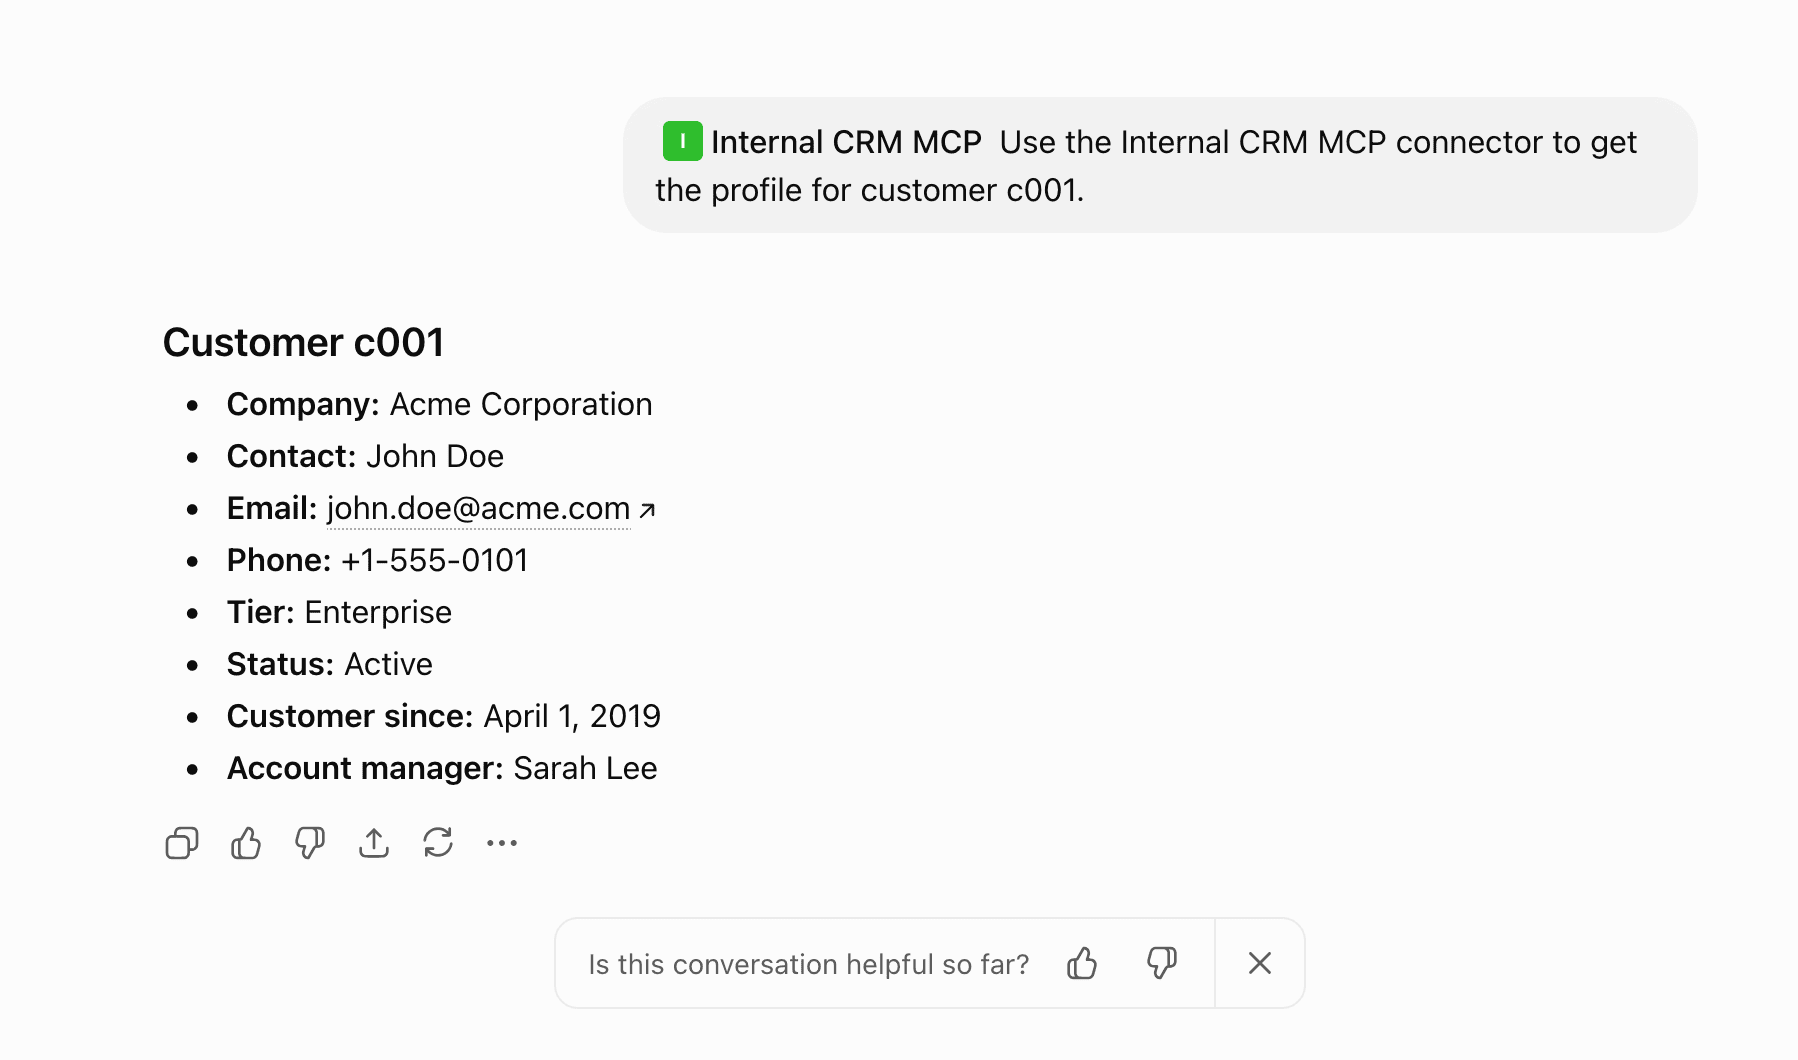
Use the Internal CRM MCP connector to get the profile for customer c001.
ChatGPT calls get_customer_profile and shows the result.
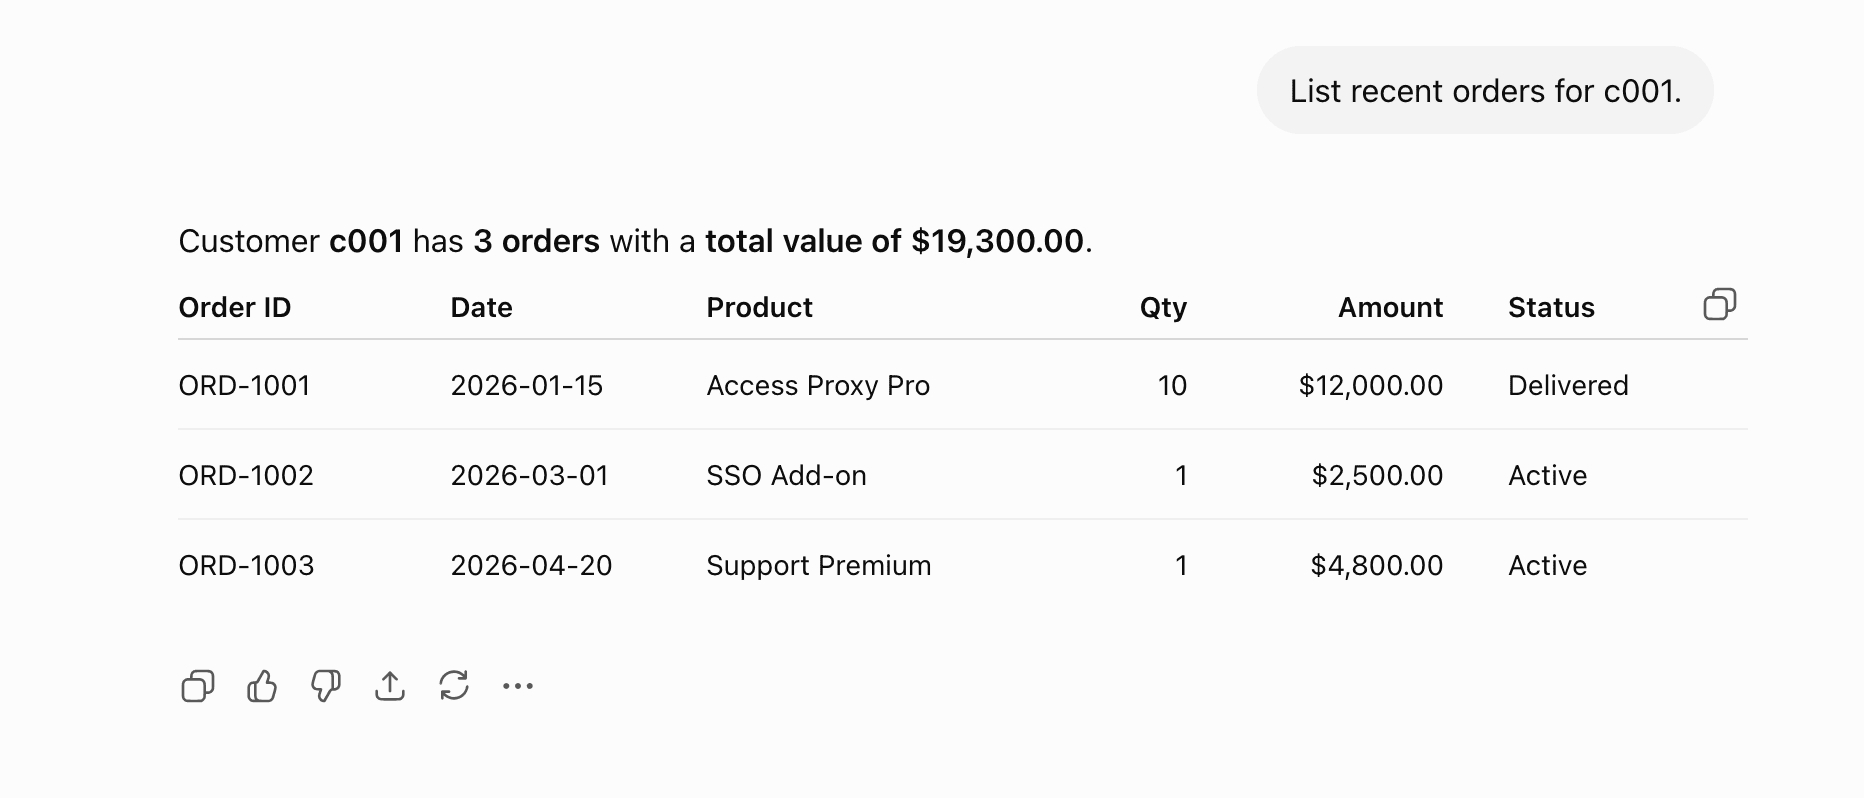
List customer orders
In ChatGPT, type:
List recent orders for c001.
ChatGPT calls list_customer_orders and displays the order history.
Step 7: Verify Datawiza Logs and Audit Records
In DAGC, open the logs for your deployment and confirm the following events appear:
- User login event with the authenticated user's email
- Okta authentication success
- Request allowed or denied based on policy
- Request forwarded to the backend MCP server
- MCP tool call recorded with user context
This confirms that Datawiza is acting as the authentication, identity, and policy enforcement layer for all ChatGPT-to-MCP traffic.
Summary
Your MCP server stays simple — it exposes tools for ChatGPT without implementing enterprise OAuth. Datawiza Agent Gateway becomes the front door: it handles Okta login, validates tokens, enforces access policy, and forwards only authenticated traffic to the backend.
This separation of concerns means MCP server developers can focus on building useful tools, while identity and access control remain owned by the teams responsible for them. The same pattern applies to any internal MCP server — CRM, HR, finance, ticketing, or internal APIs — without changing a line of server code.
ChatGPT users get a seamless experience: they authenticate once with their enterprise Okta credentials, and all MCP tools become available for the session. Unauthenticated or unauthorized requests never reach the backend.
Related Resources
- Datawiza Agent Gateway Introduction
- SSL Certificates in Datawiza Agent Gateway
- Entra ID Auth for ChatGPT MCP Servers with Datawiza Agent Gateway
- Anthropic API Proxy for Claude with Datawiza Agent Gateway
- Okta — Create an Authorization Server
- Okta — Create OAuth app integrations
- OpenAI — Developer mode and MCP apps in ChatGPT