
Add SSO and MFA to your custom web app with Datawiza Access Proxy
Overview
This tutorial shows how to add modern single sign-on (SSO) and multi-factor authentication (MFA) to your legacy or on-premises application with minimal code changes. Learn more about adding modern SSO and MFA to your legacy apps or on-prem applications with Datawiza.
This tutorial assumes prior knowledge of Datawiza Access Proxy (DAP). If you're new to DAP, refer to Introduction to Datawiza Access Proxy before continuing. The goal is to walk you through a small set of targeted changes to your existing code so that your application can work with DAP.
This tutorial uses an existing web application "WebApp" that currently relies on session-based authentication. By integrating with DAP, you can modernize its authentication with identity providers (IdPs) such as Microsoft Entra ID, Azure AD B2C, Okta, Auth0, Ping Identity, Amazon Cognito, and others.
Once DAP authenticates a user, it adds one of the following HTTP headers to every downstream request, depending on your DAP configuration.
| Header Name | Format | Value |
|---|---|---|
| x-dw-username | Plaintext | This user's username in plaintext |
| dw-token | JWT | A JWT (JSON Web Token) including user's username |
Network Security Requirement
This integration relies on your application trusting HTTP headers added by DAP. This trust is only valid when your application is exclusively reachable through DAP — not directly from the internet. If a client can reach your application directly, they can forge any HTTP header, including x-dw-username, and bypass authentication entirely.
Enforce this at the network level: use firewall rules, private networking, or bind your application to localhost so that only DAP can reach it.
When the application receives this header, it should treat the user as authenticated. This tutorial covers how to implement that logic for both options, including the logout flow.
DAP supports two header formats. Choose based on your requirements:
x-dw-username (plaintext) | dw-token (JWT) | |
|---|---|---|
| Complexity | Minimal — read a single header | Moderate — validate a signed token |
| Verification | Relies on network isolation (DAP is the only path in) | Application verifies the signature independently, providing defense-in-depth |
| When to use | When network access is tightly controlled and simplicity is preferred | When you want the application to cryptographically verify that the header was issued by DAP |
Both options are valid for production use. With dw-token, your application and DAP share a secret — DAP signs the token with it, and your application verifies the signature using the same secret.
Testing Headers During Development
You do not need DAP running to test header-based authentication during development. The ModHeader browser extension lets you inject custom headers into any request directly from your browser, so you can simulate DAP's behavior without setting up the full proxy.
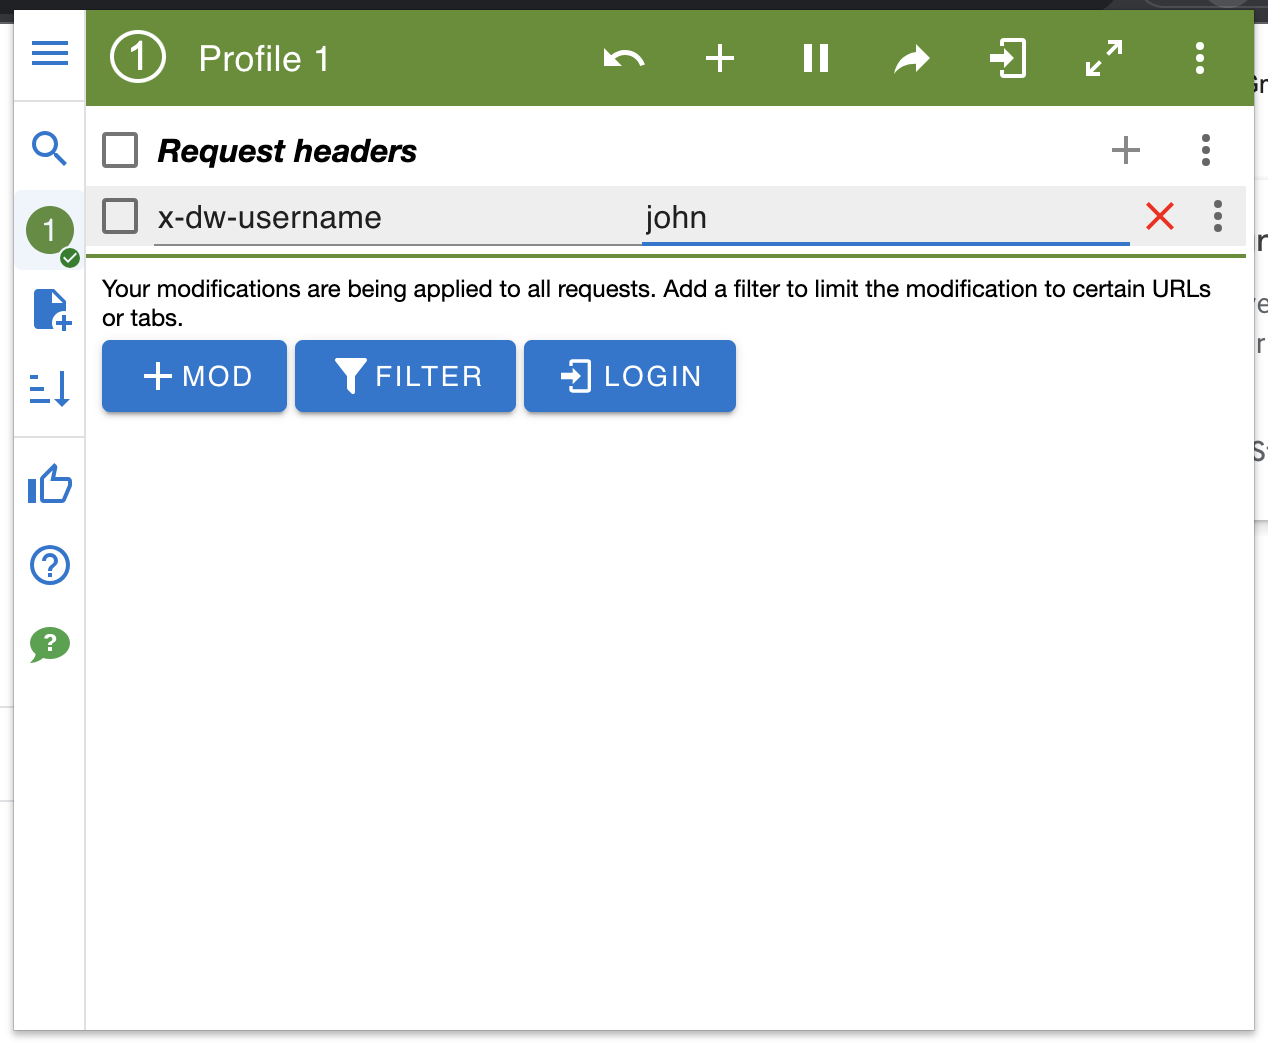
Set one of the following header values to simulate an authenticated user:
| Header Name | Value |
|---|---|
| x-dw-username | john |
Or
| Header Name | Value | Note |
|---|---|---|
| dw-token | eyJhbGciOiJIUzI1NiIsInR5cCI6IkpXVCJ9 .eyJ1c2VybmFtZSI6ImpvaG4ifQ .xhxiOgF2WzKr7QuxpQgdwZCxRwYUM23gHbA9NtLR3aU | The secret in this example is Your_Secret_Here |
Handling The Login Process
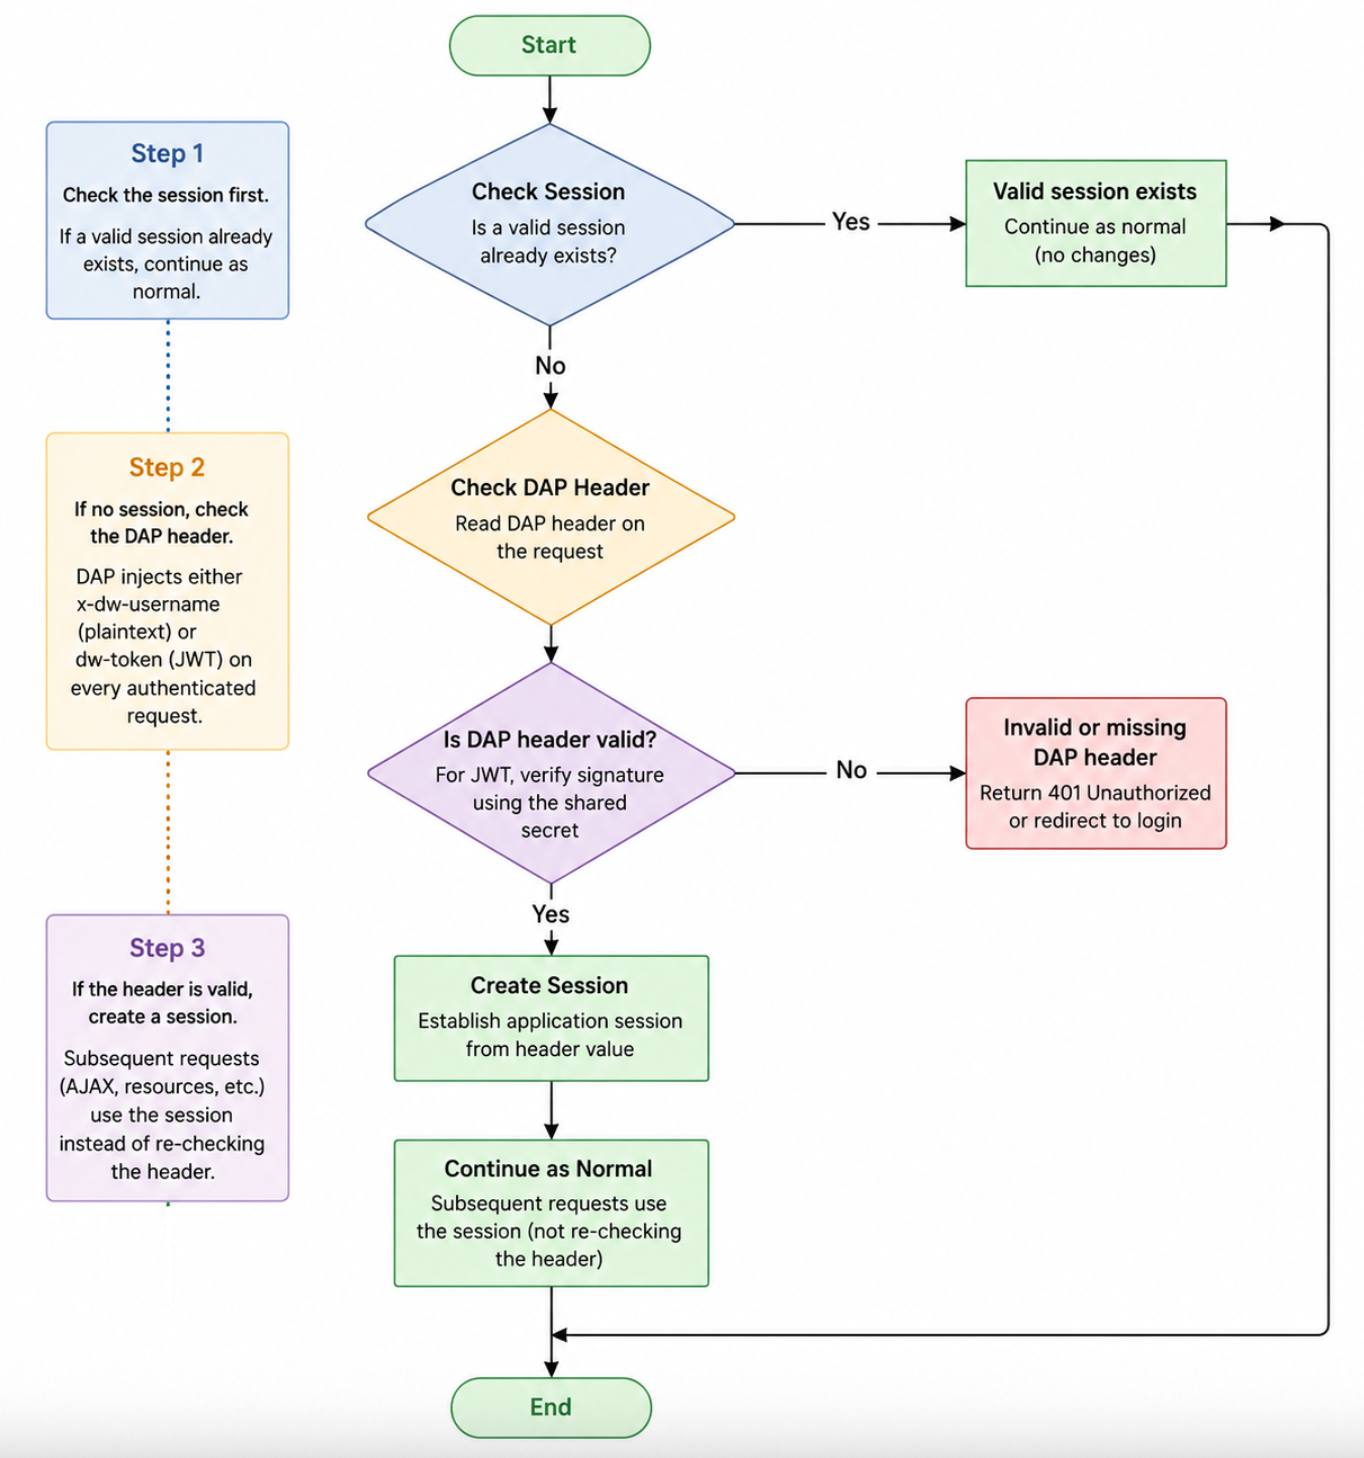
Your existing authentication check needs a small update. Previously, the application confirmed a logged-in user by checking for a valid session. Now, it also needs to recognize the DAP header as proof of authentication when no session exists.
When DAP successfully authenticates a user, it adds the header to every request. The recommended pattern is: check the session first; if no session exists, read the DAP header, create a session from it, and continue. This ensures subsequent requests (including AJAX calls) use the session rather than re-validating the header every time.
Header Authentication with x-dw-username
public class AuthFilter implements Filter {
    public void doFilter(ServletRequest req, ServletResponse res, FilterChain chain) throws IOException, ServletException {
        HttpServletRequest request = (HttpServletRequest) req;
        HttpServletResponse response = (HttpServletResponse) res;
        HttpSession session = request.getSession(false);
+       String headerUsername = request.getHeader("x-dw-username");

        if (session != null && session.getAttribute("user") != null) {
            chain.doFilter(req, res);
+       } else if (headerUsername != null) {
+           // No session yet, but the header is present — create a session from it
+           HttpSession newSession = request.getSession(true);
+           newSession.setAttribute("user", headerUsername);
+           chain.doFilter(req, res);
        } else {
            response.sendRedirect(request.getContextPath() + "/login.jsp");
        }
    }
}
session_start();

+ $headerUsername = $_SERVER['HTTP_X_DW_USERNAME'] ?? null;
+
+ // No session yet, but the header is present — create a session from it
+ if (!isset($_SESSION['user']) && $headerUsername !== null) {
+     $_SESSION['user'] = $headerUsername;
+ }

if (isset($_SESSION['user'])) {
    // the request has a valid user session
    // Continue processing
} else {
    // Redirect to login page
    header('Location: /login.php');
    exit();
}
// Implement FilterAttribute and IAuthorizationFilter
public class AuthFilter : ActionFilterAttribute, IAuthorizationFilter
{
    // OnAuthorization runs before the action method is called
    public void OnAuthorization(AuthorizationContext filterContext)
    {
        // Get user from session
        var user = HttpContext.Current.Session["user"];

        // Get username header
+       var headerUsername = HttpContext.Current.Request.Headers["x-dw-username"];

        if (user != null)
        {
            // Valid session, continue processing
+       } else if (headerUsername != null)
+       {
+           // Create a session from the DAP header
+           HttpContext.Current.Session["user"] = headerUsername;
        } else
        {
            // Redirect to login page
            filterContext.Result = new RedirectResult("~/Account/LogOn");
        }
    }
}
Header Authentication with dw-token
The JWT token issued by DAP contains a username claim with the authenticated user's username. The examples below validate the token, extract the username, and create a session — the same outcome as the plaintext approach above.
Required libraries: Add the JWT library for your language before implementing the examples below.
| Language | Library | How to add |
|---|---|---|
| Java | io.jsonwebtoken:jjwt-api, jjwt-impl, jjwt-jackson | Add to pom.xml or build.gradle |
| PHP | firebase/php-jwt | Run composer require firebase/php-jwt |
| .NET | System.IdentityModel.Tokens.Jwt | Install via NuGet Package Manager |
Note: Replace Your_Secret_Here with the secret configured in your DAP instance. In production, load this value from an environment variable or a secrets manager — never hardcode it in source code.
public class AuthenticationFilter implements Filter {

    @Override
    public void doFilter(ServletRequest req, ServletResponse res, FilterChain chain) throws IOException, ServletException {
        HttpServletRequest request = (HttpServletRequest) req;
        HttpServletResponse response = (HttpServletResponse) res;
        HttpSession session = request.getSession(false);

        String requestURI = request.getRequestURI();

        // Get the user from session and authentication header
        Object user = session != null ? session.getAttribute("user") : null;
+       String authToken = request.getHeader("dw-token");

        if (user != null) {
            chain.doFilter(req, res);
+       } else if (authToken != null) {
+           String username = getValidatedUsername(authToken);
+           if (username != null) {
+               HttpSession newSession = request.getSession(true);
+               newSession.setAttribute("user", username);
+               chain.doFilter(req, res);
+           } else if (requestURI.endsWith("login")) {
+               chain.doFilter(req, res);
+           } else {
+               response.sendRedirect(request.getContextPath() + "/login");
+           }
        } else {
            if (requestURI.endsWith("login")) {
                chain.doFilter(req, res);
            } else {
                response.sendRedirect(request.getContextPath() + "/login");
            }
        }
    }

+   /**
+    * Validates the JWT and returns the username claim if valid, null otherwise.
+    */
+   private String getValidatedUsername(String authToken) {
+       String secret = "Your_Secret_Here";
+       try {
+           Claims claims = Jwts.parser()
+                   .setSigningKey(secret.getBytes(StandardCharsets.UTF_8))
+                   .build()
+                   .parseClaimsJws(authToken)
+                   .getBody();
+           return (String) claims.get("username");
+       } catch (ExpiredJwtException e) {
+           // token expired
+           return null;
+       } catch (JwtException e) {
+           // Invalid token (bad signature, malformed, etc.)
+           // Your code to handle the exception properly, for example, log the exception into your log collector.
+           return null;
+       }
+   }
}
session_start();

+ // Get the token from the DAP header
+ $authToken = isset($_SERVER['HTTP_DW_TOKEN']) ? $_SERVER['HTTP_DW_TOKEN'] : null;

+ if (!isset($_SESSION['user']) && $authToken !== null) {
+     $username = getValidatedUsername($authToken);
+     if ($username !== null) {
+         $_SESSION['user'] = $username;
+     }
+ }

if (isset($_SESSION['user'])) {
    // Continue processing
} else {
    if (substr(parse_url($_SERVER['REQUEST_URI'], PHP_URL_PATH), -strlen('login.php')) === 'login.php') {
        // Continue to login page
    } else {
        header('Location: /login.php');
        exit();
    }
}

+ // Validates the dw-token JWT and returns the username claim if valid, otherwise null
+ function getValidatedUsername($authToken) {
+     $secret = 'Your_Secret_Here';
+     try {
+         $decoded = JWT::decode($authToken, new \Firebase\JWT\Key($secret, 'HS256'));
+         return isset($decoded->username) ? $decoded->username : null;
+     } catch (\Firebase\JWT\ExpiredException $e) {
+         // token expired
+         // Your code to handle the exception properly, for example, log the exception into your log collector
+         return null;
+     } catch (\Exception $e) {
+         // Any other exception (invalid signature, malformed token, etc.)
+         // Your code to handle the exception properly, for example, log the exception into your log collector
+         return null;
+     }
+ }
// Implement FilterAttribute and IAuthorizationFilter
public class AuthFilter : ActionFilterAttribute, IAuthorizationFilter
{
    public void OnAuthorization(AuthorizationContext filterContext)
    {
        var user = HttpContext.Current.Session["user"];
+       var authToken = HttpContext.Current.Request.Headers["dw-token"];

        if (user != null)
        {
            // Valid session, continue processing
+       } else if (authToken != null)
+       {
+           string validatedUsername;
+           if (IsValidUserToken(authToken, out validatedUsername))
+           {
+               // Token is valid, issue a session for the validated username
+               HttpContext.Current.Session["user"] = validatedUsername;
+           }
+           else if (!filterContext.HttpContext.Request.Url.AbsolutePath.EndsWith("login"))
+           {
+               filterContext.Result = new RedirectResult("~/Account/LogOn");
+           }
        } else
        {
            if (!filterContext.HttpContext.Request.Url.AbsolutePath.EndsWith("login"))
                filterContext.Result = new RedirectResult("~/Account/LogOn");
        }
    }

+   // Validates the dw-token JWT and returns the authenticated username via validatedUsername
+   private bool IsValidUserToken(string authToken, out string validatedUsername)
+   {
+       validatedUsername = null;
+       string secret = "Your_Secret_Here";
+       var tokenHandler = new JwtSecurityTokenHandler();
+       // DAP signs the token with this shared secret using HMAC-SHA256
+       SymmetricSecurityKey signingKey = new SymmetricSecurityKey(
+           Encoding.UTF8.GetBytes(secret));
+       try
+       {
+           var tokenValidationParameters = new TokenValidationParameters
+           {
+               ValidateIssuerSigningKey = true,
+               IssuerSigningKey = signingKey,
+               ValidateIssuer = false,
+               ValidateAudience = false,
+               ValidateLifetime = true,
+               RequireExpirationTime = false,
+           };
+           SecurityToken rawValidatedToken;
+           var claimsPrincipal = tokenHandler.ValidateToken(
+               authToken, tokenValidationParameters, out rawValidatedToken);
+           var usernameClaim = ((JwtSecurityToken)rawValidatedToken).Claims
+               .FirstOrDefault(x => x.Type == "username");
+           if (usernameClaim != null)
+           {
+               // username claim exists in the token
+               validatedUsername = usernameClaim.Value;
+               return true;
+           }
+           return false;
+       }
+       catch (Exception ex)
+       {
+           // Signature verification failed, or the token is malformed or expired —
+           // in production, log ex here rather than failing silently, since this
+           // could indicate a tampered token
+           return false;
+       }
+   }
}
Handling The Logout Process
Logging out requires one additional step compared to your existing flow. Previously, logout meant clearing the session and redirecting to the login page. With DAP, you also need to clear the DAP session.
Do this by redirecting to /datawiza/ab-logout instead of your login page. DAP will clear its own session and then redirect the user onward. This ensures both sessions — application and DAP — are terminated together.
// and here is logout related configuration
.logout()
    .logoutUrl("/logout") // custom logout URL
-   .logoutSuccessUrl("/login") // where to redirect after logout
+   .logoutSuccessUrl("/datawiza/ab-logout") // redirect to this datawiza endpoint to clear datawiza session
    .invalidateHttpSession(true)  // it should invalidate session
    .deleteCookies ("JSESSIONID") // it should delete your cookies
    .permitAll();
function logout(){
-  $logoutSuccessUrl = "/login";
+  $logoutSuccessUrl = "/datawiza/ab-logout";

  // Clearing session
  $_SESSION = array();

  // Deleting session cookie.
  if (ini_get("session.use_cookies")) {
      $params = session_get_cookie_params();
      setcookie(session_name(), '', time() - 42000,
          $params["path"], $params["domain"],
          $params["secure"], $params["httponly"]
      );
  }

  // Invalidating the session.
  session_destroy();

  // Redirecting to the logout success url.
  header("Location: $logoutSuccessUrl");
  exit;
}
[HttpPost]
public ActionResult Logout()
{
    // Clear the authentication cookie
    FormsAuthentication.SignOut();

    // Clear the session
    Session.Clear();

-   return Redirect("/login"); // where to redirect after logout
+   return Redirect("/datawiza/ab-logout"); // redirect to this endpoint to clear the DAP session
}
(Optional) Changing the default logout redirect page
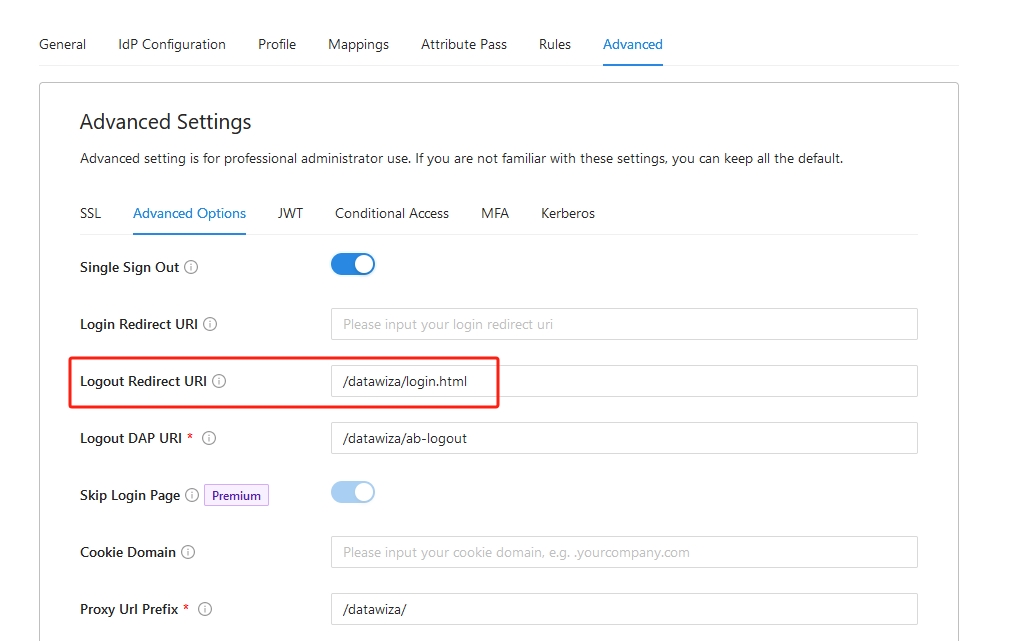
By default, DAP redirects the user to its default logout page, /datawiza/login.html. But, you may wish to redirect users to a different page upon logout, possibly something more tailored to your application's design or workflow.
To change the logout redirect, go to the advanced settings page in the Datawiza console and update the Logout Redirect URI to your desired destination, then save.
(Optional) Single logout IdP
For enhanced security in scenarios like B2C (e.g., using Auth0, Microsoft External ID, or other social logins), you can configure your application to terminate the user's session not only within your app but also at the Identity Provider (IdP). This is known as Single Logout (SLO).
SLO is recommended when you want the logout action to clear the user's central identity session, providing a more secure and seamless end-user experience.
How to Enable Single Logout
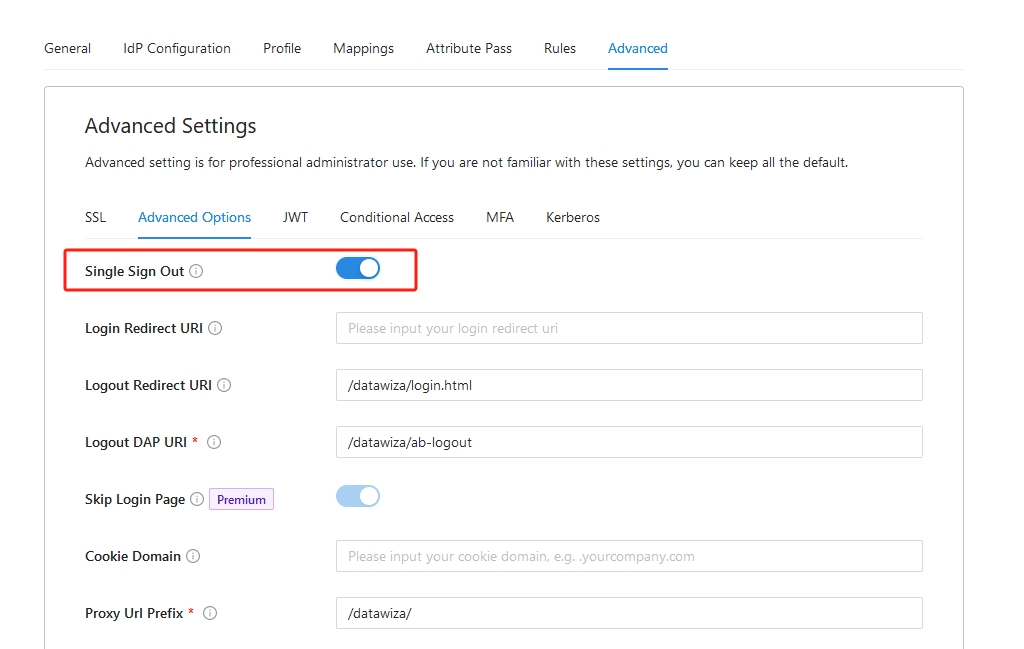
- Navigate to your application's Advanced Settings in the Datawiza console.
- Locate and check the Enable Single Logout option.
- Save your configuration.
Note
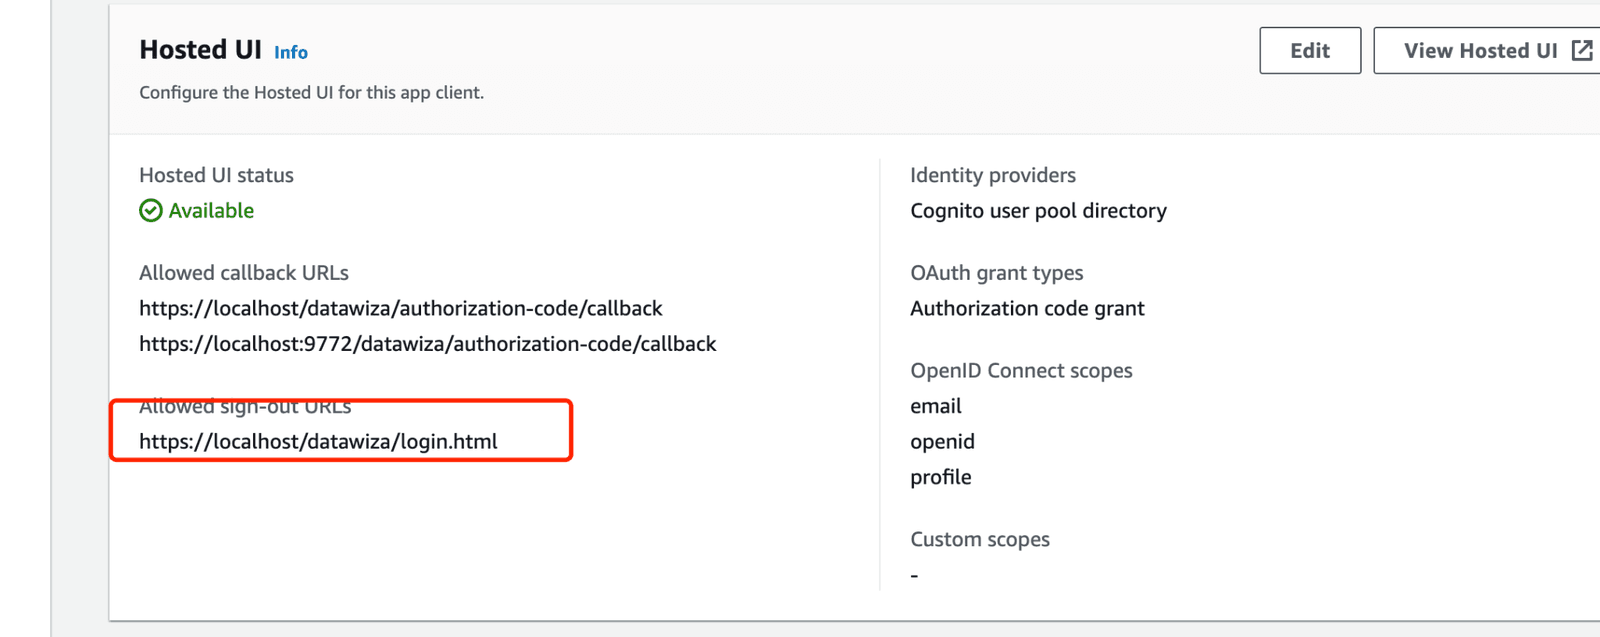
If you enable the Single Sign Out option, it's crucial to ensure that the Logout Redirect URI matches the settings on your Identity Provider (IdP) side.
The corresponding setting in IdP is frequently labeled as Allowed sign-out URL. However, the terminology may vary across different IdPs. By aligning these settings, you can ensure a smooth and secure login and logout experience for your users. Always verify this match to avoid unnecessary login issues or restrictions.
Summary
This guide showed how to integrate a legacy application with DAP by making minimal code changes. The core idea behind all the modifications is the same three-step pattern:
- Check the session first. If a valid session already exists, continue as normal — nothing changes for returning users.
- If no session, check the DAP header. DAP adds either
x-dw-username(plaintext) ordw-token(JWT) on every authenticated request. Read that header and validate it — for JWT, verify the signature using the shared secret. - If the header is valid, create a session. Establish a regular application session from the header value so subsequent requests (AJAX calls, resource fetches) use the session rather than re-checking the header every time.
For logout, the only change is redirecting to /datawiza/ab-logout instead of your application's login page, so both the application session and the DAP session are cleared together.
Everything else in your application — authorization logic, business rules, session usage — stays untouched.
If you encounter any issues or have any questions about the process, don't hesitate to reach out to our support team. We're here to help you every step of the way.