
Add Custom Claims to the Entra ID OIDC Token
Overview
Many applications—whether internal line-of-business systems, third-party SaaS, or customer-facing web apps—rely on user-specific attributes such as an employee ID, department code, or tenant identifier to make access control or personalization decisions.
Microsoft Entra ID (formerly Azure AD) lets you surface any directory attribute as a custom claim in the OIDC ID token. Once the claim is present in the token, Datawiza Access Proxy can forward it as an HTTP header to your upstream application—without any changes to the application's own code.
This guide walks you through the two-step Entra ID configuration required: enabling acceptMappedClaims in the app manifest, then defining the custom claim in the Enterprise application's SSO settings.
Prerequisites
- Microsoft Entra ID Cloud Application Administrator or Application Administrator permissions.
- Your application registered in Entra ID (App registrations) and also present under Enterprise applications.
- The custom directory attribute (e.g.,
extensionattribute7) already populated on the relevant user accounts. - Your application registration must be single-tenant. See the warning in Step 1 before proceeding if it is multi-tenant.
Step 1: Enable Mapped Claims in the App Manifest
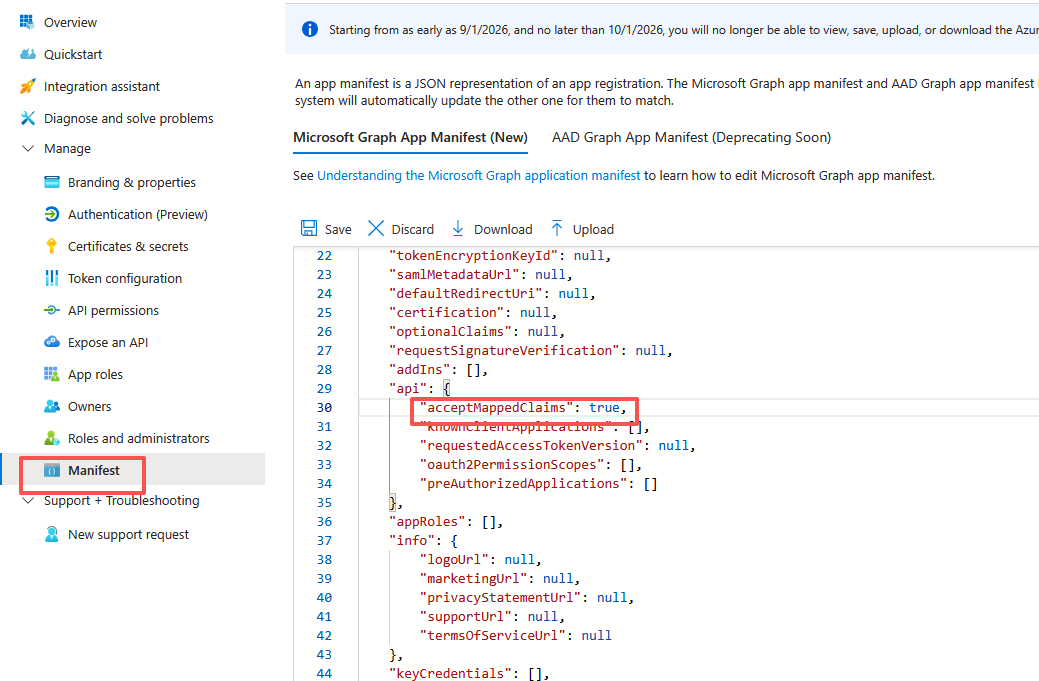
By default, Entra ID rejects custom claim mappings to prevent token spoofing. You must explicitly opt your application in by setting acceptMappedClaims to true in its manifest.
Note
Per Microsoft's documentation, do not set acceptMappedClaims to true for multi-tenant apps—doing so can allow malicious actors to create claims-mapping policies for your app. If your application registration is multi-tenant, use a custom signing key instead of this flow.
Info
Skipping this step causes authentication to fail with error AADSTS50146 once a custom claim policy is applied.
In the Azure portal, navigate to Microsoft Entra ID > App registrations.
Search for and open your target application.
In the left menu, click Manifest.
Locate the
acceptMappedClaimsproperty and set its value totrue:"acceptMappedClaims": true,Click Save.
Step 2: Add the Custom Claim in the Enterprise Application
- Go to Microsoft Entra ID > Enterprise applications.
- Search for and open the same application.
- In the left menu, under Manage, click Single sign-on.
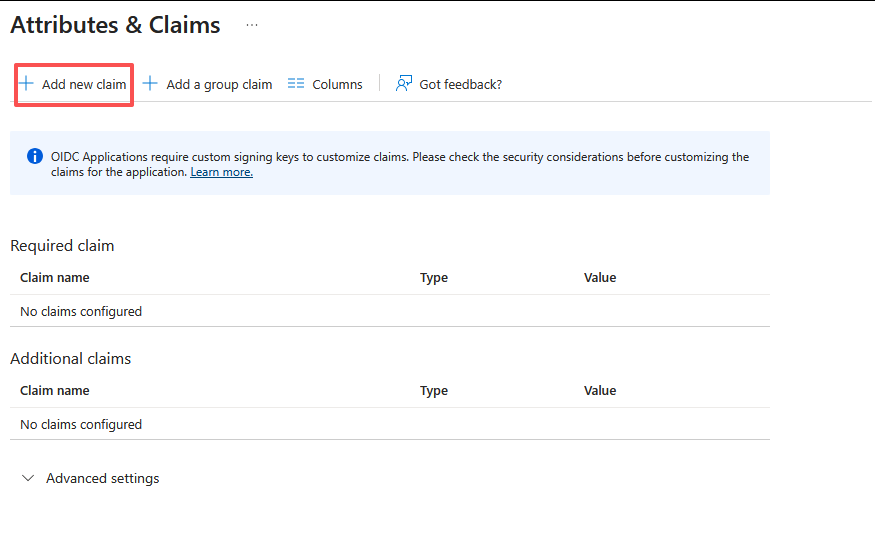
- In the Attributes & Claims section, click Edit, then click Add new claim.
Step 3: Configure the Claim Name and Source Attribute
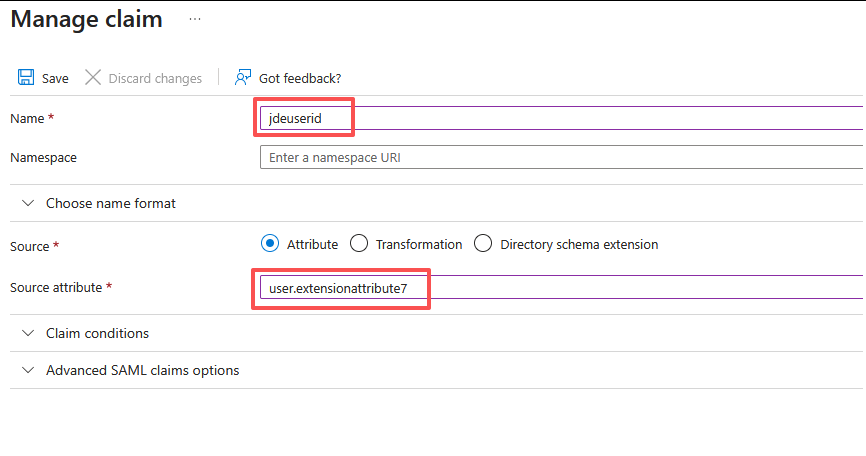
- Set Name to the claim name your application expects (e.g.,
jdeuserid). - Leave Namespace blank.
- Set Source to
Attribute. - Set Source attribute to the directory attribute you want to expose (e.g.,
user.extensionattribute7). - Click Save.
Verify the Token
You can confirm the custom claim is present by signing in to the application and inspecting the OIDC ID token at jwt.ms. Look for your claim name in the decoded payload.
Next Steps
The custom claim is now included in the OIDC ID token for every authenticated user. Datawiza Access Proxy can be configured to read this claim and forward it as an HTTP request header to your upstream application—enabling attribute-based access control or user-specific routing without modifying the application itself. See Pass User Attributes for how to configure DAP to forward this claim as a header.